Edit Chord Diagram dialog
The Edit Chord Diagram dialog allows you to edit the shape of individual chord diagrams, including changing the number of frets shown, stopped fret positions, and the starting fret number.
You can open the Edit Chord Diagram dialog in any of the following ways:
-
In Write mode by opening the Choose Chord Diagram dialog, selecting the chord diagram whose shape you want to edit, and clicking Edit.
-
In Engrave mode by double-clicking a chord diagram, or selecting it and pressing Return.
The Edit Chord Diagram dialog contains the following options and sections:
-
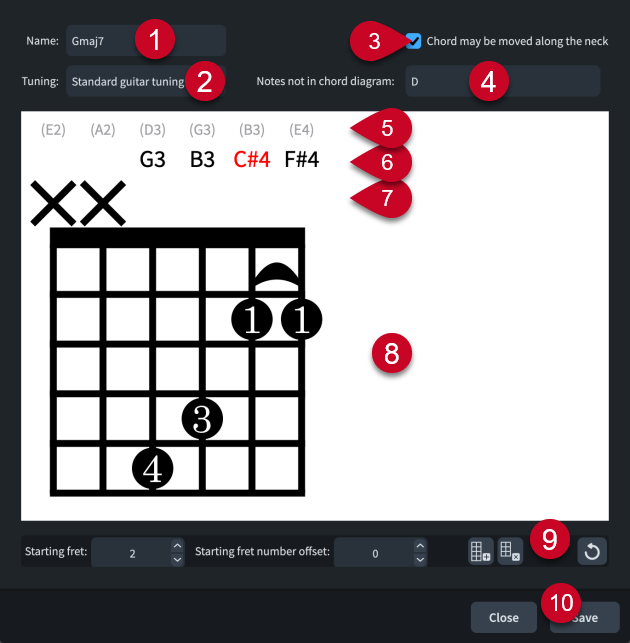
Name
Displays the name of the chord whose chord diagram you are editing in the dialog. You cannot change this name.
-
Tuning
Displays the fretted instrument and tuning for the current chord diagram.
-
Chord may be moved along the neck
Allows you to specify whether or not the shape of the chord diagram can be reused at other fret positions; for example, by playing open strings with a barré at higher fret positions.
Notes not in chord diagram
Displays any pitches that are part of the chord but not currently included in the chord diagram.
-
Open string pitch
Displays the open pitch of the corresponding string for reference.
-
Current string pitch
Displays the current pitch of the corresponding string if it is open or stopped. If the pitch of a string is not part of the chord, the string pitch appears red.
-
String status
Displays the current usage status of the corresponding string and allows you to switch the status of individual strings between open and omitted by clicking in this row.
-
O: Open string
-
X: Omitted string
-
No symbol: Stopped string
-
-
Chord diagram shape editor
Displays the current arrangement of stopped frets using dots and allows you to change the chord diagram shape. You can move stopped frets by clicking at the required positions. Each string can only have a single stopped fret position.
If two or more strings are stopped at the same fret, you can hide/show a barré by clicking any of the dots at that fret position.
You can change fingerings by double-clicking them and entering a new number, including 0 to show no fingering or T for thumb fingerings on the lowest string.
-
Action bar
Contains options that allow you to edit and change the number of frets.
-
Starting fret: Changes the fret number of the highest fret in the chord diagram.
-
Starting fret number offset: Changes the offset of the starting fret number. For example, if you want the starting fret label to appear beside the second fret down the chord diagram in order to include a barré.
-
Add fret
 : Adds a fret to the bottom of the chord diagram.
 -
Remove fret
 : Removes a fret from the bottom of the chord diagram.
 -
Reset Chord Diagram
 : Removes your changes to the chord diagram and resets it to its default shape.
-
-
Save
Saves the chord diagram shape and updates the selected chord diagram in the music area. The shape also becomes available as an alternative shape for other compatible chords.