Setting up Your System
Before you can start recording and editing your podcast project, you need to ensure that WaveLab Cast can access your microphone, so that you can record content, and your speakers or headphones, so that you can listen to your audio files.
Prerequisite
You need:
-
An audio interface, such as the Steinberg UR22C
-
A microphone, such as the Steinberg ST-M01
-
Speakers or headphones, such as the Steinberg ST-H01
Make sure that all electronic equipment is turned off before making any connections.
The images and instructions refer to the Steinberg UR22C audio interface, in connection with the Steinberg ST-M01 microphone and the Steinberg ST-H01 headphones. They are just intended as an example. For different hardware components, the steps may differ. Refer to the operating manuals of the corresponding hardware manufacturers to install and use them properly. For more detailed general information on audio connections and setups, refer to the WaveLab Cast Operating Manual on steinberg.help.
Procedure
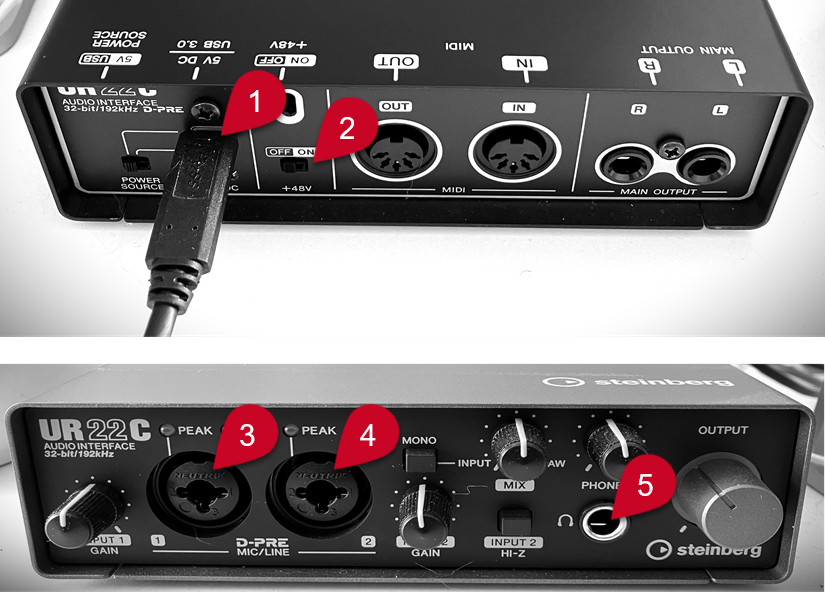
- Connect the Steinberg UR22C audio interface with your computer via USB-C (1).
-
Connect your Steinberg ST-M01 microphone (Mic Line 1 (3) or Mic Line 2 (4)) via XLR, and set the +48V switch (2) on the back of the audio interface to ON.
 Note
NoteIf you have already recorded the entire spoken content for your podcast and saved it as an audio file or as multiple audio files, you can skip this step.
- Connect your Steinberg ST-H01 headphones (5).
- In WaveLab Cast, select .
- Select your audio interface from the Audio Device pop-up menu.
- Click the Playback tab, and choose the device ports for your headphones.
- Click the Recording tab, and choose the bus (or buses) for your microphone.