Sample Tab
The Sample tab contains the sample and loop parameters.
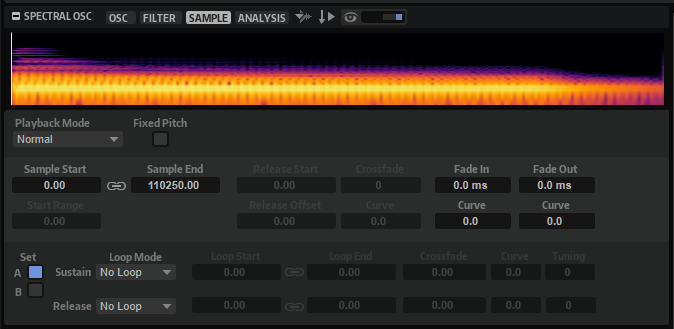
- Waveform display
-
Shows the waveform of the loaded sample.
For the parameters Start Range, Release Start, Loop Start and Loop End, markers are shown in the display.
-
You can drag the markers in the display to change their position. To do so, position the mouse in the lower section of the marker line, so that a double-arrow is shown, and drag.
-
- Playback Mode
-
-
Normal – The sample is played back from beginning to end. If loops are defined, they are played back according to their loop settings.
-
Reverse – The sample is played from end to beginning. If loops are defined, they are played back according to their loop settings.
-
One-Shot – The sample is played back from beginning to end, regardless of any loop settings.
-
Reverse One-Shot – The sample is played back from end to beginning, regardless of any loop settings.
In One-Shot and Reverse One-Shot mode, the zones ignore any MIDI note-off messages. All envelopes and LFOs play until their sustain is reached and then remain at this level for as long as the sample plays back. Any release segments of the envelopes and LFOs are not played. However, if you activate One-Shot mode in the Envelope section, the release nodes of the envelopes are included in the playback.
-
- Fixed Pitch
-
If a sample zone is triggered by a MIDI note other than the one defined by the Root Key setting, the sample is normally pitched accordingly. With Fixed Pitch activated, the relation between played note and root key is disregarded, and all keys play the sample, just as it was recorded.
NoteYou can still apply the usual pitch modulations in the Pitch section and set the sample to follow the keyboard according to the Pitch Key Follow setting.
- Sample Start
-
The start marker of the sample.
- Sample End
-
The end marker of the sample.
- Link Sample Start and End
-
Links the sample start and end positions. If you edit one of the values, the other value is automatically modified.
NoteYou cannot change the sample start or end positions beyond the limits of the sample file. For example, if the end of the sample is reached and you raise the Sample Start value, the Sample End value is not modified.
- Start Range
-
Determines the range for sample start offset modulation. If Sample Start is selected as a modulation destination in the modulation matrix, the Start Range parameter controls the sample portion that is affected by the start offset modulation. If this parameter is set to zero, no sample start modulation is performed.
For example, if Note-on Velocity is used to modulate the Sample Start parameter, a high key velocity starts playback later in the sample, and the range of this modulation is determined by the Start Range parameter.
If a value is specified for this parameter, a marker line is shown in the waveform display. You can also drag the marker to adjust the parameter.
- Release Start
-
Determines the position to which the cursor jumps when you release a key.
For example, if you are playing back a sample in a loop but you want it to play its original release phase, set the Release Start parameter to this position.
If a value is specified for this parameter, a marker line is shown in the waveform display. You can also drag the marker to adjust the parameter.
- Release Offset
-
Allows you to fine-tune the release start for each sample.
This allows you to offset the release start for several zones at the same time without losing the original release settings, for example.
- Crossfade/Fade In/Fade Out
-
Allow you to set the curve and the length of the fade in, the fade out, and the crossfade.
- Loop Sets A and B
-
Allow you to set up two different sets of loops for the same sample. This is useful to compare different versions of the same loop, for example.
- Loop Mode
-
Allows you to select a mode for the sustain loop and the release loop.
-
If this is set to No Loop, the sample is played without a loop.
-
If this is set to Continuous, the loop is played continuously until the end of the amplitude envelope.
-
If this is set to Alternate, the loop runs back and forth, even if you release the key.
-
If this is set to Once, the loop is repeated once.
-
If this is set to Until Release (sustain loop only), the loop is repeated until you release the key on the keyboard.
-
If this is set to Alternate Until Release (sustain loop only), the loop runs back and forth for as long as the key is held, and then continues to the end of the sample.
NoteIf Loop Mode is set to Alternate or Alternate Until Release, the loop crossfade is applied to the loop start and the loop end. All other modes on the Loop Mode pop-up menu apply the loop crossfade to the loop end only.
-
- Loop Start
-
Defines the loop start for the sustain loop and for the release loop.
If a value is specified for this parameter, a marker line is shown in the waveform display. You can drag the marker to adjust the parameter.
- Loop End
-
Defines the loop end for the sustain loop and for the release loop.
If a value is specified for this parameter, a marker line is shown in the waveform display. You can drag the marker to adjust the parameter.
- Link Loop Start and End
-
Links the loop start and end positions. If you edit one of the values, the other one is automatically modified.
- Crossfade
-
Allows you to introduce a crossfade between loop end and loop start. Crossfades allow for smoother transitions.
- Curve
-
Allows you to create a linear curve, an equal power curve, or anything in between for the crossfade.
- Tuning
-
Sets the tuning of the loop. This is useful to adjust the frequency of the loop.