Changing the position of left-hand fingerings
You can change the position of individual left-hand fingerings. You can do this for the current layout and frame chain only, or for all layouts and frame chains. By default, they are positioned inside the staff and to the left of the notes to which they apply.
These steps only apply to left-hand fingerings belonging to fretted instruments.
Prerequisite
-
The lower zone is shown.
-
Properties
 is selected in the lower zone toolbar.
 -
If you are in Engrave mode, Graphic Editing
 is selected in the Engrave toolbox.
 -
You have chosen the appropriate property scope for local properties.
Procedure
- Select the left-hand fingerings whose position you want to change. You can do this in Write mode and Engrave mode.
- In the Properties panel, activate Stopping finger position in the Fingering and Positions group.
-
Select one of the following options from the menu:
-
Outside staff
-
Left of note
-
Right of note
-
Result
The position of the selected left-hand fingerings is changed. When shown outside the staff, they are placed above the staff by default. If the property scope was set to Locally, this change only takes effect in the current layout and frame chain.
You can change how all fingerings shown to the left of notes project-wide avoid collisions in .
Example
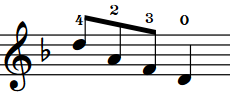
|
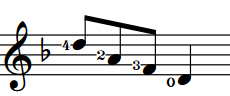
|
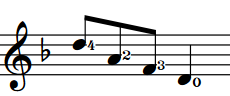
|