Edit Stage Template dialog
The Edit Stage Template dialog allows you to create new stage templates and edit existing ones. You can define the stage positions of instrument families, individual instruments, and soloists, independently of the instruments in the project.
You can open the Edit Stage Template dialog in the following ways:
-
In the Live Stage dialog, click Save as New Stage Template.
-
In the Apply Stage Template dialog, click Add Stage Template
 , Duplicate Stage Template
 , or Edit Stage Template
 .
.
The Edit Stage Template dialog comprises the following:
-
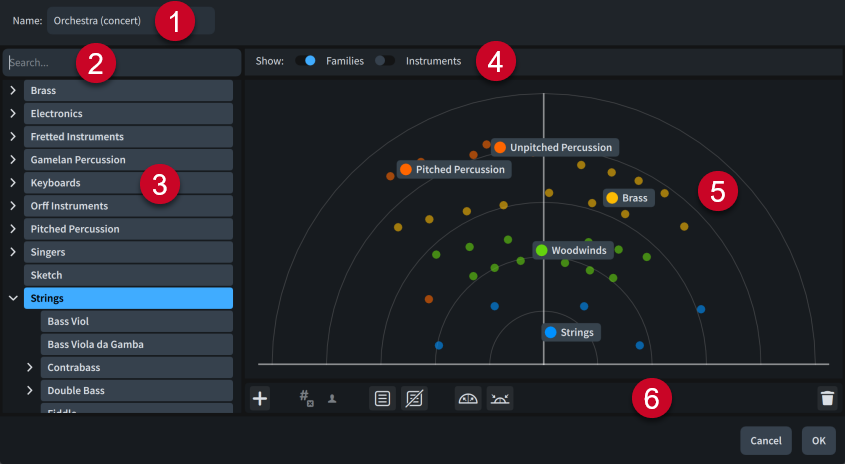
Name
Allows you to set the name of the stage template that appears in the program; for example, in the Apply Stage Template dialog.
-
Search field
Allows you to filter instruments in the list according to your entry.
-
Instrument list
Contains all the instruments available on your computer and within your search filter, if applicable.
-
Show
Allows you to hide/show the names of instrument families and individual instruments, independently of each other. Hiding names also disables editing of the corresponding category, and their colored dots appear more transparent.
-
Stage
Provides a visual representation of a stage, as seen from above. The back of the stage is at the top of the dialog, while the front of the stage is at the bottom of the dialog.
The horizontal axis determines pan positions, from left to right. The vertical axis determines the amount of sound sent to FX channels for reverb; typically, from low reverb at the bottom to more reverb at the top.
Each instrument and instrument family appears as a colored dot, representing its stage position, followed by its full instrument name. Instrument family dots are larger than individual instrument dots.
Instrument families are color-coded, meaning instrument families and the instruments within them use the same color.
When you add multiple instruments of the same type to a stage template, Dorico Pro automatically numbers them.
Parenthesized indications for soloists and groups are automatically added to the ends of instrument names.
You can click and drag instruments to new stage positions.
-
Action bar
Contains the following options:
-
Add
 : Adds the instrument or instrument family currently selected in the instrument list to the center of the stage. You can also click and drag instruments from the instrument list to specific positions on the stage.
 -
Un-numbered
 : Includes/Excludes the selected instrument from instrument numbering. Sets the stage position for the corresponding numbered instrument when multiple instruments of the same type exist in the same project.
 -
Soloist
 : Turns the selected instrument into a soloist. Sets the stage position for instruments of the corresponding type that are designated as soloists.
 -
Create Group
 : Creates a group containing the instruments selected on the stage.
 -
Remove From Group
 : Removes the selected instruments from their corresponding group.
 -
Expand
 : Moves instruments proportionally outwards. Applies to either only selected instruments, or all instruments when no instruments are selected.
 -
Contract
 : Moves instruments proportionally inwards. Applies to either only selected instruments, or all instruments when no instruments are selected.
 -
Delete
 : Deletes the selected instruments from the stage template.
-