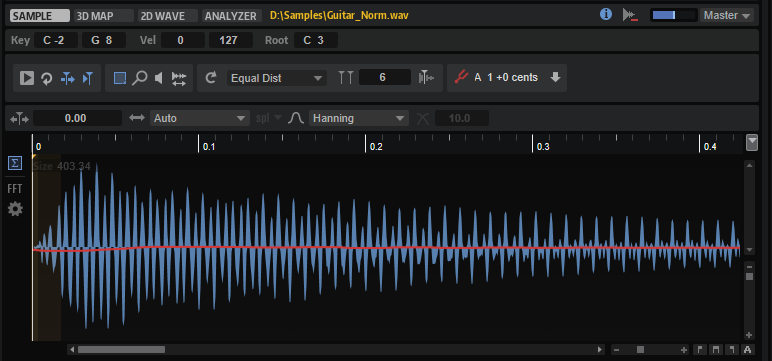
Sample Tab
The Sample tab contains the sample editing parameters and shows the sample waveform.
The file path and name of the sample are displayed above the sample display. If more than one sample is loaded, the file path serves as a menu to select the sample to edit and display. If you select a sample, the waves that belong to it are selected in the wavetable.
- Show/Hide Zone Info Bar
-
Allows you to show/hide the info bar containing the zone parameters.
- Strip Wavetable Samples
-
Allows you to remove information about used samples from the wavetable editor. When creating wavetables that are based on samples, the reference paths to the used samples are stored with the presets. This allows you to return to a wavetable and modify some of the wave markers. When making presets available to other users, you can either add all source samples to the VST container, which allows others to modify them, or you can provide the presets with the final wavetables only by activating this option.
- Preview Volume/Output for Preview
-
Allow you to specify the preview volume and output.
Zone Info Bar

-
To show/hide the zone info bar, click Show/Hide Zone Info Bar
 on the toolbar.
- Key Range
-
With the Low Key and High Key value fields, you can set the key range for the selected zone.
- Velocity Range
-
With the Low Velocity and High Velocity value fields, you can set the velocity range for the selected zone.
- Root Key
-
The root key determines the original pitch of a zone, that is, the key on which the zone is played without being transposed.
Toolbar

- Play Sample
-
Plays back the original sample.
You can specify the playback volume and output with the Preview Volume and Output for Preview controls in the upper right corner of the editor.
- Play Selection Looped
-
Activate this button to play back the selection in a loop.
- Auto-Scroll
-
If this button is activated, the waveform display is scrolled during playback, keeping the playback cursor visible.
- Follow Sample Playback
-
Activate this button to see a playback cursor when triggering a sample via MIDI.
- Range Selection Tool
-
Click and drag with this tool to create a selection.
- Zoom Tool
-
If this tool is selected, you can click in the waveform to zoom in on the position where you click.
- Play Tool
-
If this tool is selected, you can click in the waveform to start playback. The sample is played back from this position until you release the mouse button.
- Scrub Tool
-
If this tool is selected, you can click in the waveform and drag sideways to play back the audio. The playback direction and speed depend on how fast and how far you move the mouse to the left or to the right from the position where you clicked.
- Create Wavetable
-
Analyzes the sample and updates the wavetable, according to the Wavetable Creation Mode setting.
- Wavetable Creation Mode
-
-
Equal Distance – the wavetable markers are equally distributed over the sample.
-
Exponential – the distances between the wavetable markers increase over the length of the sample.
-
Spectral – the entire sample is analyzed, and wavetable markers are inserted where the change in the spectrum exceeds the set threshold.
-
Spectral Voiced – the entire sample is analyzed, and wavetable markers are inserted where the change in the spectrum exceeds the set threshold if a pitch is detected at this position.
-
Overlap-Add – wavetable markers are set so that the analysis windows overlap.
NoteThe wavetable is created automatically each time that you change the parameter settings.
-
- Number of Waves
-
Sets the number of waves in the sample display. You can enter the number of waves that you want to use in the value field.
NoteThis parameter is only available for the Wavetable Creation Mode settings Equal Distance and Exponential.
- Include Window in Range
-
If this button is activated, the wavetable markers are set in such a way that the analysis windows always encompasses the full range of the sample.
This is useful if you want to import wavetable samples that contain equally sized segments, each segment representing a waveform.
NoteThis option is only available for the Wavetable Creation Mode settings Equal Dist, Exponential, and Overlap-Add.
- Wavetable Creation Threshold/Wavetable Creation Sensitivity
-
These parameters are available for the Wavetable Creation Mode settings Spectral and Spectral Voiced.
-

-
Wavetable Creation Threshold sets the minimum level for waves to be created.
-
Wavetable Creation Sensitivity sets the sensitivity for the analysis of spectral changes. The higher the sensitivity, the more waves are created.
-
- Wavetable Creation Overlap
-
Sets the overlap of analysis windows. Higher values allow for a more accurate analysis of the signal but create a larger number of markers.
 Note
NoteThis parameter is only available for the Wavetable Creation Mode setting Overlap–Add.
- Show Pitch Detection Curve
-
If this button is activated, the pitch detection curve is displayed on the waveform. This curve shows you where in a sample the pitch can be detected properly.
- Detected Pitch
-
The detected pitch at the current marker position.
- Transfer Pitch to Root Key
-
Sets the detected pitch as the root key for the sample.
- Sample Position
-
The position of the selected marker in the sample.
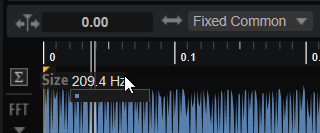
- Window Size Mode
-

Specifies how the windows size for the markers is set.
-
With Auto selected, the size is determined by the frequency that was calculated by the pitch detection. In most cases, this will result in the most appropriate sizes for each marker. The sizes are displayed next to the selected marker.
-
Fixed Individual mode allows you to manually set the window size for each marker individually for each audio channel.
-
Fixed Common mode allows you to manually set the windows size for each marker for all channels together.
For example, Fixed Individual and Fixed Common are useful if the pitch detection function cannot detect the pitches correctly but you know the pitch of the sample. In this case, you can enter the window size manually in the value field next to each marker.
-
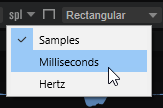
- Window Size Format
-
Allows you to specify the format for editing the window size. You can choose from Samples, Milliseconds, or Hertz.
 Note
NoteIf Window Size Mode is set to Auto, this option is not available.
- Window Type
-
Allows you to select the window type. This affects the shape of the window, which in turn influences the frequency resolution. This parameter also determines the amount of suppression of noise artifacts during the analysis.
The window types on the menu are sorted from the best frequency resolution with the lowest artifact suppression (Rectangle) to the lowest frequency resolution with best artifact suppression (Blackman-Harris).
Try out different Window Type settings to find the overall frequency resolution and artifact suppression that suits your work.
- Window Crossfade
-
Sets the amount of crossfade at the beginning and end of the window.
NoteThis option is only available for the Rectangular window type.
Waveform Display
To the left of the display, you can specify which channels to show, and you can add a spectrogram to the waveform display.
- Channel configuration pop-up menu
-

On the Channel Configuration pop-up menu, you can specify which channel or channels to use for wave extraction. You can also select the sum of all channels. The channel setting is saved for each extracted wave. This way, you can extract one wave from the left channel and another from the right channel, for example. If you select a single channel, a mono wave is created.
The icon displayed on the button indicates the current setting.
NoteWhich channel options are available depends on the sample file.
- Show Spectrogram
-
The sample display can either show the sample waveform, the spectrogram, or a blend of both. Activate Show Spectrogram
 if you are searching for the ideal sample start or release marker positions, for example. This allows you to see more precisely where the sample starts or where overtones have faded out.
 - Spectrogram Settings
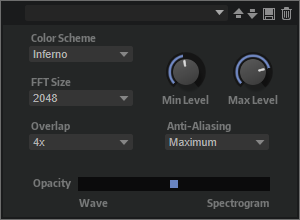
-
-
Color Scheme allows you to choose a color scheme.
-
FFT Size sets the block size of the window that is used for the analysis. This allows you to adjust the trade-off between temporal resolution and frequency resolution. If you specify a higher value, more frequencies are analyzed, but they are located less accurately within the time domain.
-
Overlap sets the number of overlapping FFT windows. Increasing the overlap can be used to reduce analysis limitations of the FFT windows, which can lead to a loss of details, such as transients.
-
Min Level sets the minimum value of the scale.
-
Max Level sets the maximum value of the scale.
-
Anti-Aliasing can be used to improve the display quality.
-
The Opacity slider allows you to seamlessly blend between sample and FFT display.
-