Markers Window
In this window, you can create, edit, and use markers while working on an audio file or audio montage.
-
To open the Markers window, open an audio file or audio montage and select .
Markers List
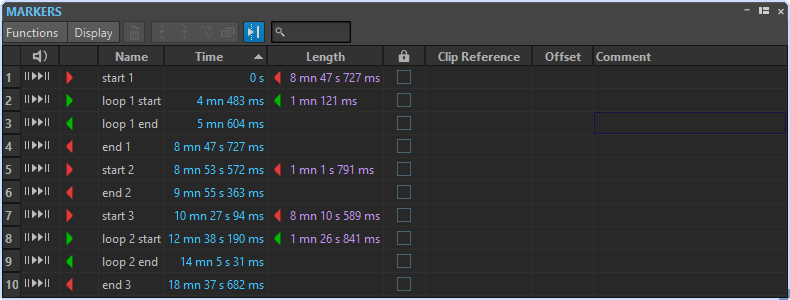
The Markers window contains a list of all markers of the active file along with their details and controls. You can create and edit indicators from the markers list.
- Marker numbers
-
Clicking the number of a marker scrolls the waveform to reveal the corresponding marker.
- Play Pre-Roll
-

Plays back the audio from the marker position with a pre-roll.
You can also press Alt and click Play Pre-Roll to play back from the marker position with a short pre-roll.
- Play
-

Plays back the audio from the marker position.
- Marker type
-
Shows the marker type. To change the marker type, click the marker icon and select another marker type from the pop-up list.
- Name
-
Shows the marker name. To change the name, double-click in the corresponding cell and enter a new name.
- Time
-
Shows the marker position on the time ruler. To change the position, double-click in the corresponding cell and enter a new value.
- Channels
-
Shows the channels on which the markers are located. You can click the channel to specify another channel for the marker or select Set for All Channels to set the marker for all channels.
- Length
-
Shows the time between the marker start position and the corresponding end or splice marker.
-
To zoom in on the region between a start and end marker, click the corresponding cell in the Length column.
-
To select the region between a start and end marker, double-click the corresponding cell in the Length column.
-
- Lock
-
Allows you to lock markers. Locking markers prevents them from being accidentally dragged to a new position in the wave window or the montage window. To lock a marker, activate the corresponding checkbox.
- Clip Reference (only available for markers in the Audio Montage window)
-
A marker can be attached to the left or right edge of a clip, and to its waveform. When you move a clip, the corresponding marker moves along. The clip reference column shows the name of the clip.
- Offset (only available for markers in the Audio Montage window)
-
Shows the distance between the marker and the reference point.
- Comment
-
Allows you to enter a comment. To enter a comment, double-click in a cell.
Functions Menu
Depending on whether the Audio Editor or the Audio Montage window is open, different options are available. The following options are available for audio files and audio montages:
- Select All
-
Selects all markers in the markers list.
- Select in Time Range
-
Selects the markers located in the selection range.
- Invert Selection States
-
Inverts the selection status of all markers.
- Deselect All
-
Deselects all markers.
- Delete Selected Markers
-
Deletes all markers that are selected.
- Select Markers to Delete
-
Opens the Delete Markers dialog, where you can select the markers to delete according to various criteria.
- Copy
-
Opens a submenu with the following options:
-
Copy All Markers copies all markers of the open audio file or audio montage to the clipboard. When pasting these markers, the marker positions are relative to the file start.
-
Copy Markers in Selected Range copies all markers of the open audio file or audio montage that are located in the selected range to the clipboard. When pasting these markers, the marker positions are relative to the first copied marker.
-
- Paste Markers
-
Pastes the markers that were copied to the clipboard at the edit cursor position. Sample rate differences between the source and destination file are taken into account when pasting markers.
- Convert Marker Types
-
Opens the Convert Marker Types dialog, where you can convert markers to another type.
- Move Multiple Markers
-
Opens the Move Multiple Markers dialog, where you can select which markers you want to move by a specified amount.
- Default Marker Names
-
Opens the Default Marker Names dialog, where you can select default marker names for each marker type.
- Batch Renaming
-
Opens the Batch Renaming dialog, where you can rename several markers in one go.
- Export Markers List as Text
-
Opens the Export Markers List as Text dialog where you can export the markers list in various file formats, or as a printout. You can decide which information about the markers to include in the exported file.
- Import Markers from XML File
-
Allows you to import markers from an XML file. The XML files must be formatted as the file that is created when you export markers.
- Generate Markers
-
Opens the Generate Markers dialog, where you can specify a sequence of markers to create.
- Customize Command Bar
-
Opens a dialog where you can customize marker-related menus and shortcuts.
The following options of the Functions menu are only available for audio montages:
- Import Markers from Active Clip's Audio File to Audio Montage
-
Automatically adds all markers of the clip’s source audio file to the audio montage. To visualize these markers before importing them, we recommend that you display the markers in one of the following ways:
-
On the View tab of the Audio Montage window, in the Clip section, activate Ruler.
-
In the Clips window, select Functions, and activate Show/Hide Clip Ruler and Markers of Source File. You can also right-click the upper part of a clip and activate this option on the pop-up menu.
-
- Bind Selected Markers to Start of Active Clip
-
Makes the marker position relative to the start of the active clip. When the start of this clip moves, the marker moves, too.
- Bind Selected Markers to End of Active Clip
-
Makes the marker position relative to the end of the active clip. When the end of this clip moves, the marker moves, too.
- Bind Selected Markers to Audio Samples of Active Clip
-
Locks the selected marker in relation to the audio samples referenced by the active clip. The marker moves when the audio samples move relatively to the start of the montage.
- Detach Selected Markers from Their Associated Clip
-
Makes the marker position relative to the start of the audio montage.
- Follow Playback
-
If this option is activated and you play back audio, a green bar next to the marker name indicates the marker that was last played back.
- Lock Selected Marker
-
Locks the selected marker. If this option is activated, the marker cannot be moved or deleted.
- Automatically Attach New Marker to the Most Suitable Clip
-
Links all newly created markers to a clip when a reasonable pattern is detected. For example, an end marker at the end of a clip or slightly beyond, or any marker inside a clip. The marker type and its position relative to the closest clip determine the type of bond.
- Full Clip Attachment
-
Attaches markers to a clip so that they are copied or deleted when the clip is copied or deleted.
- Customize Command Bar
-
Opens the Customize Commands dialog, which contains options to hide or show specific command bar buttons.
Display Menu
Use the Display menu to determine which types of markers are displayed in the markers list and on the timeline.