Graphic Slices panel
The Graphic Slices panel allows you to create graphic slices, export them, and change their graphics file format, color mode, resolution, and export path. It is located in the left zone in Engrave mode.
-
You can show the Graphic Slices panel by showing the left zone, then clicking Graphic Slices
 in the Engrave toolbox.
The Graphic Slices panel contains the following:
-
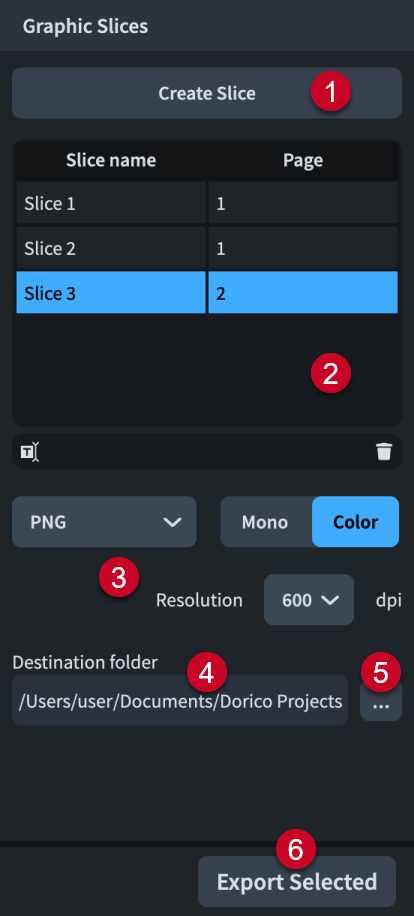
Create Slice
Allows you to draw a graphic slice.
-
Graphic slices table
Contains all the graphic slices in the current flow. The table contains the following columns:
-
Slice name: Displays the current name for the corresponding graphic slice, which is used for its file name when exported. Allows you to enter a new name or edit the existing name.
-
Page: Displays the page number in the layout on which the corresponding graphic slice exists.
The action bar at the bottom of the table contains the following options:
-
Rename Graphic Slice
 : Allows you to rename the selected graphic slice.
 -
Delete Graphic Slice
 : Deletes the selected graphic slice.
-
-
Image settings
Allow you to change the graphics file format, color mode, and image resolution of the selected graphic slices.
-
Destination folder field
Displays the export path where exported graphic slices will be saved. By default, this is the same folder as the Dorico project. If you change the export path, subsequent graphic slices you create use your most recently specified export path.
-
Choose Folder
Opens the File Explorer/macOS Finder and allows you to change the export path.
-
Export All/Export Selected
Allows you to export either all graphic slices when no graphic slice is selected or only the currently selected graphic slices, each using their current export settings.