Settings Dialog
In the Settings dialog, you can establish the connections between Nuendo Live and the audio device of your computer, and select an output mode for your recording. If a project is open, you can also make project-specific settings.
To open the Settings dialog, do one of the following:
-
On the toolbar, click Settings
 .
. -
Open the File menu, and select Settings.
-
Press F2.
-
In the Projects dialog, click Settings.
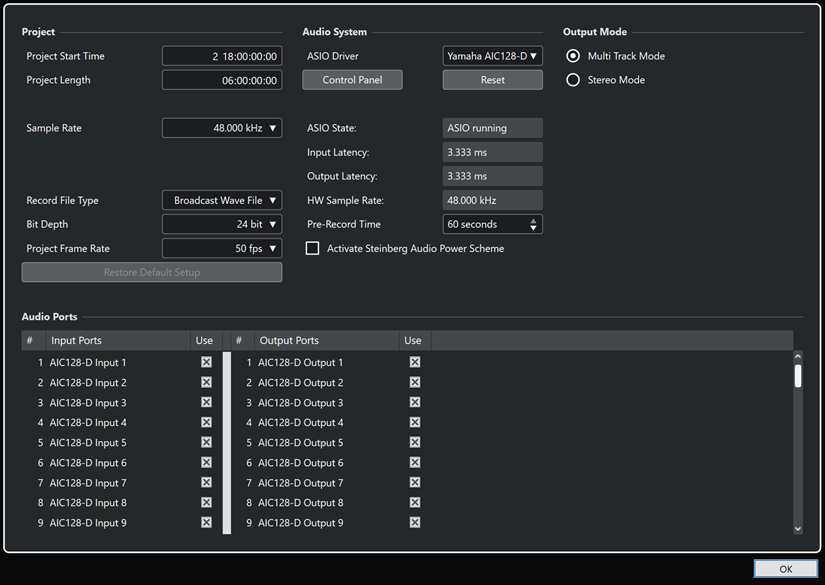
Project
In this section, you can make project-specific settings.
The Project section is only displayed in the Settings dialog if a project is open.
- Project Start Time
-
Shows the start time of the project. The value that you specify here is displayed as the start value of the ruler. The format is displayed in hours, minutes, seconds, frames: HH:MM:SS:FF.
- Project Length
-
Shows the length of the timeline of the project. The format is displayed in hours, minutes, seconds, frames: HH:MM:SS:FF.
NoteIn case your recording exceeds this length, the project length is automatically extended. No recorded data is lost.
- Sample Rate
-
Allows you to specify the sample rate at which Nuendo Live records and plays back audio.
NoteThe sample rate must correspond to the hardware sample rate.
- Record File Type
-
Allows you to specify the file type for your Nuendo Live recordings.
NoteFor recordings larger than 4 GB, the EBU RIFF 64 standard is used. If a FAT 32 hard disk is used, audio files are split automatically.
The following file types are available:
-
Broadcast Wave File is the most commonly used format. It can store metadata, such as the timecode position or the name of the artist, without loss in quality.
-
Wave File allows you to use the recorded files in applications that do not support Broadcast Wave files.
NoteIf Wave File is selected, you cannot record files that exceed 4 hours at 48 kHz.
-
- Bit Depth
-
Allows you to specify the bit depth of the audio files that you record in Nuendo Live.
-
16 bit allows for smaller file sizes. When recording audio with very low levels, this can have an impact on the quality.
-
24 bit is the most commonly used resolution.
-
32 bit float offers the highest resolution for post production. You can use this setting if you want to process the recorded files in a Nuendo system.
-
- Project Frame Rate
-
Allows you to select the frame rate for the project.
To synchronize your recordings to video during production, select a compatible frame rate.
- Restore Default Setup
-
Restores the default setup and ensures that for each activated input port, an audio track is available and assigned to that port. If necessary, new tracks are created, or surplus tracks are removed.
Audio System
In this section, you can select the ASIO driver for your recording and make settings for it.
- ASIO Driver
-
Allows you to select an ASIO driver.
- Control Panel
-
Opens the control panel for the selected ASIO driver. The available options depend on your audio hardware.
- Reset
-
Resets the ASIO driver and re-establishes the communication between the audio card and Nuendo Live.
NoteWe recommend to use this option if you encounter problems related to your audio system.
- ASIO State
-
If the ASIO driver is not working properly, an error message is displayed here.
- Input Latency
-
Shows the input latency of your audio system.
- Output Latency
-
Shows the output latency of your audio system.
- HW Sample Rate
-
Shows the sample rate of the hardware.
- Pre-Record Time
-
Defines the size of the pre-record buffer, which all incoming audio is automatically recorded to, after you record-enable a track.
- Activate Steinberg Audio Power Scheme
-
Deactivates all power save modes that have an impact on real-time processing.
NoteThis only works for very low latencies, and it increases the power consumption of your computer.
Output Mode
In this section, you can select an output mode for your recording.
- Multi Track Mode
-
If this option is activated, each audio track is sent to a separate output on your audio card.
- Stereo Mode
-
If this option is activated, all audio tracks are output as a stereo downmix. You can set the stereo output level on the info line.
NoteWhen opening a project in the full version of Nuendo, any level and pan settings made in Stereo Mode are assigned to Aux Send 1.
Audio Ports
In this section, you can specify the input ports for recording and the output ports for playback.
- Input Ports
-
Allows you to define the input ports for recording.
-
The # column shows the port number.
-
The Input Ports column shows the port name.
-
The Use column allows you to activate/deactivate the corresponding input port.
NoteWhen you create a new project, one track is created for each active input port.
-
- Output Ports
-
Allows you to define output ports for playback.
-
The # column shows the port number.
-
The Output Ports column shows the port name.
-
The Use column allows you to activate/deactivate the corresponding output port.
-