Edit Instruments dialog
The Edit Instruments dialog allows you to change the settings and names of existing instruments, and to create new instruments with custom definitions and names. You can save your changes as new defaults for future projects.
You can open the Edit Instruments dialog in any of the following ways:
-
Choose .
-
To open the dialog for a specific instrument, expand the card of the player holding the instrument in the Players panel in Setup mode, then click the instrument menu
 in its instrument label and choose Edit Instrument Definition.
The Edit Instruments dialog contains the following sections:
-
Instruments list
Contains all instruments within the selected instrument family and your search filter, if applicable.
Instruments in the current project are appended with “(in score)”. Any changes you make to instruments in the Edit Instruments dialog affect all instruments of the corresponding type and variant in the project.
At the top of the list, there are the following options:
-
Filter by family: Allows you to select which type of instrument is available in the instruments list.
-
Search field: Allows you to filter instruments in the selected instrument family according to your entry.
-
Show only project instruments
 : Allows you to filter the instruments list so that it only includes instruments used in the current project.
The action bar at the bottom of the list contains the following options:
-
New Instrument from Selection
 : Creates a new instrument that starts as a copy of an existing instrument.
 -
New Variant from Selection
 : Creates a new variant of an existing instrument; for example, for alternative transpositions.
 -
Save as Default
 : Saves the selected instrument to your user library, allowing you to use it with its current settings in multiple projects. Appears as
  for instruments saved as default.
 -
Reset
 : Removes all your changes to the selected instrument, returning it to its saved settings.
 -
Delete
 : Deletes the selected instrument.Note
You cannot delete predefined instruments or any instrument that is currently used in your project.
-
-
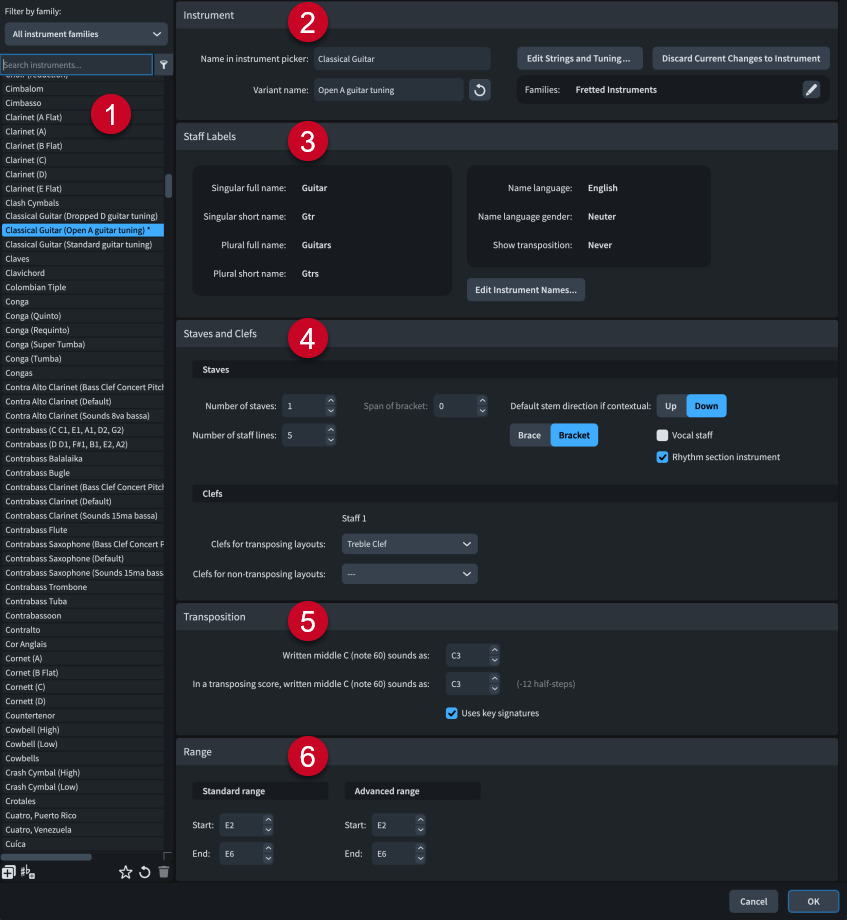
Instrument
This section allows you to specify identifying and category information for the selected instrument.
-
Name in instrument picker: Allows you to set the name used in the instrument column in the instrument picker.
-
Variant name: Allows you to set the name used in the variants column in the instrument picker.
-
Reset variant description
: Resets the variant name to its default. -
Edit Strings and Tuning: Opens the Edit Strings and Tuning dialog. Only available for fretted instruments.
-
Edit Percussion Playing Techniques: Opens the Percussion Instrument Playing Techniques dialog. Only available for unpitched percussion instruments that you have not added to the project.
-
Edit Percussion Kit: Opens the Edit Percussion Kit dialog. Only available for percussion kits that you have not added to the project.
-
Discard Current Changes to Instrument: Removes all the changes you have made to the selected instrument since you last opened the dialog.
-
Families: Displays the instrument families to which the selected instrument belongs. You can click Edit
 to add/remove the instrument from instrument families.
TipYou can edit percussion instruments and percussion kits that you have already added to the project in Setup mode.
-
-
Staff Labels
This section displays all instrument names and related settings for the selected instrument.
You can click Edit Instrument Names to open the Edit Instrument Names dialog.
-
Staves and Clefs
In the Staves subsection, the following options for the selected instrument are available:
-
Number of staves: Allows you to set the default number of staves, up to a maximum of three.
-
Number of staff lines: Allows you to set the number of staff lines used for each staff.
NoteClefs are positioned relative to the bottom staff line, regardless of the number of staff lines. For example, for a pitched instrument with a single-line staff and a treble clef, the single staff line is treated as the E above middle C.
-
Span of bracket: Allows you to set the staves across which braces/brackets extend, from the top staff downwards. Only available for instruments set to use two or more staves.
-
Join type: Allows you to change whether staves are joined by braces or brackets by default.
-
Default stem direction if contextual: Allows you to change whether the stems of notes on the middle staff line point upwards or downwards, if the stem direction behavior is contextual.
-
Vocal staff: Allows you to define the instrument as being vocal. Vocal staves are not joined by barlines, and dynamics are automatically positioned above them.
-
Rhythm section instrument: Allows you to define the instrument as being in the rhythm section. This can affect when chord symbols are shown on its staves.
In the Clefs subsection, you can select the clef you want to use on each staff in concert/transposed pitch layouts independently.
-
-
Transposition
This section contains transposition and key signature options for the selected instrument. Not available for unpitched percussion instruments.
-
Written middle C (note 60) sounds as: Allows you to set an octave transposition in concert pitch layouts.
-
In a transposing score, written middle C (note 60) sounds as: Allows you to set the transposition in transposed pitch layouts.
-
Uses key signatures: Allows you to set whether the instrument shows key signatures. For example, timpani staves typically do not use key signatures.
-
-
Range
This section allows you to set the pitch ranges that are playable on the selected instrument by both standard and advanced performers, according to your middle C numbering convention setting.
The ranges you set affect which notes are considered out of range.