Edit Line Annotations dialog
The Edit Line Annotations dialog allows you to change the appearance and settings of all line annotations in the project and add, edit, and delete custom line annotations.
All types of annotations can be used as caps. Music symbol and text annotations can also be used as center annotations on line bodies.
You can open the Edit Line Annotations dialog in any of the following ways:
-
Choose .
-
In the Edit Lines dialog, click Line Annotation Editor
 .
.
The Edit Line Annotations dialog contains the following sections and options:
-
Category menu
Allows you to select which type of line annotation is available in the line annotations list.
-
Search field
Allows you to filter line annotations in the selected category according to your entry.
-
Line annotations list
Contains all the line annotations in the project within the currently selected category and your search filter, if applicable.
The action bar at the bottom of the list contains the following options:
-
New
 : Adds a new blank line annotation or one with default settings. For music symbols, New opens the Edit Line Annotation dialog, where you can design your new music symbol annotation.
 -
New from Selection
 : Creates a copy of an existing line annotation that you can edit separately from the original.Note
Line annotations copied from existing line annotations are linked to the original. Any changes you make to line annotations in the Edit Line Annotation dialog affect original line annotations and any copies of them.
-
Save as Default
 : Saves the selected line annotation to your user library, allowing you to use it in multiple projects. Appears as
  for line annotations saved as default.
 -
Revert to Factory
 : Removes all your changes to the selected line annotation, returning it to its saved settings and appearance.
 -
Delete
 : Deletes the selected line annotation.Note
You cannot delete predefined line annotations or any line annotation that is currently used in your project.
-
-
Name
Allows you to enter a new name or edit the existing name for the selected line annotation.
-
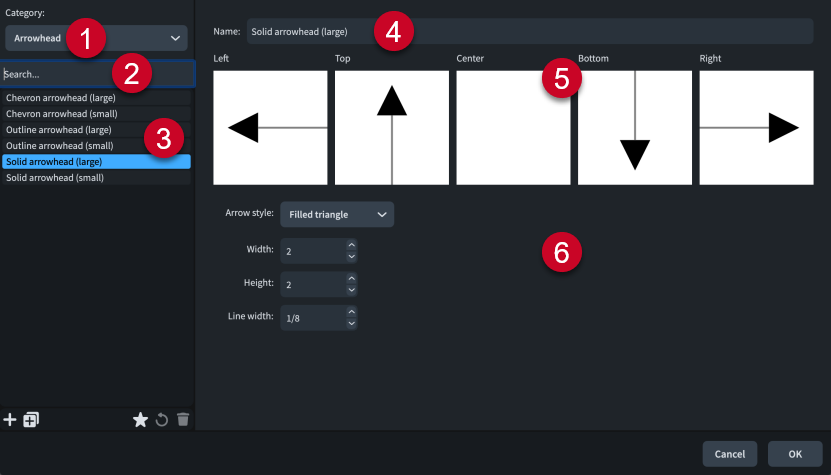
Preview
Displays the line annotation in its current form in all possible positions.
-
Line annotation options
Contains options that control the appearance of the selected line annotation. The options available depend on the category of the current line annotation.
For Arrowhead line annotations, the following options are available:
-
Arrow style: Allows you to select the style for the arrowhead. Arrowheads can be a chevron with a pair of angled lines, an empty triangle, or a filled triangle.
-
Width: Allows you to set the width of the arrowhead.
-
Height: Allows you to set the height of the arrowhead.
-
Line width: Allows you to set the line width of the arrowhead. Only applies to Chevron and Empty triangle arrowheads.
For Hook line annotations, the following options are available:
-
Length: Allows you to set the length of the hook.
-
Line width: Allows you to set the width of the line used for the hook.
-
Direction: Allows you to select the direction in which the hook points. Inward and Outward hooks always point towards or away from the staff respectively, regardless of their staff-relative placement. Up, Down, Left, and Right hooks always appear as set.
-
Rotation: Allows you to select whether the hook follows the rotation of the line or is always aligned with its axis; that is, pointing in one of the four cardinal directions.
For Music Symbol line annotations, the following options are available:
-
Symbol: Clicking Edit opens the Edit Line Annotation dialog, where you can edit the appearance of the music symbol.
-
Horizontal attachment: Allows you to select the attachment point of the music symbol relative to vertical lines.
-
Vertical attachment: Allows you to select the attachment point of the music symbol relative to horizontal lines.
-
Gap above/Gap below: Allow you to set the gap between the music symbol and line bodies above and below respectively.
-
Gap on the left/Gap on the right: Allow you to set the gap between the music symbol and line bodies to the left and right respectively.
-
Rotation: Allows you to select whether the music symbol follows the rotation of the line or is always aligned with its axis; that is, one of the four cardinal directions.
For Terminal Line line annotations, the following options are available:
-
Length: Allows you to set the length of the terminal line.
-
Line width: Allows you to set the width of the line used for the terminal line.
-
Rotation: Allows you to select whether the terminal line follows the rotation of the line or is always aligned with its axis; that is, pointing in one of the four cardinal directions.
For Text line annotations, the following options are available:
-
Text: Allows you to enter the text you want for the text annotation.
-
Font style: Allows you to select the font style for the text annotation.
-
Horizontal attachment: Allows you to select the attachment point of the text annotation relative to vertical lines.
-
Vertical attachment: Allows you to select the attachment point of the text annotation relative to horizontal lines.
-
Gap above/Gap below: Allow you to set the gap between the text annotation and line bodies above and below respectively.
-
Gap to the left/Gap to the right: Allow you to set the gap between the text annotation and line bodies to the left and right respectively.
-
Rotation: Allows you to select whether the text annotation follows the rotation of the line or is always aligned with its axis; that is, one of the four cardinal directions.
-
Ignore font metrics: Allows you to choose whether Dorico Pro uses a tight bounding rectangle or the font’s metrics for ascenders/descenders when calculating the position of text annotations relative to other items, such as line bodies, and their erased backgrounds.
-
Erase background: Allows you to set whether or not the text annotation erases its background.
-
Border: Allows you to show a border around the text annotation and set the border thickness.
-