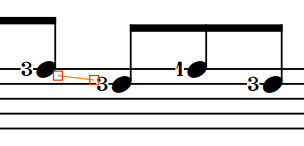
Moving fingering slides graphically
You can move individual fingering slides graphically without changing the notes to which they apply and independently of the fingerings at their start/end. You can move each end of fingering slides that join notes independently, meaning you can also adjust their angles. You can do this for the current layout and frame chain only or for all layouts and frame chains.

-
If you want to move handles at the start/end of fingering slides because you want to change their length, we recommend that you do so by changing their Slide type property or by moving the fingerings. Dorico Pro automatically adjusts the length/angle of fingering slides when you move the fingerings at the start/end.
-
You cannot move fingering slides rhythmically. If you want to change the notes to which fingering slides apply, you must hide them between their original notes and show new fingering slides between the new notes.
-
Fingering slides shown only before the destination note have a fixed length, and so do not have handles at the start/end.
-
You cannot move whole fingering slides that join notes. You can only move their handles.
Prerequisite
-
Graphic Editing is selected in the Engrave toolbox.
-
You have chosen the appropriate property scope for local properties.
Procedure
-
In Engrave mode, select one of the following that you want to move:
-
Whole fingering slides shown before destination notes
-
Individual handles on fingering slides that join notes
TipYou can show handles on all items, not just selected items, by choosing . This can make it easier to select individual handles on multiple items.
-
-
Move the fingering slides or handles in any of the following ways:
-
Press Alt/Opt-Right Arrow to move them to the right.
-
Press Alt/Opt-Left Arrow to move them to the left.
-
Press Alt/Opt-Up Arrow to move them upwards.
-
Press Alt/Opt-Down Arrow to move them downwards.
TipIf you want to move items by larger increments, you can press Ctrl/Cmd as well as the standard key command, for example, Ctrl/Cmd-Alt/Opt-Left Arrow.
-
Click and drag them in any direction.
-
Result
The selected fingering slides or handles are moved graphically without affecting the notes to which they apply or the fingerings at their start/end. If the property scope was set to Locally, this change only takes effect in the current layout and frame chain.
The following properties in the Fingering and Positions group of the Properties panel are activated automatically when you move the corresponding fingering slide handle:
-
Slide start moves the start handle of fingering slides. X moves them horizontally, Y moves them vertically.
-
Slide end moves the end handle of fingering slides. X moves them horizontally, Y moves them vertically.
For example, if you move a whole fingering slide, both handles are moved so both Slide start and Slide end are activated. You can also use these properties to move fingering slides graphically and change their angles by changing the values in the value fields.
Deactivating the properties resets the selected fingering slides to their default positions.