Hiding/Showing string fingering shift indicators
You can hide/show shift indicators after individual fingerings. You can do this for the current layout and frame chain only or for all layouts and frame chains.
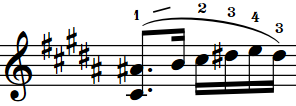
Shift indicators are angled lines that indicate the direction of movement when string players must shift their finger position on the fingerboard to play a higher/lower note with the same finger as the previous note.
These steps do not apply to fingerings belonging to fretted instruments, which can show fingering slides instead.
Prerequisite
-
If you are in Engrave mode, Graphic Editing is selected in the Engrave toolbox.
-
You have chosen the appropriate property scope for local properties.
Procedure
- Select the notes or fingerings on string instrument staves from which you want to indicate a fingering shift. You can do this in Write mode and Engrave mode.
- In the Properties panel, activate/deactivate Indicate shift to next note in the Fingering and Positions group.
Result
Shift indicators are shown when the property is activated, even if neither of the notes at each end have explicit fingerings, and hidden when the property is deactivated. They are positioned between the selected notes and the notes that immediately follow them. If the property scope was set to Locally, this change only takes effect in the current layout and frame chain.
You can change the length, thickness, angle, and placement of shift indicators in the String Fingering Shifts section of the Fingering page in .
Example