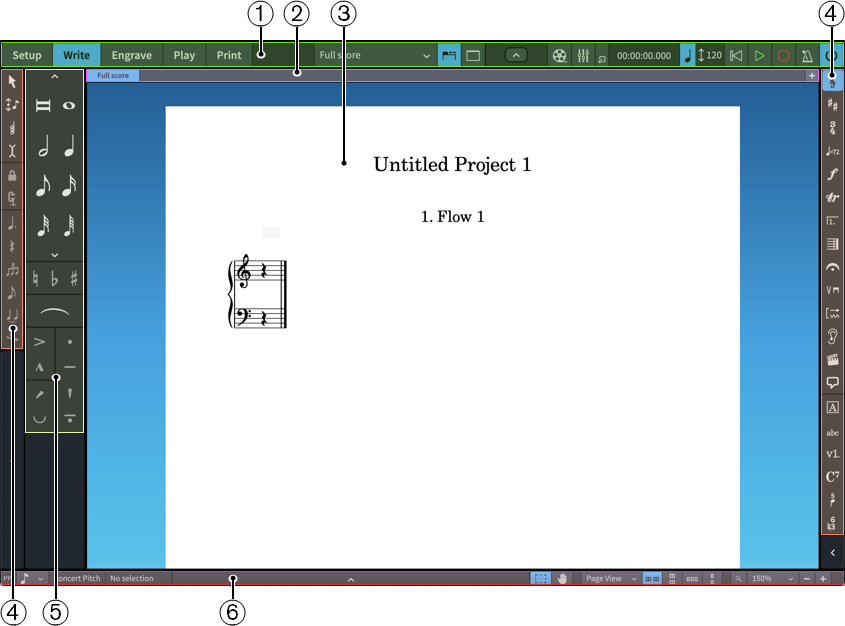
Tour of the user interface
In Dorico, the user interface is everything within the project window. Its basic structure is the same in all modes.
The project window looks like this and consists of the following areas:
-
Toolbar
The toolbar is located at the top of the project window.
On the left of the toolbar, there are the buttons for the different modes. By changing the mode, you change the workspace and the available panels. The button for the current mode appears highlighted. You can find out more about modes in the next topic.
NoteDorico Elements and Dorico SE do not have an Engrave button as they do not have Engrave mode.
In the middle of the toolbar, there is the layout selector, which allows you to change the layout shown in the music area, and buttons to show/hide panels and tabs.
On the right of the toolbar, there are buttons for hiding/showing the Video, Mixer, and Transport windows and a mini transport with playback and recording controls.
-
Tab bar
The tab bar is located towards the top of the project window, between the toolbar and the music area. It is available in Setup, Write, and Engrave modes.
The tab bar shows the tabs that are currently open, the name of the layout open in each tab, and allows you to open more tabs. If you split the music area and open several tabs, tab groups are shown.
-
Project start area/Music area/Event display/Print preview area
The central part of the project window where you work on your project. When you set up a new empty project, this area in Setup, Write, and Engrave modes shows the project start area that allows you to add your first players.
Once you have added a player or an ensemble, this area becomes the music area that displays the scores and instrumental parts that you create.
In Play mode, this area contains an event display, in which every note is displayed as an event on a piano roll or drum editor, and shows the effects of manipulating the playback of your music.
In Print mode, this area becomes the print preview area, which shows a preview of how layouts will appear when printed onto paper or exported into a graphics file format.
TipScores and instrumental parts are known as “layouts” in Dorico. Layouts allow you to show different presentations of your music. In a project with separate instrumental parts, such as a string quartet, you can switch between showing the full score layout and each part layout in the current tab. You can have as many or as few tabs open as you want.
-
Toolboxes
Toolboxes are the columns on the left and right edges of the project window. They contain different tools and options according to the current mode. Toolboxes allow you to input and modify notes, notation items, and frames, and to determine which options are shown in their corresponding panels.
You cannot hide toolboxes, they are always shown.
-
Panels
Panels are areas on the left, right, and bottom edges of the project window. They contain a variety of functions, options, and notations that you need to create and edit your music, depending on the mode. For example, the left panel in Write mode is the Notes panel, which contains durations for notes, common accidentals, slurs, and articulations.
You can hide and show panels either individually or together. To hide/show all panels, click Hide/Restore Panels
 in the toolbar. To hide/show individual panels, press Ctrl/Cmd-7 for the left panel, Ctrl/Cmd-8 for the bottom panel, and Ctrl/Cmd-9 for the right panel.
 -
Status bar
The status bar is the strip at the bottom of the project window. It allows you to change the rhythmic grid resolution
 , choose different views and page arrangements for the music area, change the zoom, and displays information about your current selection, such as the bar number in which you have selected a note. It contains different options in different modes.