Exporting OMF files
When exporting tracks and files as OMF, you should consider setting up your project to use mono tracks and mono files, to allow compatibility with audio applications that provide limited support for interleaved audio files.
Procedure
- Open the File menu, open the Export submenu and select “OMF…”.
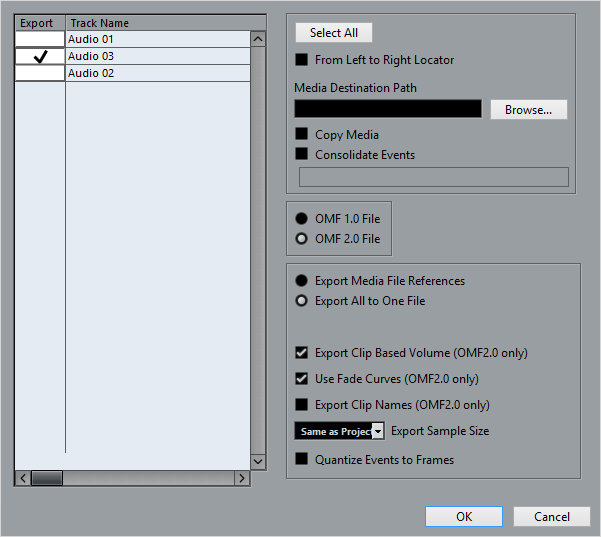
The Export Options dialog opens.

- Use the track list to the left to select the tracks that you want to include in the exported file.
To select all tracks, click the “Select All” button. Normally, the whole project is included – to export the range between the locators only, activate “From Left to Right Locator”.
When referencing media files (see below), you can set the referenced output path by entering it in the “Media Destination Path” field or by clicking on “Browser…” and choosing it in the file dialog that opens.
All file references will be set to this path. You can create references to media destinations that do not exist on the system you are working with, making it easy to prepare files for use in projects on another system or in a network environment.
- If you want to create copies of all the media files, choose the “Copy Media” option.
By default, the copied audio files are placed in a subdirectory in the export destination folder. To specify a different location for the copied files, use the “Media Destination Path” field.
- If you want to copy only the portions of audio files that are used in the project, activate “Consolidate Events”.
You can also define handle lengths in milliseconds to include audio outside each event boundary for later fine tuning. If you do not have any handles when consolidating audio files, you will not be able to adjust fades or edit points when the project is imported in another application.
- Select “1.0 File” or “2.0 File”, depending on which OMF version is supported by the application in which you plan to import the file.
Select whether you want to include all audio data in the OMF file (“Export All to One File”) or use references only (“Export Media File References”).
If you choose “Export All to One File”, the OMF file will be totally “self-contained”, but possibly very large. If you choose “Export Media File References”, the file will be small, but the referenced audio files must be available for the receiving application.
- If you selected the “2.0 File” option above, you can choose whether to include the volume settings and fades for the events (as set up with the event volume and fade handles) as well as the clip names – to include these in the OMF file, activate “Export Clip Based Volume”, “Use Fade Curves” and/or “Export Clip Names”.
- Specify a sample size (resolution) for the exported files (or use the current project settings).
- If you activate “Quantize Events to Frames”, the event positions in the exported file will be moved to exact frames.
- Click OK, and specify a name and location in the file dialog that opens.
The exported OMF file will contain (or reference) all audio files that are played in the project (including fade and edit files). It will not include unused audio files referenced in the Pool, or any MIDI data. Video files are not included.