Importing audio CD tracks
You can import audio from audio CDs into Cubase projects in 2 ways:
To import the CD tracks directly into project tracks, choose the “Audio CD…” option from the Import submenu of the File menu.
The imported audio CD track(s) are inserted on the selected audio track(s) at the project cursor position.
To import the CD tracks into the Pool, select “Import Audio CD…” from the Media menu.
This might be the preferred method if you want to import several CD tracks in one go.
Selecting one of the Import Audio CD menu items brings up the following dialog:
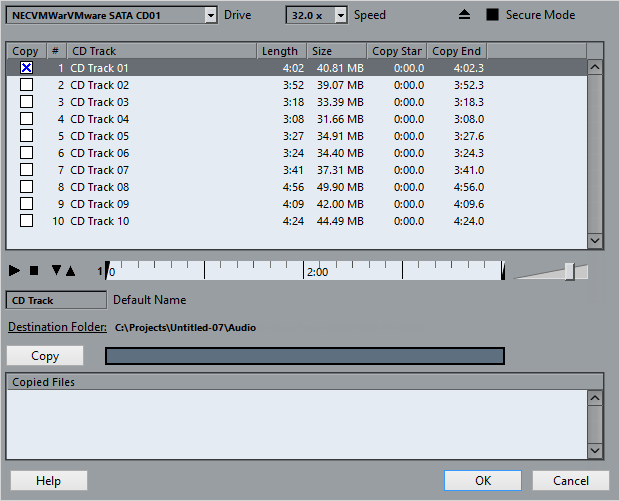
Play
Stop
Play from Left Marker
Play to Right Marker
Start of selection handle
End of selection handle
To import one or more tracks, proceed as follows:
Procedure
- If you have more than one CD drive, select the correct one from the Drive pop-up menu at the top left.
On opening the CD, the program tries to retrieve the track names from CDDB (a CD database). If no connection to CDDB can be established or the CD track names are not found, you can manually change the generic track name in the Default Name field.
-
Windows only:
Activate the “Secure Mode” option if you want to use a Secure Read mode.
Use this if you encounter problems when trying to import an audio CD. Error checking and correction will be done during the process. Note that this mode will take more time.
-
In the Windows version, select the data transfer speed from the Speed pop-up menu.
While you normally want to use the fastest possible speed, you may have to select a slower speed for flawless audio extraction.
- Activate the Copy checkbox for every audio file you want to import.
You can also select a copy section for every file, see below.
- Click on the Copy button to create a local copy of the audio file(s) or section(s).
The copied files are listed at the bottom of the dialog. By default, imported audio CD tracks will be stored as Wave files (Windows) or AIFF files (Mac OS) in the Audio folder of the current project. To change the folder, click Destination Folder and select a different folder from the dialog. During copying, the Copy button is labeled “Stop”; click it to stop the process.
- Click OK to import the copied audio files into the project, or click Cancel to stop the import and discard the copied files.
If you import more than one audio file into project tracks, a dialog opens in which you have to choose whether to insert the tracks on one track or on different ones.
The new track(s) are displayed in the Project window. New audio clips are created and added to the Pool.
The columns in the “Import from Audio CD” dialog have the following functionality:
Column
Description
Copy
Activate the checkbox in this column for the track you want to copy/import. To activate more than one checkbox, click and drag over the checkboxes (or press Ctrl/Cmd or Shift and click).
#
This is the track number.
CD Track
When you import an audio CD track, the file is named according to this column. The names are pulled automatically from CDDB, if possible. You can rename a track by clicking in the CD Track column and typing a new name. You can also apply a generic name to all audio CD tracks if no name was available in CDDB.
Length
The length of the audio CD track in minutes and seconds.
Size
The file size of the audio CD track in MB.
Copy Start
You can copy a section of a track if you like. This indicates the start of the section to be copied in the track. By default, this is set to the start of the track (0.000) but you can adjust this on the copy selection ruler, see below.
Copy End
Indicates the end of the section to be copied in the track. By default, this is set to the end of the track but you can adjust this on the copy selection ruler, see below.
By default, complete tracks are selected.
If you want to copy and import a section of an audio CD track only, select the track in the list and specify the start and end of the selection to be copied by dragging the handles in the copy selection ruler.
NoteNote that you can import sections of several audio CD tracks by selecting them in turn and adjusting the selection. The start and end settings for each track are displayed in the list.
You can audition the selected audio CD track by clicking the Play button.
The track will be played back from selection start to selection end (or until you click the Stop button).
The Play from left Marker (down arrow) and Play to Right Marker (up arrow) buttons allow you to audition the start and end of the selection only.
The down arrow button will play a short snippet beginning at the start of the selection, while the up arrow button will play a snippet starting just before the end of the selection.
To open the CD drive, click on the Eject button at the top of the dialog.