Creating a permission preset
In the User Manager dialog, read and write permission settings for users can be stored in permission presets. These can then be applied to other projects, that is, the users will automatically get read and write permissions according to the settings stored in the permission preset.
About This Task
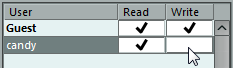
Read permission allows users to view and play back shared projects or tracks but not make any changes to them.
Write permission allows users to make any changes to shared projects or tracks.
It is not possible to have write permission without also having read permission.
Proceed as follows to create a permission preset:
Procedure
- Type in the desired name and click OK.
The permission preset is created and added to the list.

The “User Pool” column to the right lists all the users who have entered a user name, and who have been online and established in the network at some point (note that users do not have to be online to be listed here).
However, there may also be instances when you want to add a user who is offline and has not been established in the network. If this is the case, the user is not available in the User Pool list, but you can still add him to a permission preset in the following way:
- Type in the desired name.
The user you’re adding may have decided on a user name and entered it, but has been offline and therefore not yet established in the network. In this case, you can enter that name if you know it. Otherwise, enter a name of your own choice and later let the user know which name to use.

The next step is to add users to the permission preset.
Result
When you have added the desired users and specified their read and write permissions, the preset is complete. The permission preset will now be available for use.
Permission presets apply to entire projects. When a permission preset is loaded, the read and write permission settings in it are valid for the entire project. However, you can also specify separate permissions for each track.
It is also possible to create a permission preset in the Project Sharing and Permissions dialog.