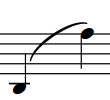
Short slurs that cover large pitch ranges
When short slurs span large pitch ranges, they are significantly rotated to compensate. This can make the ends of short slurs appear too angular.
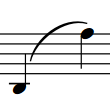
You can move the control point handles of slurs to improve their curves.
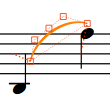
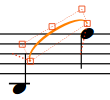
Of the three examples, the middle slur has the smoothest curve. The handles on the slur on the right have been moved poorly, making the curve far too angular.
In the bottom row, the positions of the handles are shown to indicate how each curve above was created.
|
|

|

|
|
|
When adjusting slur ends, you can achieve the best results using the following guidelines:
-
The control point at the lower end of the slur does not extend outside the width of the slur, as marked by its neighboring endpoint.
-
The control point at the higher end of the slur does not form an angle greater than 90 degrees relative to the endpoints. You can use the dashed lines to help you judge this.
You can adjust the shape of short slur ends in different ways:
-
Project-wide, by increasing the value for Offset shoulders by fraction of half length of short slur, which you can find by clicking Advanced Options in the Design section of the Slurs page in .
-
Individually, by activating Start handle offset and End handle offset in the Properties panel in Engrave mode, and changing their X values.
-
Individually, by moving the handles of slurs in Engrave mode.