Edit Chord Diagrams dialog
The Edit Chord Diagrams dialog allows you to design your own chord diagram shapes, either by creating a new blank one or by editing any of the available chord diagram shapes.
When you edit an existing chord diagram, Dorico Pro saves a duplicate of it with your changes. The original chord diagram is always retained.
-
You can open the Edit Chord Diagrams dialog in Engrave mode by choosing .
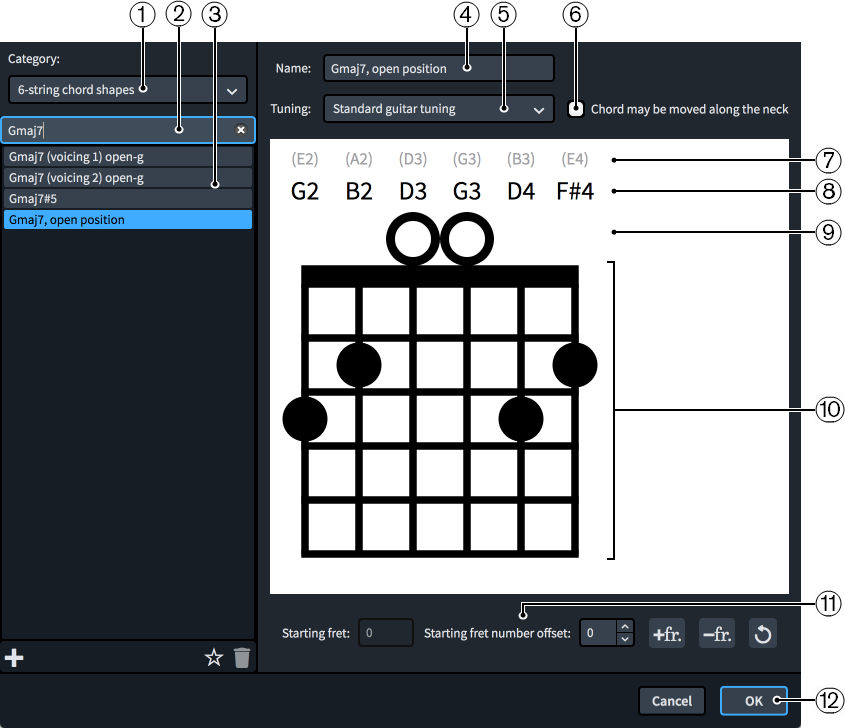
The Edit Chord Diagrams dialog contains the following options and sections:
-
Category menu
Allows you to select which shapes are available in the chord diagram shapes list by selecting the number of instrument strings required.
-
Search field
Allows you to filter chord diagrams according to your entry.
-
Chord diagram shapes list
Contains all the available chord diagram shapes within the currently selected category and your search filter, if applicable.
NoteShapes appear in the chord diagram shapes list with the name of their simplest usage or their closest position to the nut. Movable chord diagram shapes that can produce many different chords only appear once. For example, replacing the open strings in the E, open position shape with a barré and moving the shape up the neck can produce multiple major chords. Therefore, chords that use the same shape but at different fret positions, such as F, open position, do not appear in the list.
The action bar at the bottom of the list contains the following options:
-
New
 : Adds a new blank chord diagram.
 -
Save as Default
 : Saves the selected chord diagram shape to your user library, allowing you to use it in multiple projects. Appears as
  for chord diagram shapes saved as default.
 -
Delete
 : Deletes the selected chord diagram shape.Note
You cannot delete predefined chord diagram shapes. You must click Delete twice to delete your own chord diagram shapes that you have saved as default.
-
-
Name
Displays the name of the chord whose chord diagram you are editing in the dialog. Optionally includes other relevant identifying information, such as “movable” or “open-g”. You cannot change the name of predefined chord diagrams and chord diagrams that you have saved as default.
-
Tuning
Displays the fretted instrument and tuning for the current chord diagram. You can select other tunings to see what chords the current shape produces in different tunings and on different instruments. If you have changed the tuning of fretted instruments in the project or imported custom tunings, they are available in this menu. The open and current string pitches in the editor update when you select other tunings.
-
Chord may be moved along the neck
Allows you to specify whether or not the shape of the chord diagram can be reused at other fret positions, for example, by playing open strings with a barré at higher fret positions.
Because it is not normally possible to reuse chord diagram shapes that have more than three stopped strings at other fret positions, Dorico Pro shows a warning icon
 when this option is activated for chord symbols with four or more stopped strings.
 -
Open string pitch
Displays the open pitch of the corresponding string according to the currently selected tuning for reference.
-
Current string pitch
Displays the current pitch of the corresponding string if it is open or stopped, according to the currently selected tuning. If the pitch of a string is not part of the chord, the string pitch appears red.
-
String status
Displays the current usage status of the corresponding string and allows you to switch the status of individual strings between open and omitted by clicking in this row.
-
O: Open string
-
X: Omitted string
-
No symbol: Stopped string
-
-
Chord diagram shape editor
Displays the current arrangement of stopped frets using dots, and allows you to change the chord diagram shape and move the stopped fret positions by clicking at the required positions. Each string can only have a single stopped fret position.
If two or more strings are stopped at the same fret, you can hide/show a barré by clicking any of the dots at that fret position.
-
Action bar
Contains options that allow you to edit and change the number of frets.
-
Starting fret: Changes the fret number of the highest fret in the chord diagram.
-
Starting fret number offset: Changes the offset of the starting fret number, for example, if you want the starting fret label to appear beside the second fret down the chord diagram in order to include a barré.
-
Add fret
 : Adds a fret to the bottom of the chord diagram.
 -
Remove fret
 : Removes a fret from the bottom of the chord diagram.
 -
Reset Chord Diagram
 : Removes your changes to the chord diagram and resets it to its default shape.
-
-
OK
When you click OK, all your changes in the dialog are saved.