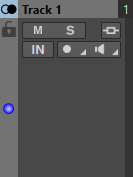
Track Control Area for Stereo and Mono Tracks
The track control area for stereo and mono tracks allows you, for example, to mute and solo tracks, add track effects, specify routing options, monitor the input signal, and record enable tracks.
Options
Track Control Area Options
- Track Name
-
Allows you to change the track name. Double-click the track name to open the Track Name dialog where you can enter a name for the track.
- Lock
-
Disables all editing on the track.
- Mute
-
Mutes the track.
- Solo
-
Solos the track.
- Effects
-
Opens the Effects pop-up menu where you can select effects for the track. A highlighted icon indicates that a track has track effects.
- Input Bus/Channel Output Routing
-
Allows you to select the Input Bus, the Channel Output Routing, and the Track Routing dialog. When you hover over the button, a tooltip displays the selected routing options.
- Audio Input
-
Allows you to select the audio input for recording.
- Record
-
To be able to record, you must record enable the corresponding tracks. If you click the arrow, the following options are available:
File Properties for Recording opens a dialog that allows you to specify the name, location, and bit resolution of the audio file that you want to record.
If Stop When Record Position Reaches Last Marker is activated, recording stops when the record position reaches the last visible marker of the montage. Hidden markers are not taken into account. You can create and move the last marker during recording. This option is global to all audio montages.
If Stop When Record Position Reaches Next Marker is activated, recording stops when the record position reaches the next visible marker of the montage. Hidden markers are not taken into account. This option is global to all audio montages.
- Ducker On/Off
-
Allows you to activate or deactivate ducking. You can then select the voice modulator track and make settings.
- Source
-
Opens the Modulator Tracks menu that allows you to select the track that you want to use for ducking.
- Ducker Settings
-
Opens the Ducker plug-in that allows you to edit ducking settings to fine tune the ducking effect.
- Change Track Height of All Tracks
-
The lower left area of the track control area allows you to change the track height of all tracks simultaneously. Click and drag to change the track height.
- Change Track Height of Active Track
-
The lower middle area of the track control area allows you to change the track height of the active track. Click and drag to change the track height.
- Change Track Height of Active Track and Track Below
-
The lower right area of the track control area allows you to change the track height of the active track and the track below. Click and drag to change the track height.
- Track peak meter
-
The track peak meter shows the volume level for audio tracks. It is located on the right side of the track control area.
Track Pop-up Menu
This pop-up menu contains all track-related options.
-
To open the Track pop-up menu, right-click in the track control area.
- Add Track
-
Adds a track below the active track.
- Split into Left/Right Mono Tracks
-
Converts the stereo track into two mono tracks that represent the left and right channels of a stereo track. This does not alter the audio material.
- Remove Track
-
Removes the active track.
- Show Ducking Controls
-
Activates the ducking controls in the track control area.
Track Settings Menu
-
To open the Track Settings menu, click the down arrow in the lower middle area of the track control area.
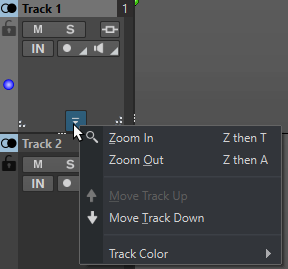
- Zoom In
-
Shows the active track in the full available height.
- Zoom Out
-
Shows as many tracks as possible.
- Move Track Up/Move Track Down
-
Moves the active track up or down.
- Track Color
-
Opens a submenu, where you can select a color for the active track.