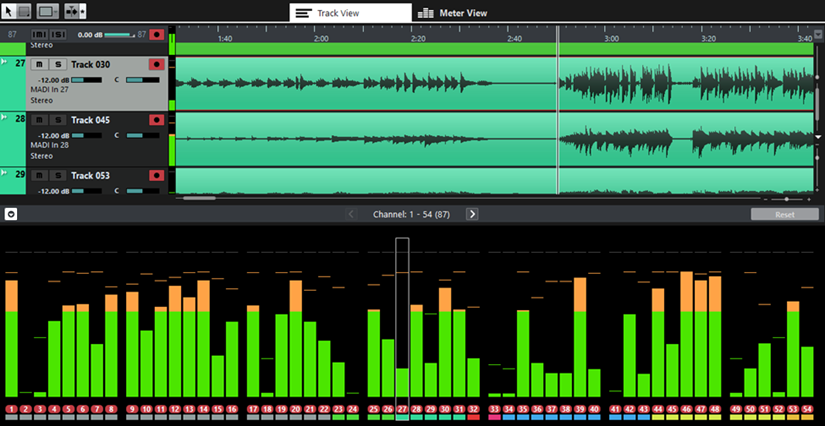
Track View
The Track View tab shows the track list and the event display. Its meter bridge allows you to monitor the levels of your channels.
- Object Selection/Range Selection
-

You can use these tools to select either one or several events or a time range in the event display.
- Select Colors
-

Allows you to select different colors for the tracks or events in your projects.
- Auto-Scroll
-

Allows you to keep the project cursor visible during playback.
Activate the button on the right to suspend Auto-Scroll when you are editing your project.
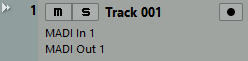
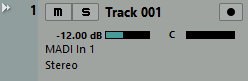
Track list
The track list shows all tracks of the project and provides controls for each track.
You can show/hide the marker track above the audio tracks.
- Global controls
-

At the top of the track list, you can find the global controls. The digit on the left shows the number of tracks in the project. Mute and Solo allow you to unmute all tracks or deactivate all solo states. The digit on the right, next to the global record-enable button, shows the number of record-enabled tracks.
- Track controls
-
The controls on a track allow you to mute, solo, and record-enable this track.
In Multi Track Mode, the names of the input and output ports that are used by the track are displayed.
In Stereo Mode, you can set the volume and the pan position for the track in the stereo mix.
Event display
The event display to the right of the track list shows the audio events. If the marker track is displayed, the markers are also shown. A ruler, zoom controls, and the project cursor help you to navigate within your project.

- Ruler
-
The ruler above the display shows the timeline. The two triangular markers on the ruler are the locators. They define the cycle area.
- Locators
-

The left and right locators are a pair of markers that you can use to set up cycle boundaries for playing back a section of the project in a loop.
- Waveform zoom slider
-
To zoom in on the contents of events vertically, use the waveform zoom slider in the top right corner of the event display.
This is useful when viewing quiet audio passages.
NoteTo get an approximate reading on the level of the audio events by viewing the waveforms, make sure this slider is all the way down. Otherwise, zoomed waveforms may be mistaken for clipped audio.
- Project cursor
-
The white vertical line is the project cursor. It indicates the playback or recording position. When playback or recording are stopped, it defines the position where editing is performed.
NoteDuring recording, the project cursor cannot be moved. In stop mode, you can set the cursor by clicking on the timeline. Double-clicking starts/stops playback.
- Zoom controls
-
The horizontal and vertical zoom sliders in the lower right of the event display allow you to zoom within the main display. When you click the triangle above the vertical zoom slider
 , the zoom pop-up menu opens, from which you can select a zoom preset.
Meter section
- Show/Hide Meter Bridge
-

Allows you to show/hide the meter bridge on the Track View tab.
- Show Previous Page/Show Next Page
-
Allows you to scroll through the meter pages.
NoteYou can also scroll through the meter pages pressing Alt-P.
- Meter bridge
-
Allows you to monitor the levels of your channels.
- Reset
-
Resets all peak hold values.