Engraving Options dialog
The Engraving Options dialog allows you to change the default graphical appearance and position of items project-wide, in all flows and layouts. For example, you can change the line thickness of notation items, their continuation style, their default staff-relative placement, and their minimum distance from the staff and other items.
-
You can save all options that you set in Engraving Options as the default for new projects by clicking Save as Default.
-
If you want to make changes to individual notes and notations, you can use properties in the Properties panel.
You can open Engraving Options in any of the following ways:
-
Press Ctrl/Cmd-Shift-E in any mode.
-
Choose in Engrave mode.
The Engraving Options dialog contains the following:
-
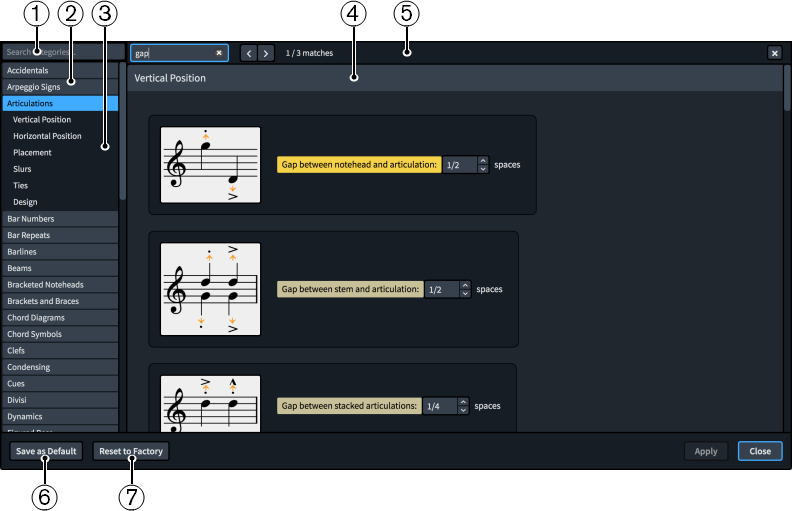
Search categories field
Allows you to filter categories and section titles according to your entry.
TipYou can set the focus to the Search categories field by pressing Ctrl/Cmd-L. You can set the focus away by pressing Tab.
-
Category list
Contains the categories of options that you can view and change in the dialog. When you click a category in this list, any applicable section titles appear below the category in the list and its options appear as a page in the main body of the dialog.
-
Section titles
Shows the titles of any sections on the selected category’s page. You can click these section titles to navigate directly to that section of the page.
-
Section
Pages are divided into sections, which can contain multiple options. Sections that contain many options are divided into subsections. For options that have multiple possible settings, the current setting is highlighted.
-
Search pages bar
Allows you to search section titles and options on the currently selected page according to your entry and navigate through matches. The number of matches is displayed in the bar. Matches appear highlighted on the page, and the current option appears with a brighter highlight.
You can show the Search pages bar by pressing Ctrl/Cmd-F.
The bar contains the following options:
-
Search pages field: Allows you to enter the term you want to search for. You can set the focus to the Search pages field by pressing Ctrl/Cmd-F.
-
Previous match: Allows you to navigate to the previous match on the page. You can also navigate to the previous match by pressing Ctrl/Cmd-Shift-G.
-
Next match: Allows you to navigate to the next match on the page. You can also navigate to the next match by pressing Ctrl/Cmd-G.
-
Close: Closes the bar and removes all match highlights. You can also close the bar by pressing Esc.
-
-
Save as Default/Remove Saved Defaults
This button has different functions depending on whether you have existing saved defaults.
-
Save as Default saves all options currently set in the dialog as the default for new projects.
-
Remove Saved Defaults deletes your previous saved defaults without resetting the options in the current project. After removing your saved defaults, all future projects start with the default factory settings. If you have existing saved defaults, you can access Remove Saved Defaults by pressing Ctrl (Windows) or Opt (macOS).
-
-
Reset to Factory/Reset to Saved Defaults
This button has different functions depending on whether you have existing saved defaults.
-
If you have no saved defaults, Reset to Factory resets all the options in the dialog back to the default factory settings.
-
If you have existing saved defaults, Reset to Saved Defaults resets all the options in the dialog back to your saved defaults. You can access Reset to Factory instead by pressing Ctrl (Windows) or Opt (macOS). Resetting options back to the default factory settings only affects the current project, meaning future projects still start with your saved defaults.
-