Moving individual staves/systems vertically
You can change the spacing of individual staves, including ossia staves, by changing the vertical position of individual staves and systems independently of your project-wide settings.
We recommend that you add extra pages and finish laying out your pages before moving individual staves, as individual staff spacing changes are automatically deleted if the frame in which they occur changes. For example, if you move staves individually and then add a blank page at the start of the layout, all individual staff spacing changes in the layout are deleted.
Moving individual staves/systems vertically does not affect the casting off. If you want to show more/fewer systems in a frame, you can change the casting off by, for example, using frame breaks or setting a fixed number of systems per frame.
When Staff Spacing
![]() is activated in the Engrave toolbox, the following are shown:
is activated in the Engrave toolbox, the following are shown:
-
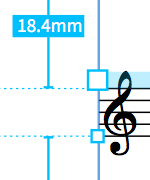
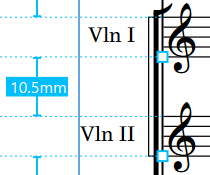
System spacing handles: Large square handles on the top left corner of the top staff in each system. System spacing handles control the vertical position of whole systems.
-
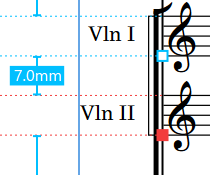
Staff spacing handles: Small square staff handles on the bottom left corner of each staff. Staff spacing handles control the vertical position of individual staves.
-
Gap measurements: Lines and highlighted numbers indicating the distances between staves and systems, shown using your preferred unit of measurement.
-
Music frame margin highlights: Translucent highlights at the top/bottom of music frames indicating the extent of music frame margins.
Prerequisite
Staff Spacing
![]() is selected in the Engrave toolbox.
is selected in the Engrave toolbox.
Procedure
-
In Engrave mode, select one of the following on each staff/system you want to move vertically:
-
Staff spacing handle

-
System spacing handle

Note-
You can switch between having a staff or system spacing handle selected by pressing Tab.
-
When using the mouse, you can only move one staff/system at a time.
-
-
Move the selected staves/systems in any of the following ways:
-
To move them a standard amount upwards or downwards, press Alt/Opt plus the corresponding arrow key. For example, press Alt/Opt-Up Arrow to move handles upwards.
-
To move them a large amount, press Ctrl/Cmd plus the standard key command; for example, Ctrl/Cmd-Alt/Opt-Up Arrow.
-
To move them a moderate amount, press Shift plus the standard key command; for example, Shift-Alt/Opt-Up Arrow.
-
To move them a small amount, press Ctrl/Cmd-Shift plus the standard key command; for example, Ctrl/Cmd-Shift-Alt/Opt-Up Arrow.
-
Click and drag a single staff/system spacing handle upwards/downwards.
-
Result
The vertical position of the selected staves/systems is changed. The color of the handles changes to indicate that you have moved them. When you move system handles, both the square handle and the highlighted strip at the top of the system change color.
-
When Staff Spacing
 is activated, you cannot select or edit anything other than staff/system spacing handles. To resume normal selection and editing, click Graphic Editing
 in the Engrave toolbox or return to Write mode.
 -
You can also click the gap measurement numbers and change the value using any of the supported units of measurement, which are points, millimeters, centimeters, and inches.
You can change your preferred unit of measurement to be used throughout Dorico Pro on the General page in Preferences.
Example
|
|
After Completing This Task
You can copy manual changes you have made to the staff spacing on individual pages to other pages in the layout.