FX Modulator
This multi-effect modulation plug-in combines several modulation effects that allow for extensive sound shaping, from classic ducking effects to exciting rhythmic patterns. You can create custom-shaped LFOs and modulate up to 6 integrated effect modules at once. The LFO can be triggered via MIDI or separate side-chain inputs, where the envelope of the side-chain signal is added to the LFO.
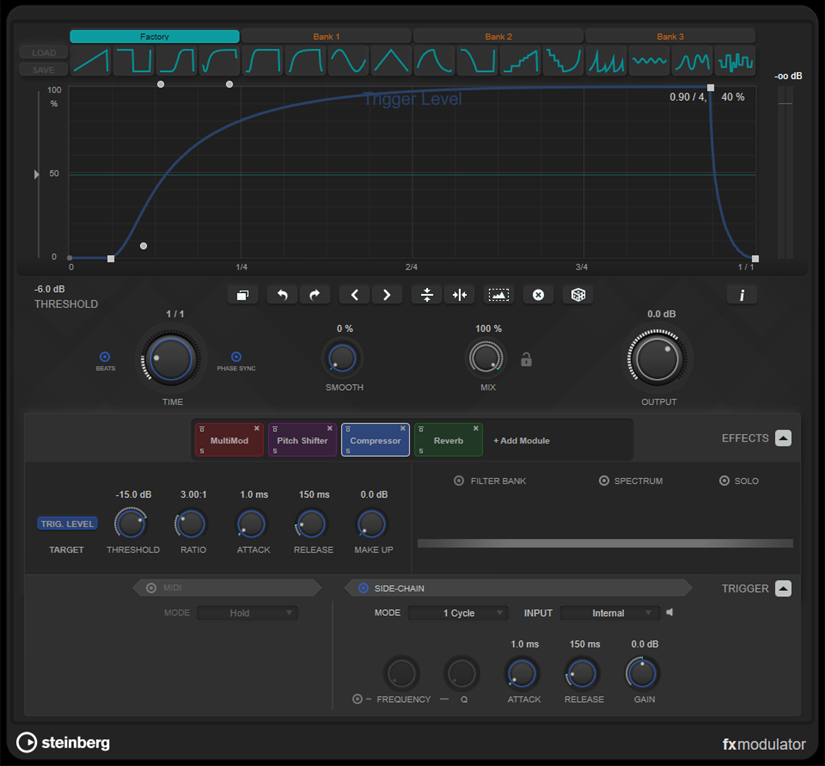
Curve Section
This section contains a curve editor that allows you to define the modulation curve. You can apply predefined curve shapes, or create and store custom curve shapes.
- Factory
-
The factory bank allows you to apply predefined curve shapes to the whole curve or a selection range. You cannot change the assignment of the factory slots. However, you can adjust factory curves in the editor after applying it.
- Bank 1-3
-
User banks allow you to apply custom curve shapes to the whole curve or a selection range.
-
To add the curve shape that is displayed in the editor to a user bank, click an empty slot.
-
To remove the curve shape of a slot, click x and click again to confirm. To cancel, click elsewhere.
Load opens a browser window that shows the available bank presets.
-
To load a bank preset to the selected bank, double-click it.
-
To filter the list of bank presets, click Set Up Window Layout at the top right of the browser window, activate Filters, and select your filter settings.
Save allows you to save the curve shapes in the selected bank as a bank preset.
-
- Lock Banks 1-3 When Loading Presets
-
Locks/Unlocks Bank 1, Bank 2, and Bank 3 while browsing through presets.
- Curve editor
-
Shows the shape of the modulation curve and allows you to manually adjust it. The editor allows the following editing techniques:
-
To add a node, double-click the curve.
-
To move a node, drag it. If you move a node close to a horizontal or vertical grid line, it automatically snaps to the grid. To suspend this behavior, hold Shift while dragging.
-
To delete a node or shape handle, double-click it.
-
To move, delete, or flip multiple nodes or shape handles, drag a selection rectangle around them and edit them.
-
To modify the shape of the curve, drag the curve between two nodes.
-
To create an S-shaped curve, hold Shift and drag the shape handle left of a node.
-
To compress or expand the curve, hold Alt and drag a node of a selection up or down.
-
- Threshold
-
Sets the threshold value for 1 Cycle trigger mode. The threshold value is shown as a horizontal line within the display. This control is only available if Side-Chain is activated and 1 Cycle mode is selected in the Trigger section.
- Duplicate Curve
-
Duplicates the shape of the curve.
- Undo/Redo
-
Undoes/Redoes actions in the curve editor.
NoteEach modulation curve has its own undo/redo history
- Shift Curve to the Left
-
Moves the curve to the left.
- Shift Curve to the Right
-
Moves the curve to the right
- Flip Vertically
-
Flips the shape of the whole curve or a selection range vertically.
- Flip Horizontally
-
Flips the shape of the whole curve or a selection range horizontally.
- Select All Curve Points
-
Selects all curve nodes and handles.
- Reset Curve
-
Resets the curve to default.
- Create Random Curve
-
Applies a random shape to the whole curve or a selection range.
- Show Curve Editing Instructions
-
Shows/Hides a list of techniques for editing the modulation curve in the editor.
Main Section
This section contains the general modulation parameters and settings.
- Time
-
Sets the time base for the modulation curve individually for each modulated effect parameter. The default value of 1/1 means that 1 cycle of modulation has a length of 1 bar. The tempo of the song is automatically taken into account.
- Smooth
-
Smoothes sharp edges and steep slopes of the modulation curve individually for each modulated effect parameter. This can avoid artifacts that are caused by abrupt value changes.
- Mix
-
Sets the level balance between dry and wet signal.
- Lock Mix Value When Loading Presets
-
Locks/Unlocks the balance between dry and wet signal when loading presets.
- Output
-
Sets the output level.
Effects Section
This section allows you to add, edit, and remove effects. You can create effect chains by adding up to 6 different effect modules from 14 effects available overall. You can modify the order of the effects in the chain by dragging the modules.
For each effect, you can see which is its target parameter that is affected by the modulation curve. Some effects have multiple target parameters. A filter bank allows you to restrict the modulation to a defined frequency range.
- Effects
-
Shows/Hides the effect parameters and filter bank settings.
- Target
-
Shows the parameter that is modulated by the modulation curve. For effects with multiple target parameters, click a parameter to show and edit its specific modulation curve.
- Filter Bank
-
Activates/Deactivates the filter bank for the selected module. If activated, the effect is restricted to the range defined on the frequency display. Frequencies below and above this range are bypassed.
- Spectrum
-
Activates/Deactivates the spectrum display for the effect signal on the frequency display.
NoteActivating this option increases the CPU load.
- Solo
-
Allows you to listen to the set frequency range exclusively. Frequencies below and above this range are muted.
- Frequency display
-
Shows the spectrum of the effect signal and allows you to define the frequency range of the filter bank. To adjust the range, drag the frequency handles or drag the area between the handles.
Trigger Section
This section allows you to determine how the modulation curves are applied when triggered via MIDI or side-chaining.
The following settings are available for MIDI triggering:
- Trigger
-
Shows/Hides the settings for MIDI and side-chain triggering.
- MIDI
-
Activates/Deactivates triggering via MIDI.
- Mode
-
Sets the mode for MIDI triggering.
-
If Hold is selected, the modulation curve is applied as long as a MIDI note is played.
-
If 1 Cycle is selected and a MIDI note is played, the modulation curve is only applied once, regardless of the note length. You must play a note again to apply the curve again.
NoteThis mode is useful to create MIDI-triggered ducking effects with the Volume or Compressor effect modules.
-
The following settings are available for side-chain triggering:
- Side-Chain
-
Activates/Deactivates triggering via side-chain input.
- Mode
-
Sets the mode for side-chain triggering
-
If Continuous is selected, the envelope of the side-chain signal is added to the modulation curve.
-
If 1 Cycle is selected and the envelope of the side-chain signal exceeds the threshold, the modulation curve is applied once.
Note-
This mode is useful to create envelope-triggered ducking effects with the Volume or Compressor effect modules.
-
If this mode is selected, the envelope of the side-chain signal and the threshold are shown in the curve editor, and you can set the Threshold there.
-
-
- Input
-
Sets the side-chain input. If Internal is selected, the input signal of the plug-in is used as the side-chain source. If Side-Chain 1 to Side-Chain 6 is selected, the signal of tracks that are routed to the corresponding plug-in side-chain input is used.
- Side-Chain Filter Listen
-
Allows you to solo the side-chain filter. This way, you can quickly check the part of the signal that is filtered out using the current settings.
- Frequency
-
Sets the frequency of the side-chain filter.
You can set the frequency either in Hz or as a note value. If you enter a note value, the frequency is automatically changed to Hz. For example, a note value of A3 sets the frequency to 440 Hz. When you enter a note value, you can also enter a cent offset. For example, enter A5 -23 or C4 +49.
Note-
Ensure that you enter a space between the note and the cent offset. Only then are cent offsets taken into account.
-
- Q
-
Sets the resonance or width of the side-chain filter.
- Attack
-
Sets the attack time for the side-chain envelope signal.
- Release
-
Sets the release time for the side-chain envelope signal.
- Gain
-
Attenuates or boosts the side-chain envelope signal.