Mystic
|
Cubase LE |
Cubase AI |
Cubase Elements |
Cubase Artist |
Cubase Pro |
Nuendo |
|
|---|---|---|---|---|---|---|
|
Included with |
– |
– |
– |
X |
X |
X |
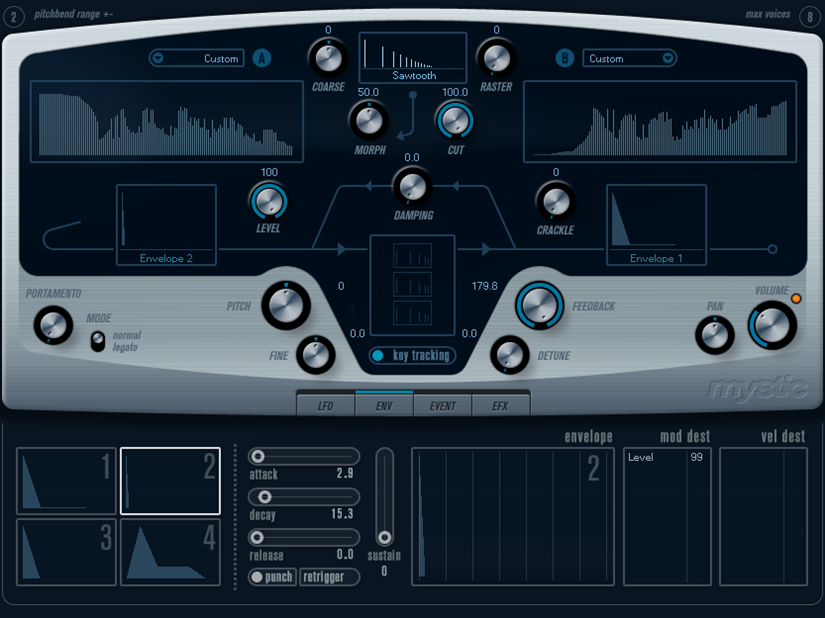
The synthesis method used by Mystic is based on three parallel comb filters with feedback. A comb filter is a filter with a number of notches in its frequency response, with the notch frequencies harmonically related to the frequency of the fundamental (lowest) notch.
A typical example of comb filtering occurs if you are using a flanger effect or a delay effect with very short delay time. Raising the feedback (the amount of signal sent back into the delay or flanger) causes a resonating tone – this tone is basically what the Mystic produces. This synthesis method is capable of generating a wide range of sounds, from gentle plucked-string tones to weird, non-harmonic timbres.
The basic principle is the following:
You start with an impulse sound, typically with a very short decay.
The spectrum of the impulse sound largely affects the tonal quality of the final sound.
The impulse sound is fed into the three comb filters, in parallel. Each of these has a feedback loop.
This means the output of each comb filter is fed back into the filter. This results in a resonating feedback tone.
When the signal is fed back into the comb filter, it goes via a separate, variable low-pass filter.
This filter corresponds to the damping of high frequencies in a physical instrument – if this is set to a low cutoff frequency it causes high harmonics to decay faster than the lower harmonics (as when plucking a string on a guitar, for example).
The level of the feedback signal is governed by a feedback control.
This determines the decay of the feedback tone. Setting this to a negative value simulates the traveling wave in a tube with one open end and one closed end. The result is a more hollow, square wave-like sound, pitched one octave lower.
A detune control offsets the fundamental frequencies of the three comb filters, for chorus-like sounds or drastic special effects.
Finally you have access to the common synth parameters – two LFOs, four envelopes and an effect section.
By default, envelope 2 controls the level of the impulse sound – this is where you set up the short impulse decay when emulating string sounds, etc.