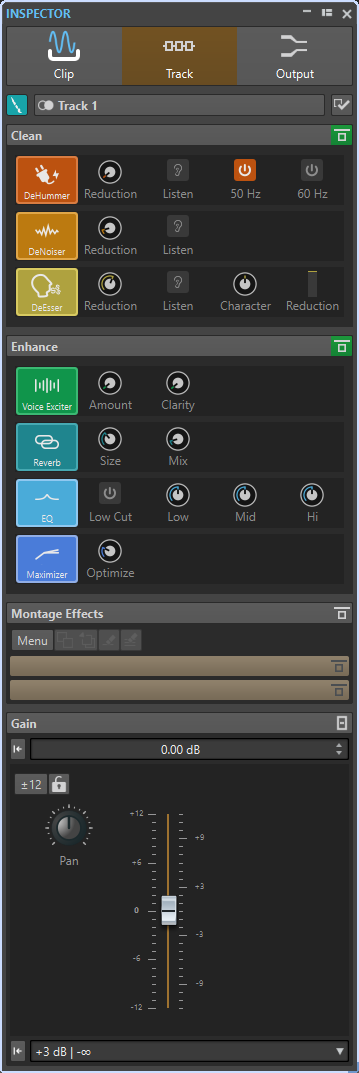
Inspector Window
-
To open the Inspector window, open an audio montage and select .
Clip/Track/Output
At the top of the Inspector, you can select if you want to display and edit the plug-ins for clips, tracks, or the montage output in the Inspector window.
- Clip Color/Track Color
-
Allows you to specify a color for the waveform of the selected clip or track.
- Select Clip/Select Track
-
Allows you to select a clip or track.
- Edit Clip Name/Edit Track Name
-
Allows you to specify a name for the selected clip or track.
- Pane Visibility
-
Allows you to show or hide panes in the Inspector window.
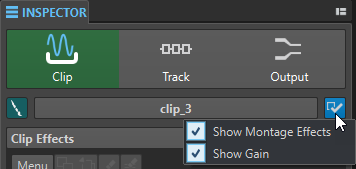
The following options are available:
-
If you have selected Clip, you can Show Montage Effects, and Show Gain.
-
If you have selected Track, you can Show Clean, Show Enhance, Show Montage Effects, and Show Gain.
-
If you have selected Output, you can Show Montage Effects and Show Gain.
-
Clean (Only for Tracks)
The Clean pane contains a DeHummer, DeNoiser, and DeEsser to remove unwanted sounds and noises from your audio in real-time.
- Fold/Unfold Clean Pane
-
Folds or unfolds the Clean pane.
- Bypass All Effects Displayed Here
-
Bypasses any effect processing during playback and rendering.
- DeHummer
-
DeHummer allows you to decrease power hum interference that is caused by a bad grounding or unreliable recording equipment. This is done by removing the corresponding frequencies from the audio.
The following parameters are available:
-
Reduction allows you to specify the amount of the hum reduction.
-
Listen allows you to listen to the signal that was removed from the audio material. This allows you to verify that you did remove the correct portions of the audio.
-
50 Hz and 60 Hz allow you to remove harmonic noise with a fundamental frequency at 50 or 60 Hz. These disturbing frequencies can be caused by electric noise due to badly shielded recording equipment, for example.
-
- DeNoiser
-
DeNoiser allows you to remove noise from the audio material, for example, ambience sound.
The following parameters are available:
-
Reduction allows you to specify the amount of the noise reduction.
-
Listen allows you to listen to the signal that was removed from the original audio material. This allows you to verify that you did remove the correct portions of the audio.
-
- DeEsser
-
DeEsser is a compressor that reduces excessive sibilance, primarily for vocal recordings.
For example, you can use it when close proximity microphone placement and equalizing lead to situations where the overall sound is just right, but where unwanted sibilants occur.
When recording a voice, the position of DeEsser in the signal chain is usually after the microphone pre-amp and before a compressor/limiter. This keeps the compressor/limiter from unnecessarily limiting the overall signal dynamics.
The following parameters are available:
-
Reduction allows you to specify the amount of the sibilance reduction.
-
Listen allows you to listen to the signal that was removed from the original audio material. This allows you to verify that you did remove the correct portions of the audio.
-
Character allows you to specify the frequency on which the DeEsser is applied. A low Character setting is generally used for low male voices, for example. Higher Character settings generally apply to higher voices of females or children, for example.
-
The Reduction meter shows how much the DeEsser is working.
-
Enhance (Only for Tracks)
The Enhance pane contains the Voice Exciter, Reverb, EQ, and Maximizer that allow you to increase the clarity, expression, and deepness of your audio in real-time.
- Fold/Unfold Enhance Pane
-
Folds or unfolds the Enhance pane.
- Bypass All Effects Displayed Here
-
Bypasses any effect processing during playback and rendering.
- Voice Exciter
-
Voice Exciter allows you to add upper harmonics and increase clarity and intelligibility of your voice recordings.
The following parameters are available:
-
Amount allows you to specify the amount of the effect.
-
Clarity allows you to increase the clarity and intelligibility of your voice recording.
-
- Reverb
-
Reverb allows you to add more room and space to recordings that sound a bit lifeless.
The following parameters are available:
-
Size allows you to specify the room size.
-
Mix allows you to set the level balance between the dry signal and the wet signal.
-
- EQ
-
The three band EQ allows you to tame or boost the Low, Mid and High frequency ranges. An additional Low Cut filter allows you to cut the low end below 30 Hz for even more clarity.
The EQ bands have the following specifications:
-
Low: low-shelf, frequency 250 Hz, 12 dB/octave
-
Mid: peak, frequency 1500 Hz, Q 1, 12 dB/octave
-
Hi: high-shelf, frequency 5000 Hz, 12 dB/octave
-
- Maximizer
-
Maximizer allows you to add loudness and punch to your recording while making sure that the signal does not exceed -1 dB. The Optimize dial lets you specify how much compression is applied.
Montage Effects
The Montage Effects pane allows you to add and manage effect plug-ins.
- Fold/Unfold Effects Pane
-
Folds/Unfolds the Effects pane.
The following options are available on the Menu pop-up menu:
- Remove Selected Plug-ins
-
Removes the selected plug-in from the Montage Effects list.
- Remove All Plug-ins
-
Removes all plug-ins from the Montage Effects list.
- Copy
-
Copies the selected plug-in and its settings to the clipboard.
- Copy All
-
Copies all plug-ins and their settings to the clipboard.
- Paste (Insert)
-
Inserts the plug-in that was copied to the clipboard before the first selected slot. If no slot is selected, the plug-in is inserted at the end of the plug-in list.
- Paste (Replace)
-
Replaces the selected plug-in with the plug-in that was copied to the clipboard. If no slot has been added, a new slot is created.
- Close All Windows
-
Closes all plug-in windows related to this audio montage.
- Plug-in Map
-
Opens the Plug-in Map dialog that displays all plug-ins that are used in the audio montage and the clips and tracks that are using them.
- Add Effect
-
Allows you to add an effect.
The following options are available on the toolbar of the Montage Effects pane:
- Copy
-
Copies the selected plug-in and its settings to the clipboard.
- Paste
-
Inserts the plug-in that was copied to the clipboard before the first selected slot. If no slot is selected, the plug-in is inserted at the end of the plug-in list.
- Remove Selected Plug-ins
-
Removes the selected plug-ins from the Montage Effects list. You can Ctrl/Cmd-click the plug-ins to select the plug-ins that you want to remove.
- Remove All Plug-ins
-
Removes all plug-ins from the Montage Effects list.
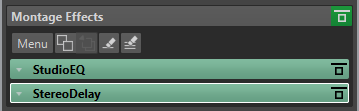
Effects List
The effects list displays the effect plug-ins of the selected clip, track, or montage output. In the list, you can replace effect plug-ins, change the effect order, and edit the Tail of effects.
- Tail
-
If you click the arrow to the left of the plug-in name, you can specify the tail value for the plug-in.
Some effects, such as reverb and delay, produce audio tails. This means that the effect sound continues after the clip sound ends. For example, if you add echo to a clip without specifying a tail value, the echo effect is muted as soon as the clip ends. Set the tail length so that the effect is allowed to decay naturally. If you add another plug-in to the clip that also produces a tail, there is no need to set a separate tail value for this plug-in, unless you want the decay to sum up. The overall tail length for the clip is the sum of the tail of each plug-in. The maximum tail setting is 30 seconds.
- Effect Name
-
Click the effect name to open the corresponding effects window. Right-clicking an effect name opens the Plug-ins menu where you can select a new effect.
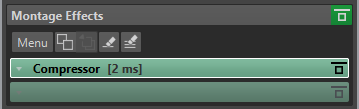
- Latency
-
If a plug-in has latency, the latency value is displayed next to the plug-in name.
- Presets
-
Allows you to save and restore plug-in presets.
- Effect Options
-
Opens the Plug-ins menu where you can select a new plug-in and remove the plug-in.
- Bypass Effect
-
Bypasses the plug-in during playback and optionally during rendering. The signal is still processed by the plug-in, but is not injected in the audible stream.
Gain
In this section, you can edit Gain and Pan settings for each clip and track. You can also set the global gain for the montage output.
- Fold/Unfold Gain Pane
-
Folds or unfolds the Gain pane.
- Reset Gain to 0 dB
-
Resets the gain to 0 dB.
- Gain
-
Allows you to set the gain for the effects.
If you select Output at the top of the Inspector window, you can set the global gain for the active audio montage.
- Pre/Post Effect (Montage Output only)
-
Allows you to apply the gain before or after the montage output, depending on the Pre/Post Effect setting. Pre Effects is the default setting.
- Gain Range
-
Allows you to increase the slider precision. If the active gain is outside a certain gain range, you cannot select the gain range.
- Lock Fader
-
If this option is activated, you cannot change the fader with the mouse.
- Pan Dial (Clip and Track only)
-
Allows you to set the pan for the clip effects and the track effects.
- Reset Pan to Center (Clip and Track only)
-
Resets the pan to the center position.
- Pan Mode (Clip and Track only)
-
Allows you to select a pan mode different than 0 dB or mute to compensate a dB drop when the signal is panned hard left or right.