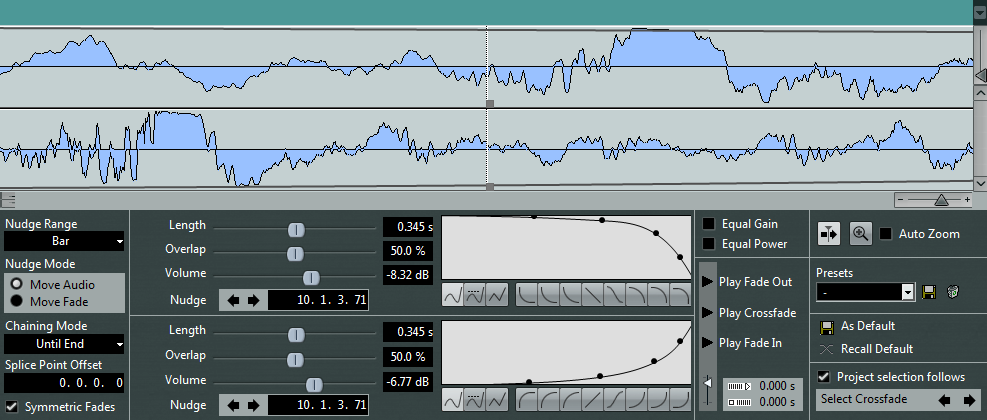
Crossfade Editor
To open the Crossfade editor, select one or both crossfaded events, and select , or double-click the crossfade zone.
NoteYou can activate a simplified Crossfade editor in the Preferences dialog. Select and activate the Simple Crossfade Editor option.
- Nudge Range
Specifies the range that is moved when using Nudge.
- Nudge Mode
Determines what is moved when you use Nudge.
To move the audio, activate Move Audio.
To move the fade, activate Move Fade.
- Chaining Mode
Determines how the audio to the right of the crossfade on the track behaves when you move the crossfade for an event.
To move all following events on the track, activate Until End.
To move all following events on the track up to the next gap, activate Until Gap.
To move none of the following events on the track, activate None.
NoteThe behavior is different depending on whether the next audio event on the track follows seamlessly or with a gap.
- Splice Point Offset
The dotted vertical line in the fade-in and fade-out curves marks the splice point. If you work with asymmetric crossfades, you can set a splice point offset. This means that the splice points for the fade-in and the fade-out event are different.
- Symmetric Fades
Activate this to link the editing controls of the fade-out and fade-in curves. This allows you to use the fade-out or fade-in controls to move both fade curves by the same amount.
- Length
Specifies the length of the crossfade area.
- Overlap
Defines the position of the splice point in the crossfade area.
- Volume
Changes the volume of the crossfaded events. This is the same as using the volume handles in the event display.
- Nudge
Nudges the fade area or the audio in the desired direction.
- Fade curve displays
Shows the shape of the fade-out and fade-in curve, respectively.
To add points, click a curve.
To change the fade shape, click and drag existing points.
To remove a point, drag a point outside the display.
- Curve Kind and Shape buttons
Determine whether the corresponding fade curve uses Spline Interpolation (left button), Damped Spline Interpolation (middle button) or Linear Interpolation (right button).

The curve shape buttons give you quick access to some common curve shapes.

- Equal Gain
Adjusts the fade curves so that the summed fade-in and fade-out amplitudes are the same all along the crossfade region. This is often suitable for short crossfades.
- Equal Power
Adjusts the fade curves so that the energy (power) of the crossfade is constant all along the crossfade region.
Equal Power curves have only one editable curve point. You cannot change the curve shape if this mode is selected.
- Play buttons
To audition the whole crossfade, click Play Crossfade.
To audition the fade-out part of the crossfade, click Play Fade Out.
To audition the fade-in part of the crossfade, click Play Fade In.
You can set up key commands for this in the following categories of the Key Commands dialog.
- Pre-roll and Post-roll
To start playback before the fade area, activate Use pre-roll.
To stop playback after the fade area, activate Use post-roll.
To adjust the pre-roll time, use the Pre-roll Amount value field.
To adjust the post-roll time, use the Post-roll Amount value field.
- Audition Level
Allows you to set the audition level.
- Auto-Scroll
Scrolls the crossfade display during playback, so that the position cursor is always visible. This only applies when using the Transport panel and it works like the corresponding function in the Project window.
- Zoom to Fade
Zooms and centers the display on the selected crossfade area.
- Auto Zoom
Zooms and centers the display automatically on the current crossfade when you resize it. This also works when you select the next crossfade using Select Crossfade.
- Presets
Click Store to the right of the Presets pop-up menu to store the crossfade settings so that you can apply them to other events.
To remove a preset, select it on the pop-up menu and click Delete.
- Default buttons
Click As Default to store the current settings as default. Default settings are used whenever you create new crossfades.
Click Recall Default to apply the curves and settings of the default crossfade to the Crossfade editor.
- Project selection follows
If this option is activated, selecting another crossfade automatically changes the event selection in the Project window.
- Select Crossfade buttons
Allow you to select the previous/next crossfade area, provided that the current track contains more than one crossfade.