A dialog opens listing all pre-configured MIDI devices. For now we assume that your MIDI device is included in this list.
Locate and select the device in the list and click OK.
If your MIDI device is not included in the list but is compatible with the GM (General MIDI) or XG standards, you can select the generic GM or XG Device options at the top of the list.
When you select one of these options, a name dialog will appear. Enter a name for the instrument and click OK.
The device now appears in the Installed Devices list to the left.
Make sure that the new device is selected in the list and open the Output pop-up menu.
Select the MIDI output that the device is connected to.
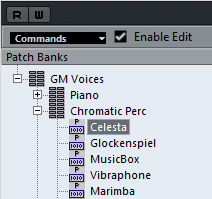
Result
The Patch Banks list in the left half of the window shows the patch structure of the device. This could simply be a list of patches, but it is usually one or several layers of banks or groups containing the patches (much like a folder structure on a hard disk for example).
You can rename a device in the Installed Devices list by double-clicking and typing – this is useful if you have several devices of the same model, and want to separate them by name instead of by number.
To remove a device from the Installed Devices list, select it and click Remove Device.