Loop Tweaker Dialog
This dialog allows you to adjust loop start and end points, and to crossfade loop boundaries. The loop start and end points are specified via loop start and end markers.
If more than one loop marker pair is available in the audio file, click in the area between a loop marker pair to tweak the corresponding start and end points.
-
To open the Loop Tweaker dialog, open the Audio Editor. Select the Process tab. In the Loop section, select Tweaker.
Loop Points Adjustment Tab
This tab allows you to manually refine a loop selection by dragging the waveform to the left/right or by using the automatic search buttons to find the nearest suitable loop point. The aim is to align the waveforms so that they meet at a zero-crossing point where the waveforms match as closely as possible.
When you adjust your loop start and end points in the dialog, the start and end loop markers in the main waveform window adjust accordingly. This movement may not be visible depending on how much you move the markers and on the zoom factor that you have selected.
-
If you want to hear the difference when you adjust the loop markers, activate Loop on the transport bar during playback.
-
If you are not using a crossfade or post-crossfade, you do not have to click Apply when tweaking loop points.
-
You can leave the Loop Tweaker dialog open and manually adjust the position of the markers in the main waveform windows.
If you use the Loop Tweaker feature on surround audio files, only the L/R channels are displayed and used to match the waveforms, but all channels are processed.
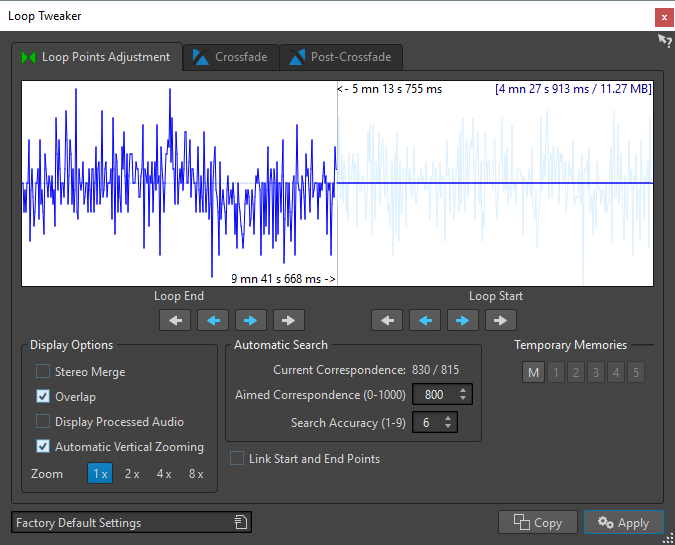
The top of this dialog shows the beginning and the end of the waveform between the loop markers. The bottom of this dialog offers the following options:
- Loop End – Inner Arrows
-
Move the loop end points to the left/right.
- Loop End – Outer Arrows
-
Invokes an automatic search for the nearest suitable loop point to the left/right of the loop end point and moves the end point to that position.
- Loop Start – Inner Arrows
-
Moves the loop start points to the left/right.
- Loop Start – Outer Arrows
-
Invokes an automatic search for the nearest suitable loop point to the left/right of the loop start point, and moves the start point to that position.
- Stereo Merge
-
If this option is activated for a stereo file, the two waveforms are overlaid. Otherwise, they are shown in two separate sections.
- Overlap
-
If this option is activated, the waveforms of both halves are continued in the other half. This shows how the waveform looks like right before and after the loop.
- Display Processed Audio
-
This option only makes sense after you have applied a crossfade. If this option is activated, a preview of the waveform after crossfading is displayed. If this option is deactivated, you see what the waveform looks like without crossfading.
- Automatic Vertical Zooming
-
If this option is activated, the vertical magnification is adjusted so that the waveform always fills the entire display vertically.
- Zoom
-
Sets the zoom factor.
- Current Correspondence
-
Indicates how well the waveforms near the loop points match one another. The left value estimates the similarity across several wave cycles, while the right value estimates the similarity of the few samples near the loop points. The higher the values, the better the match.
- Aimed Correspondence (0-1000)
-
Sets up the automatic search for good loop points. This defines how well the found section must resemble the section to which it is compared, in order to be considered a match. The higher the value, the more precise the resemblance must be. A value of 1000 requires a 100% match.
- Search Accuracy (1-9)
-
Determines how many samples are to be taken into account by the auto-find analysis. Higher values result in greater accuracy, but also in longer processing times.
- Link Start and End Points
-
If this option is activated, both the start and end points move simultaneously when you adjust the loop points manually. That is, the loop length stays exactly the same, and the entire loop moves.
- Temporary Memories
-
Allows you to save up to five different sets of loop points which you can later recall. This allows you to try out different loop settings. To save a set, click the M button, then one of the buttons 1-5.
Crossfade Tab
This tab allows you to apply a crossfade between the audio at the end of a loop and the audio at the beginning of the loop. This can be useful to smooth the transition between the end of a loop and its beginning, especially when you use material that is not perfectly suited to create a loop. Use the envelope drag points or value sliders to adjust the crossfade envelope. Click Apply to create the crossfade.
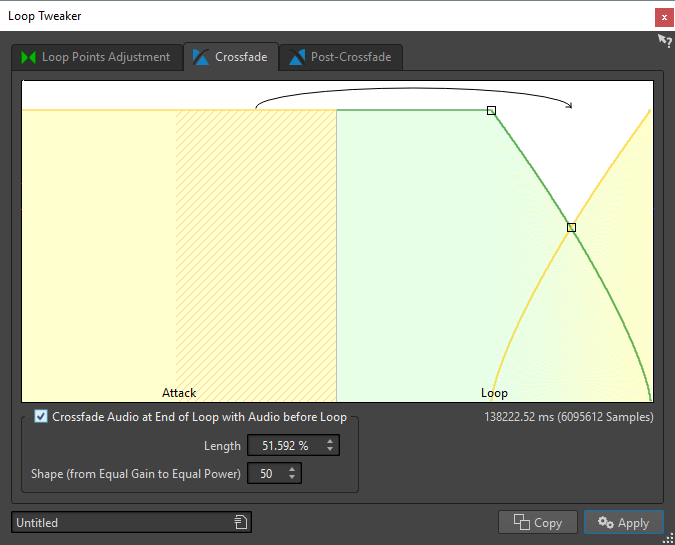
- Crossfade Audio at End of Loop with Audio before Loop
-
To enable crossfading, activate this checkbox. The crossfade is applied when you click Apply.
- Length
-
Determines the length of the crossfade. Generally, you want the crossfade to be as short as possible, with an acceptable result.
Note-
Using a long crossfade smoothens the loop. However, more of the waveform is processed, which changes its character.
-
A shorter crossfade affects the sound less, but the loop is not as smooth.
-
- Shape (from Equal Gain to Equal Power)
-
Determines the shape of the crossfade. Use low values for simple sounds and high values for complex sounds.
Post-Crossfade Tab
Post-crossfading means crossfading the loop back into the audio after the end of the loop so that there is not glitch when playback continues after the loop. This is done by mixing a copy of the loop back into the audio.
This tab allows you to apply a crossfade at the end of the loop by mixing a copy of the loop back into the audio. Use the envelope drag points or value sliders to adjust the crossfade envelope. Click Apply to create the post crossfade.
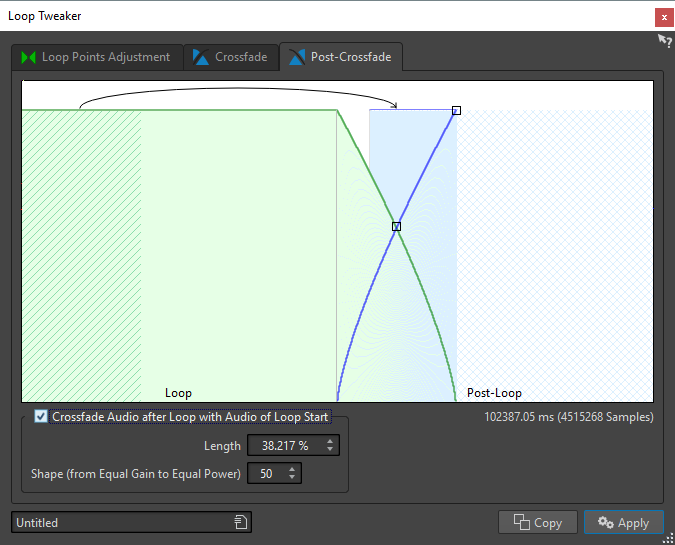
- Crossfade Audio after Loop with Audio of Loop Start
-
To enable crossfading, activate this checkbox. The crossfade is applied when you click Apply.
- Length
-
Determines the length of the crossfade. Generally, you want the post-crossfade to be as short as possible, with an acceptable result.
Note-
Using a long post-crossfade smoothens the loop. However, more of the waveform is processed, which changes its character.
-
A shorter post-crossfade affects the sound less, but the loop is not as smooth.
-
- Shape (from Equal Gain to Equal Power)
-
Determines the shape of the post-crossfade. Use low values for simple sounds and high values for complex sounds.