Recording Dialog
In this dialog, you can make recording settings and start recording an audio file.
-
To open the Recording dialog, open the Audio Editor or the Audio Montage window, and on the transport bar, click Record.
Main Buttons

- Record
-
Starts recording. Depending on the recording options, the Pause mode is activated.
- Pause
-
Pauses recording.
- Stop
-
Stops recording.
- Discard
-
Stops recording and deletes anything recorded so far.
Method Tab
On this tab, you can define options for starting, stopping, and pausing the recording automatically. You can select an input device and choose to start a recording at a specific time or stop if after a specific duration.
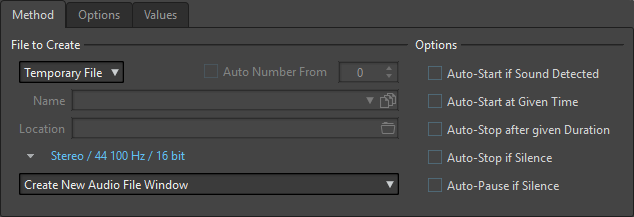
- File to Create
-
Specify whether you want to record a temporary file to be saved later, or record to a file with a specific name and location.
- Auto Number From
-
If this option is activated and you record multiple files, increasing numbers are added to the file names of the files.
- Name
-
The name of the file to be written, without the path. When typing, all files in the selected folder that start with the same letters are displayed. To display all files in the selected folder, click the list icon.
- Location
-
Specifies the folder where you want to save the recording.
- Audio File Format
-
Opens the Audio File Format dialog, where you can specify the file format.
- Location of the Recording
-
Specifies where the audio is recorded:
-
If Create New Audio File Window is selected, the audio is recorded in a new audio file window.
-
If Add to Active Audio File is selected, the audio is recorded in the active audio file window at the edit cursor position (if no audio file window exists, a new one is created).
-
If Add to Selected Track of Montage is selected, the audio is recorded in an existing audio montage at the edit cursor position (if no audio montage exists, a new one is created).
-
- Auto-Start if Sound Detected
-
If this option is activated, recording starts when the audio input level exceeds the threshold level specified on the Values tab.
- Auto-Start at given Time
-
If this option is activated, recording starts at a specified time. Specify the time on the Values tab.
- Auto-Stop after given Duration
-
If this option is activated, recording stops automatically after the duration specified on the Values tab.
- Auto-Stop if Silence
-
If this option is activated, recording automatically stops when the audio input level drops below a specified threshold level and stays there for a specific amount of time. Specify the level and the duration on the Values tab.
- Auto-Pause if Silence
-
If this option is activated, recording automatically pauses when the audio input level drops below a specified threshold level and stays there for a specific amount of time. Specify the level and the duration on the Values tab.
Options Tab
On this tab, you can make additional settings for the recording process.
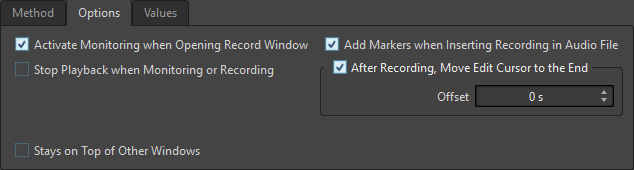
- Activate Monitoring When Opening Record Window
-
If this option is activated, the meters are activated when the Recording dialog opens. If this option is deactivated, the meters and the audio thru are displayed when pressing Record or activating Monitor.
- Stop Playback When Monitoring or Recording
-
If this option is activated, playback stops before monitoring or recording starts.
- Add Markers when Inserting Recording in Audio File
-
If this option is activated and a recording is inserted into an audio file, markers are added encompassing the new samples.
- After Recording, Move Edit Cursor at the End
-
If this option is activated, the edit cursor is moved to the end of the recording.
Values Tab
On this tab, you can define values for the various recording options.
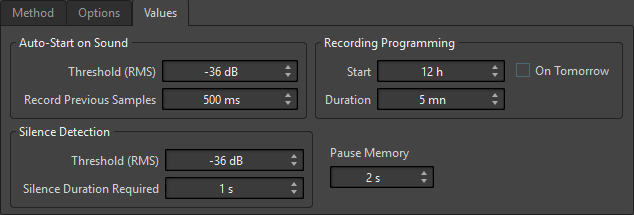
- Auto-Start on Sound – Threshold (RMS)
-
Specify the sound level that will trigger recording.
- Auto-Start on Sound – Record Previous Samples
-
Allows you to include a short section of audio before the start point, to capture attacks, for example. It is only relevant if Auto-Start if Sound Detected is activated.
- Silence Detection – Threshold (RMS)/Silence Duration Required
-
The threshold value used for the options Auto-Stop if Silence and Auto-Create Markers at Silence Points. It is used in conjunction with the Silence Duration Required setting, so that recording is stopped or a marker is added if the input level stays below the threshold value for the specified duration.
- Recording Programming – Start
-
Determines the time at which recording starts when the option Auto-Start at Specific Time is activated.
- Recording Programming – On Tomorrow
-
If this option is activated, you can specify a time on the next day (starting midnight).
- Recording Programming – Duration
-
Determines the length of the recording if Auto-Stop after Specific Duration is activated.
- Pause Memory
-
This is a safety buffer when you are using the Pause button. When you resume recording, this buffer is used to restore the last short section of audio before you deactivated the Pause button. This way, you can resume recording even if you deactivated the Pause button a bit too late.
Meter Display
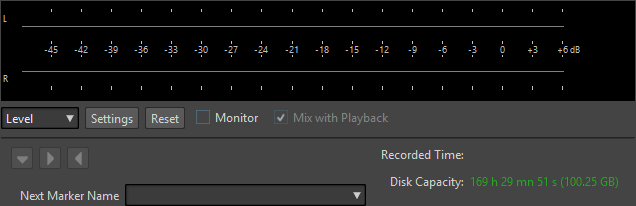
- Level/Spectrum
-
Specifies which meter to display.
- Settings
-
Opens the Level/Pan Meter Settings dialog, where you can customize the meter settings.
- Reset
-
Resets the peak values.
- Monitor
-
If this option is activated, the audio input is also sent to the output ports (not available if Windows MME drivers are used).
- Mix with Playback
-
If this option is activated and the same audio ports are selected for monitoring and for playback (in the VST Audio Connections tab), the signals are mixed. If this is not activated, the monitoring signal has priority.
This allows you to toggle between the auditioning of the recorded signal and the playback signal, and to have full control over the monitor outputs.
- Marker
-
Allows you to set markers during the recording.
- Next Marker Name
-
Edit the name of the next marker to insert.