Render Tracks
The Render Tracks dialog allows you to customize the track render settings.
To open the Render Tracks dialog, select one or more audio tracks, instrument tracks, or MIDI tracks, and select .
The following settings are available:
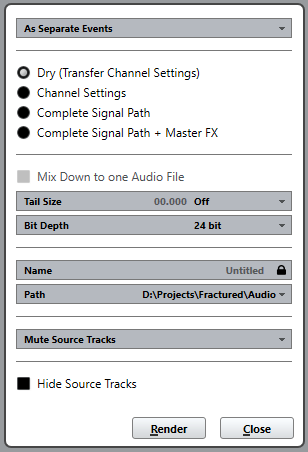
- As Separate Events
-
One or more tracks are created. These contain separate events or parts that are saved as separate audio files.
- As Block Events
-
One or more tracks are created. These contain adjacent events/parts that are combined to blocks. Every block is saved as a separate audio file.
- As One Event
-
One or more tracks are created. These contain the events/parts that are combined to one event/part. Every combination is saved as a separate audio file.
- Dry
-
If this option is activated, all effects and panner settings are copied to new audio tracks. The resulting audio tracks keep the formats of their source tracks. A mono track results in a mono track, for example.
- Channel Settings
-
If this option is activated, all effects are rendered into the resulting audio files. This includes insert effects, channel strip settings, group channel settings, and FX send channel settings. Panner settings are transferred to the new audio tracks. The resulting audio tracks keep the formats of their source tracks. A mono track results in a mono track, for example.
- Complete Signal Path
-
If this option is activated, the complete signal path is rendered into the new audio files, including all channel settings, group channel settings, FX send channel settings, and panner settings. The new audio track is created without effects. Stereo balance panner settings are activated. The resulting audio file format is determined by the output channel of the source track. A mono track that is routed to a stereo bus results in a stereo audio file.
- Complete Signal Path + Master FX
-
If this option is activated, the complete signal path and the master bus settings are rendered into the resulting audio files. This includes all channel settings, group channel settings, FX send channel settings, and panner settings. The resulting audio file format is determined by the output channel of the source track. A mono track that is routed to a stereo bus results in a stereo audio file.
- Mix Down to One Track
-
By default, rendering multiple tracks or selections from multiple tracks at once results in multiple new audio tracks. To create one resulting audio track from all your source material, activate Mix Down to One Track.
Mix Down to One Track is only available if several tracks are selected and Dry (Transfer Channel Settings) is deactivated.
- Tail Size
-
Allows you to set a tail size in seconds or bars and beats for the rendered files. This adds time at the end of the rendered file to allow reverb and delay tails to fully fade out.
- Bit Depth
-
Allows you to set the bit depth for the resulting material to 16 bit, 24 bit, 32 bit, 32 bit float, or 64 bit float.
- Name
-
Allows you to enter a custom name for the rendered files. To do this, unlock this option by clicking the lock icon.
- Path
-
Allows you to select a custom folder to which the resulting .wav files are rendered.
- Keep Source Tracks Unchanged
-
If this option is selected, the source tracks remain unchanged.
- Mute Source Tracks
-
If this option is selected, the source tracks are automatically muted.
- Disable Source Tracks
-
If this option is selected, the source tracks are disabled and are therefore no longer processed. This option releases CPU and RAM resources and is therefore similar to the Freeze function. To reenable the tracks, right-click the disabled track to open the context menu and select Enable Track.
- Remove Source Tracks
-
If this option is selected, the source tracks are removed from the track list.
- Hide Source Tracks
-
If this option is activated, the source tracks are hidden after rendering. To show the source tracks again, select the Visibility tab in the Project window and select the track that you want to show.