Main Tab
On the Main tab, you can make global settings for the recording, for example, set up Input Source and Input Gain and specify whether you want to record a single sample or multiple samples.
- Record/Record Enable
-
The behavior of this button depends on the Record Start Trigger setting.
-
In Manual mode, this button starts/stops recording.
-
In the Audio Threshold, MIDI Note-On, and MIDI Note-Off modes, this button record-enables the Sample Recorder. This means that recording starts as soon as the audio signal exceeds the threshold or a MIDI note-on or note-off event is received.
NoteThe Sample Recorder always records the sample for the selected program or layer. Every recording creates a new sample zone.
-
- Play/Stop
-
The behavior of this button depends on the Record Start Trigger setting in the Trigger section.
-
In Manual mode, the Play/Stop button starts/stops playback of the recorded sample.
-
In the Audio Threshold, MIDI Note-On, and MIDI Note-Off modes, the Play/Stop button starts/stops recording.
-
- Reset Recording
-
Removes the current recording, allowing you to start over.
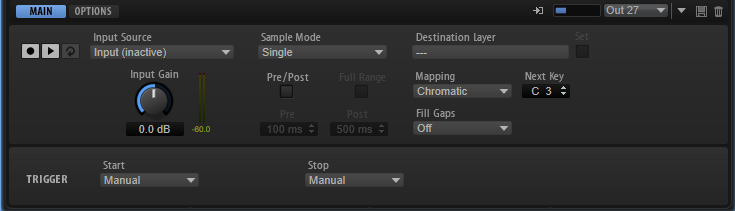
- Input Source
-
Allows you to select the source from which to record. You can use HALion’s side-chain input, the output of one of the slots in HALion, or one of the plug-in outputs.
NoteOnly the available options are shown on the menu, that is, outputs for empty slots or plug-in outputs that have not been activated are not shown.
- Input Gain
-
Adjusts the input level for the recording.
- Sample Mode
-
Determines whether you can make a single recording or record multiple samples.
-
In Single mode, you can only record one sample.
-
In Auto-Next mode, you can record multiple samples in a row. This is particularly useful when working with the Audio Threshold, MIDI Note-On, and MIDI Note-Off modes. Every time that recording is stopped, the Sample Recorder reverts to its record-enabled state and starts recording again as soon as the condition that triggers recording is met.
-
- Destination Layer
-
This field displays the name of the layer into which the sample zone is recorded.
- Set
-
Allows you to switch to another layer, even if Record Enable is active.
To switch to another layer, select it in the Program Tree and click Set.
- Mapping
-
When you record multiple samples, you can specify how they are mapped.
-
As played can be used when the recording start is triggered by MIDI notes. The played notes determine the root key of the sample.
-
Fixed maps all samples to the key that is specified in the Next Key text field.
-
Chromatic maps the samples chromatically to the keys on the keyboard, starting with the key that is specified in the Next Key text field.
-
White Keys maps the samples to the white keys on the keyboard, starting with the key that is specified in the Next Key text field.
-
Black Keys maps the samples to the black keys on the keyboard, starting with the key that is specified in the Next Key text field.
-
- Next Key
-
Specifies the initial key or the fixed key for the sample mapping, depending on the selection you made on the Mapping pop-up menu.
- Fill Gaps
-
Allows you to automatically map samples so that they are distributed over the keyboard. The available key range is from C-2 to G8.
-
If Off is selected, the sample zone is mapped only to the root key of the sample.
-
If Fill Centered is selected, the mapping of the sample zones is extended upwards and downwards halfway towards the adjacent sample zone. The mapping spans the entire keyboard range.
-
If Fill Up is selected, the mapping of the sample zones is extended upwards until the next sample zone is reached.
-
If Fill Down is selected, the mapping of the sample zones is extended downwards until the next sample zone is reached.
-
- Pre/Post Record
-
Allows you to start the recording slightly ahead or let it continue for a bit after the recording stop trigger is received. This way, you can capture transients or reverb tails that are slightly lower than the set threshold, or perform fine-adjustments of the start and end regions of the sample at a later stage, for example.
-
Full Range – If this option is activated, the pre- and post-record portions of the recording span the entire sample range.
-
Pre sets the time that is recorded before the recording is triggered. The sample start marker of the zone is set to the exact trigger moment. The pre-record time can then be used to adjust the start of the sample.
-
Post sets the time that is recorded after the trigger event has stopped the recording. The sample end marker of the zone is set to the exact trigger moment. The post-record time can then be used to adjust the end of the sample.
NoteWhen you record multiple samples, Post Record is automatically stopped 50 ms after a new sample recording has started, to avoid overlapping recordings.
-
- Record Start Trigger
-
Determines what starts the recording.
-
If Manual is selected, recording starts when you click the Record/Record Enable button.
-
If Audio Threshold is selected, recording starts as soon as the audio signal exceeds the specified threshold.
-
If MIDI Note-On is selected, recording starts when a MIDI note-on event is received on the specified channel and port.
-
If MIDI Note-Off is selected, recording starts when a MIDI note-off event is received on the specified channel and port.
-
- Record Stop Trigger
-
Determines what stops the recording.
-
If Manual is selected, recording stops when you click the Record/Record Enable button.
-
If Audio Threshold is selected, recording stops as soon as the audio signal falls below the specified threshold.
-
If MIDI Note-Off is selected, the following applies:
If Trigger – Start is set to MIDI Note-On, recording stops when the corresponding MIDI note-off is received on the specified channel and port.
NoteOnly this specific note-off event stops the recording. Any other MIDI notes can be played and the resulting audio will be recorded.
If Trigger – Start is set to a setting other than MIDI Note-On, recording stops when a MIDI note-off event is received on the specified port.
-
If MIDI Note-On is selected, recording stops when a MIDI note-on event is received on the specified channel and port.
NoteAny note that is sent on the specified channel and port stops the recording.
-
Fixed Duration allows you to specify the duration for the recording, either as absolute recording time or as recording time in beats, in sync to the project tempo.
-