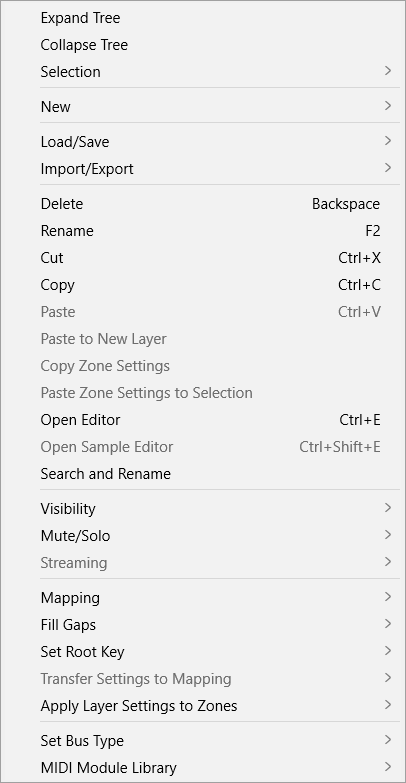
Program Tree Context Menu
The context menu contains options and commands for the Program Tree elements.
The available options depend on the selected element. For example, Copy Zone Settings is only available for zones.
- Expand All/Collapse All
-
Expands/Collapses all elements of the Program Tree.
NoteThese options are only available if no element is selected.
- Expand Tree/Collapse Tree
-
Expands/Collapses the selected element.
- Selection
-
-
To select the entire content of a program, choose Select All.
-
To select all elements that were previously not selected, and to deselect all elements that were previously selected, select Invert Selection.
NoteThis function applies to elements of the same type that belong to the same hierarchy. For example, layers that are all sub-elements of a program, or busses that are part of the same layer.
-
To select all sub-entries of an element, choose Select Tree.
-
- New
-
This submenu allows you to add a new layer, zone, bus, MIDI module, or audio effect.
NoteSome elements can only be added at specific positions. For example, audio effects can only be added to busses.
- Load/Save
-
Allows you to load/save Program Tree elements. The available options depend on the selected element.
-
Replace Program/Layer allows you to replace the current program/layer.
-
Load to New Layer allows you to select a new program/layer and add it to the active program at the current hierarchy position.
-
Save Program saves the active program.
NoteFactory content cannot be overwritten. If you try to save a factory program, the Save Program As dialog opens, allowing you to save the program to your user content folder or to the specified folder in your system.
-
Save Program As/Save Layer As allows you to save the current program or layer in your user content folder or the specified folder in your system.
-
Save Layer As Program allows you to save the selected layer as a program in your user content folder or the specified folder in your system.
-
Revert to Last Saved Program discards all changes that you made since you last saved the program.
-
- Import/Export
-
-
Import VST 3 Preset opens a dialog, where you can select and load a VST 3 preset.
-
Export Program/Layer as VST 3 Preset allows you to set up attributes for the selected program or layer and to export it as a VST 3 preset.
Activate Export Files to include all the files in the VST 3 preset.
Activate Protect to export the program or layer as a protected VST 3 preset.
Activate As HALion Sonic Layer to export the selected program or layer as a HALion Sonic layer preset. These presets can then be loaded by HALion Sonic as layers or as programs.
-
Import Folder allows you to import a folder containing samples or subfolders with samples.
-
Import Samples allows you to import samples.
-
Export Samples allows you to export samples.
-
Replace Samples allows you to exchange one or multiple samples that are used to play back one or multiple zones. Any zone-specific settings like Pitch, Filter, or Amplifier are not modified by this.
-
Change Sample Folder allows you to relocate samples. This is useful when processing samples and saving them in a new location without changing their names.
-
Find Missing Samples opens a dialog that allows you to search for missing samples.
-
- Delete
-
Deletes the selected element from the Program Tree.
If the element is a sample, it is only deleted from the tree, not from the hard disk.
- Rename
-
Allows you to rename the selected element.
- Cut
-
Removes the selected element from the list and saves it to the clipboard.
- Copy
-
Copies the selected element to the clipboard.
- Paste
-
Pastes the element from the clipboard to the selected program or layer.
- Paste to New Layer
-
Allows you to paste one or several copied elements to a new layer within a zone, to a layer, or to the program, depending on where you click to open the context menu.
- Copy Zone Settings
-
Copies the settings of the selected zone to the clipboard.
- Paste Zone Settings to Selection
-
Pastes the zone settings from the clipboard to the selected element in the Program Tree.
- Open Editor
-
Opens the editor for the selected layer, zone, effect, MIDI module, or bus in a separate window. For example, the MIDI Modules Editor opens for MIDI modules, while the Sound Editor opens for programs and layers.
The key command for this function is specified via the Edit command in the Edit category of the Key Commands dialog.
- Open Sample Editor
-
Allows you to open a sample zone in the Sample Editor.
- Open Wavetable Editor
-
Allows you to open a wavetable zone in the Wavetable Editor.
- Search and Rename
-
Allows you to perform a search and rename operation on the selected element or on all elements in the Program Tree.
- Visibility
-
-
Hide Selected hides the selected elements.
-
Hide Non-Selected hides all elements that are not selected.
-
Show Selected shows all selected elements.
-
Hide All hides all elements.
-
Show All shows all elements.
-
If Auto Visibility is activated, the selected zones and any of their direct siblings that are part of the same layer are automatically shown. Other zones are hidden.
If this option is activated, you can still switch the visibility of zones inside the layers.
-
- Mute/Solo
-
-
Mute All Zones mutes all zones.
The program itself and any of its layers are not muted.
-
Solo All Zones solos all zones.
The program itself and any of its layers are not soloed.
-
Mute Selected Zones mutes the selected zones.
-
Solo Selected Zones solos the selected zones.
-
Make All Zones Audible resets the mute and solo states for all zones.
-
Solo Follows Selection automatically solos the layers and zones that you select. The other elements of the program are muted.
This is useful if you want to switch between layers and zones and only play back the current selection.
-
- Streaming
-
Allows you to choose between two streaming settings for the selected sample:
-
Play from RAM
-
Remove Completely from RAM
-
- Mapping
-
Allows you to set up the mapping for the selected sample.
- Fill Gaps
-
-
Pitch Only fills any gaps between the selected zones on the keyboard axis.
-
Velocity Only fills any gaps between the selected zones on the velocity axis.
-
Pitch and Velocity first fills the gaps on the keyboard axis. Afterwards, the remaining gaps on the velocity axis are filled.
-
Velocity and Pitch first fills the gaps on the velocity axis. Afterwards, the remaining gaps on the keyboard axis are filled.
-
- Set Root Key
-
Allows you to adjust the root keys of the selected zones without changing their key or velocity ranges.
-
Center of Zone sets the root key to the center of the zone. If the zone has no center because it has an even number of keys, the root key is set to the key in the center that is closest to the previous root key.
-
High Key of Zone sets the root key to the High Key of the zone.
-
Low Key of Zone sets the root key to the Low Key of the zone.
-
Key Text in Sample Name sets the root key to the key that is extracted from the sample file name. The function searches for the name of the key in text form.
-
Key Number in Sample Name sets the root key to the MIDI note number that is extracted from the sample file name. The function searches for a number.
-
Root Key in Sample File sets the root key to the key that is stored in the header chunk of the sample file.
-
- Transfer Settings to Mapping
-
Zones often have varying Fine Tune and Level settings, while sharing various other settings. To avoid varying Fine Tune and Level settings, you can transfer these settings to the Tune and Gain parameter in the Mapping Editor.
-
Select All transfers the Fine Tune and Level settings at the same time.
-
Fine Tune and Level allow you to transfer the parameters separately.
Afterwards, the zone settings are reset to their default values.
-
- Apply Layer Settings to Zones
-
It can be helpful to apply the layer settings to the zones they contain.
For example, if a program contains layers that are limited to a specific key range but that contain zones that use the full key range, all these zones fill the whole key range in the Mapping Editor, and it is impossible to see their real limitations.
To solve this, select to make the zones inherit the limits of the layers. You can either apply all settings at once or apply the settings for Key Range, Velocity Range, Fine Tune, Level, and Pan separately.
- Set Bus Type
-
Allows you to change the bus type. You can convert a regular audio bus into an AUX bus, or vice versa. This is particularly useful if you have added effects for a bus and want to change the bus type while keeping the effects.
- MIDI Module Library
-
Allows you to save your script modules as MIDI modules. These modules are then treated just like other MIDI modules in HALion, that is, they appear in the MIDI modules list on the toolbar, they can be opened in the MIDI Modules Editor, etc.