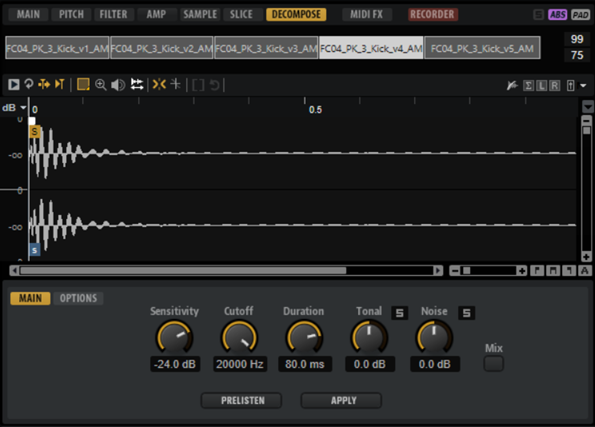
Decompose Tab
On the Decompose tab, you can separate the tonal from the noise component of a sample, for example, the harmonic tonal part of a tom sample from the attack part, where the stick hits the drum head.
This allows you to mix the noise and tonal components of a sample differently, or to create new sounds by exchanging the noise component within a sample with the noise component of another sample.
This tab contains the mapping view at the top, the waveform display, and the Decompose parameters on the Main and Options tabs at the bottom.
Toolbar
- Play Sample
-
Plays back the raw sample.
- Play Selection Looped
-
Activate this button to play back the selection in a loop.
- Auto-Scroll
-
If this button is activated, the waveform display is scrolled during playback, keeping the playback cursor visible.
- Follow Sample Playback
-
Activate this button to see a playback cursor when triggering a sample via MIDI.
- Range Selection Tool
-
Click and drag with this tool to create a selection.
- Zoom Tool
-
If this tool is selected, you can click in the waveform to zoom in on the position where you click.
- Play Tool
-
If this tool is selected, you can click in the waveform to start playback. The sample is played back from this position until you release the mouse button.
- Scrub Tool
-
If this tool is selected, you can click in the waveform and drag sideways to play back the audio. The playback direction and speed depend on how fast and how far you move the mouse to the left or to the right from the position where you clicked.
- Snap
-
If this button is activated, the selection start and end points and the markers snap to other markers.
- Snap to Zero Crossing
-
If this button is activated, markers and selection start and end points are only placed at zero crossings, that is, at positions in the audio where the amplitude is zero. This helps you to avoid pops and clicks that are caused by sudden amplitude changes.
- Trim Sample
-
Trims the sample, either to the selection or to the range that is set with the sample start/end markers.
- Revert to Full Sample
-
Undoes the trimming, so that the entire sample is restored.
NoteAfter undoing the trimming, make sure to set the start/end markers to their original positions. Otherwise, these parts are not played back.
- Show Fades in Wave
-
Activate this button to show the effect of your fade settings directly in the waveform.
- Show Channel Sum
-
Activate this button to show the sum of the left and right channels in the waveform display.
- Show Left Channel
-
Activate this button to show the left channel in the waveform display.
- Show Right Channel
-
Activate this button to show the right channel in the waveform display.
- Preview Volume
-
Click this icon to display a level slider. Keep the mouse button pressed and use the slider to specify the level for previewing your samples.
NotePreview Volume affects the Play Sample function and the Play tool.
- Output for Preview
-
Allows you to specify the output that is used for playback.
Waveform Display and Level Scale
The waveform display shows the waveform image of the sample. To the left of the waveform display, a level scale is shown, indicating the amplitude of the audio.
-
To select whether the level is shown as a percentage or in dB, click the level scale label at the top (dB or %), and select an option from the pop-up menu.
-
To display the half level axis, right-click in the waveform display, and select the corresponding option from the context menu.
Main Tab
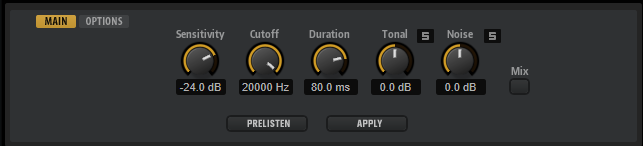
- Sensitivity
-
Specifies the relative level difference between signal partials and the noise floor. For a partial to be considered part of the tonal component of the sample, it requires the difference in level specified with this parameter.
- Cutoff
-
Allows you to limit the range in which Groove Agent searches for partials. Any signals above the Cutoff frequency are considered to be noise, regardless of the Sensitivity or Duration settings.
- Duration
-
Allows you to specify the minimum length for a partial. Signals that are shorter than the value specified here are automatically considered to be noise, longer signals are considered to be part of the tonal component.
- Tonal
-
Allows you to specify the level for the tonal component of the sample. Activate Solo to solo the tonal component.
Click Apply for your modifications to take effect.
- Noise
-
Allows you to specify the level for the noise component of the sample. Activate Solo to solo the noise component.
Click Apply for your modifications to take effect.
- Mix
-
Mixes the resulting components into a single sample rather than splitting it into two samples.
- Prelisten
-
Pre-calculates the tonal and noise components, according to the settings that you made for Sensitivity, Cutoff, and Duration.
- Apply
-
Applies the Decompose function.
This creates two new sample files, one for the tonal and one for the noise component of your sample, or, if Mix is activated, a single new sample file containing both components.
Options Tab
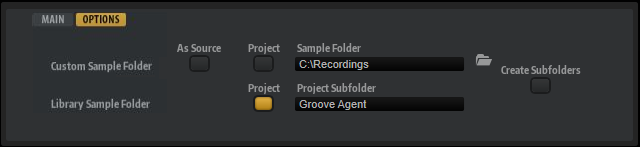
By default, the samples created by the Decompose function are saved in the same folder as the original file. However, if this is not what you want or if you decompose samples that are part of a write-protected VST Sound container, you can specify an alternative destination folder on the Options tab.
In the Custom Sample Folder section, you specify the location for samples that are created from unprotected source samples, and in the Library Sample Folder section, you specify the location for samples that are created from write-protected VST Sound containers.
- As Source
-
Activate As Source to save the created samples in the same folder as the original sample.
- Project
-
Activate Project to save the samples in the project folder of your Steinberg DAW.
- Project Subfolder
-
If Project is activated, you can specify a subfolder of the project folder in which the samples are to be saved. This allows you to structure your folders, to keep a better overview over your sample files.
- Custom Sample Folder
-
If Project is not activated, you can enter the path to the folder in which the new samples are to be saved. You can enter the path manually in the text field or click Select Folder and browse to the destination folder.
- Create Subfolders
-
Activate Create Subfolders to save the tonal and the noise components in different subfolders.