Changing the aperture of hairpins
The change in volume indicated by individual hairpins is shown in the distance between the two lines that make up hairpins at their apertures. You can change the aperture of hairpins individually.
Hairpins typically have a closed end and an open end. If the hairpin crosses a system or frame break, the closed end can appear with a small gap so that the hairpin is not misread as two separate hairpins.
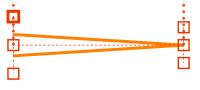
In Dorico Pro, you can use the pair of outer handles at the start/end of hairpins in Engrave mode to change the aperture. These handles are linked and mirror each other: moving one handle also moves the other handle by the same amount, but in the opposite direction. This ensures that hairpins remain symmetrical.
Procedure
-
In Engrave mode, select one of the outer handles of the hairpins whose aperture you want to change.
Tip
-
The hairpins you select do not have to be the same direction, or on the same staff.
-
You can show handles on all items, not just selected items, by choosing . This can make it easier to select individual handles on multiple items.
-
-
Change the distance between the handles in any of the following ways:
-
Press Alt/Opt-Up Arrow to move them upwards.
-
Press Alt/Opt-Down Arrow to move them downwards.
TipIf you want to move handles by larger increments, you can press Ctrl/Cmd as well as the standard key command, for example, Ctrl/Cmd-Alt/Opt-Up Arrow.
-
Click and drag them upwards/downwards.
-
Result
The apertures of the selected hairpins are changed.
-
You can also change the aperture of individual hairpins by activating Hairpin open aperture and/or Hairpin closed aperture in the Dynamics group of the Properties panel.
Increasing the value makes the corresponding aperture wider. Decreasing the value makes the corresponding aperture narrower.
-
You can find options to set minimum and maximum values for the width of hairpin apertures project-wide, including for hairpins across system and page breaks, by clicking Advanced Options in the Hairpins subsection of the Gradual Dynamics section of the Dynamics page in .
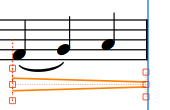
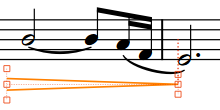
Example
|
|