Expression Maps dialog
The Expression Maps dialog allows you to create new expression maps, edit existing expression maps, and import/export expression maps. You can also import expression maps made in Cubase.
-
You can open the Expression Maps dialog in Play mode by choosing .
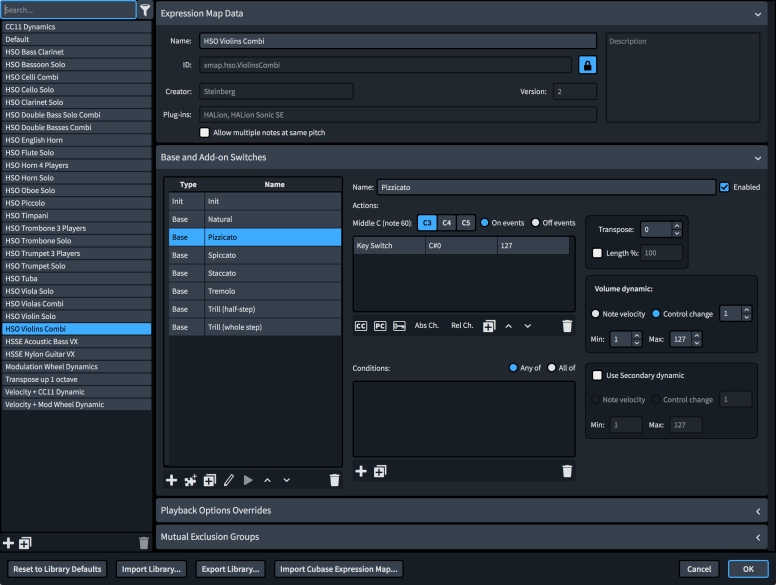
The Expression Maps dialog contains the following sections and options:
Expression maps list

-
Expression maps list: Contains the expression maps currently available in your project.
-
Search field: Allows you to search for expression maps by name.
-
Show only expression maps used in this project: Allows you to filter the expression maps list so it only includes expression maps used in the current project.
-
Expression maps list action bar: Contains the following options:
-
Add Expression Map
 : Adds a new expression map that contains no existing settings.
 -
Duplicate Expression Map
 : Creates a copy of an existing expression map that you can edit separately from the original.
 -
Delete Expression Map
 : Deletes the selected expression maps.Note
You can only delete custom expression maps. You cannot delete any default expression maps.
-
Expression Map Data
This section allows you to specify identifying information for the selected expression map.
You can hide/show the Expression Map Data section by clicking the section header.
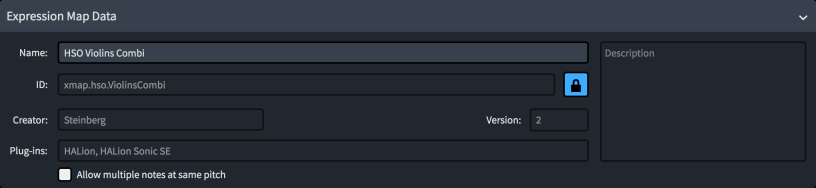
The Expression Map Data section contains the following options:
-
Name: Allows you to set the name of the expression map that appears in the program, for example, in the Endpoint Setup dialog.
-
ID: Allows you to set the unique ID of the expression map. You can enter any content in the ID field.
It can be useful to include the instrument and sound library for which you created the map, as well as your name, for example, xmap.user.paulsmith.hso.violinpizz.
-
Creator: Allows you to name the creator if you are sharing your expression map with other users.
-
Version: Allows you to indicate the expression map version, so you can identify the most recent one.
-
Plug-ins: Allows you to list the names of plug-ins to which the expression map applies, with each name separated by a comma. You can leave this field blank.
-
Allow multiple notes at same pitch: Allows you to set whether or not the plug-in can treat identical pitches in multiple voices belonging to the same instrument as multiple separate notes when independent voice playback is disabled.
-
Description: Allows you to add any other information about the expression map.
All fields in the Expression Map Data section are locked by the Lock Info
![]() button. You must click this button to unlock Lock Info
button. You must click this button to unlock Lock Info
![]() in order to change the information in the fields.
in order to change the information in the fields.
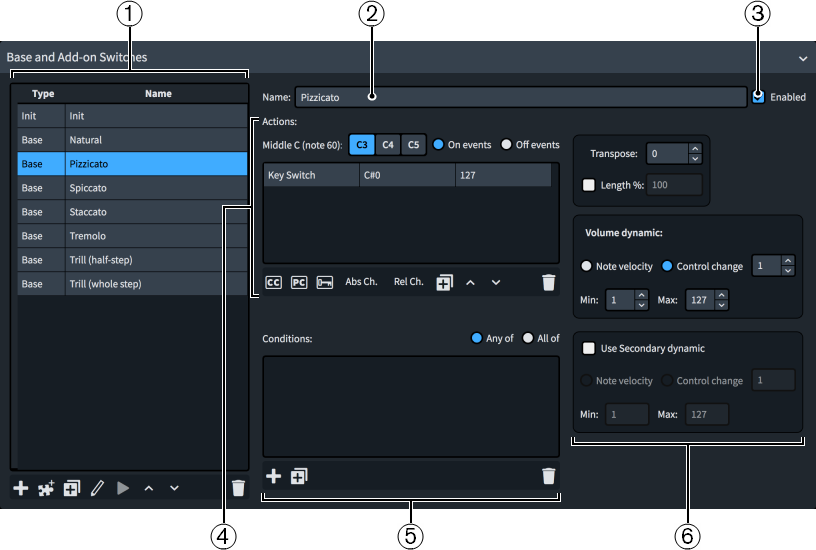
Base and Add-on Switches
This section allows you to view, edit, and control the switches for playback techniques in the selected expression map.
You can hide/show the Base and Add-on Switches section by clicking the section header.
The Base and Add-on Switches section contains the following:
-
Switches table: Contains the switches in the currently selected expression map. Allows you to add new switches and edit existing ones.
-
Name: Allows you to change the name that appears for the currently selected switch in the Switches table, for example, so it appears the same as in your sound library.
TipYou can still see which playback techniques are triggered by switches with custom names by hovering the mouse pointer over the corresponding row in the Switches table.
-
Enabled: Allows you to enable/disable the currently selected switch without removing it from the expression map.
-
Actions: Contains any actions required to produce the selected playback technique. Allows you to add new actions and edit existing ones.
-
Conditions: Contains any conditions that determine the circumstances in which the currently selected switch is used. Allows you to add new conditions and edit existing ones. Only available for Base switches.
-
Technique controls: Contains controls that affect the switch currently selected in the Switches table. Only available for Base switches.
Switches table
Contains the switches in the currently selected expression map.
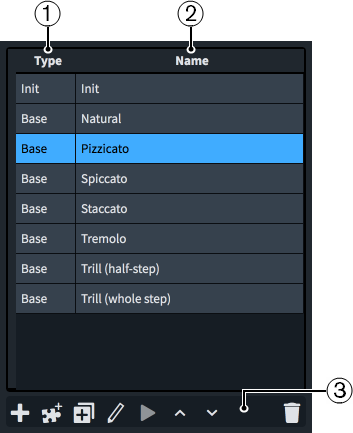
The Switches table comprises the following:
-
Type column: Displays the switch type. Switches can be any of the following types:
-
Base
-
Add-on
-
Init
-
-
Name column: Displays the name of the switch. By default, this is the same as the playback technique or playback technique combination it triggers.
In simple cases, each switch triggers an individual playback technique, such as Staccato or Accent. However, some plug-ins have separate samples for different combinations of playback techniques. For example, Staccato + Accent might require a separate set of key switches to Staccato and Accent individually.
-
Switches table action bar: Contains the following options:
-
Add Base Switch
: Allows you to add a new base switch to the expression map by selecting the playback techniques you want the switch to trigger in the Playing Technique Combinations dialog that opens. -
Add Technique Add-on Switch
 : Allows you to add a new add-on switch to the expression map by selecting the playback techniques you want the switch to trigger in the Playing Technique Combinations dialog that opens.
 -
Duplicate Technique
: Creates a copy of an existing switch that you can edit separately from the original. -
Edit Technique
 : Opens the Playing Technique Combinations dialog, which allows you to edit the combination of playback techniques triggered by the selected switch.
You can also edit the playback techniques of existing switches by double-clicking them in the Switches table.
-
Audition switch
 : Plays two notes using the currently selected switch and any corresponding actions to demonstrate their effect on playback. Only available for expression maps used in the project.
 -
Transpose up 1 octave
 : Raises the octave of all key switch actions for the selected switch.
 -
Transpose down 1 octave
 : Lowers the octave of all key switch actions for the selected switch.
 -
Delete Technique
: Deletes the selected switch.
-
Selecting a switch in the Switches table allows you to edit its controls and actions. Different options are available in the Base and Add-on Switches section depending on the switch type.
-
Most instruments have a “natural” playback technique, which is the most common way of playing the instrument. Dorico Elements requires every instrument to have a defined natural playback technique.
-
You can only select one switch at a time in the Switches table.
Actions
Displays in a table any actions required to produce the selected playback technique. Allows you to determine how the switch that triggers each playback technique is controlled, either by adding new actions or editing existing ones.
Depending on your plug-in, multiple types of actions can be required for each switch.
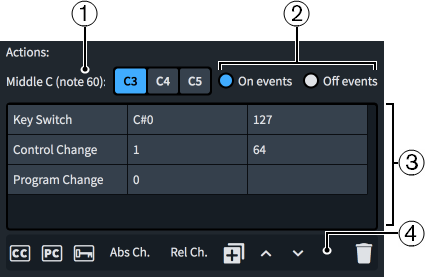
The Actions subsection comprises the following:
-
Middle C (note 60): Allows you to choose the pitch for middle C, as there are different conventions for this. We recommend that you consult the documentation for your sound libraries to check whether each one considers middle C to be C3, C4, or C5, and change this setting accordingly.
-
On events/Off events: Allows you to specify whether actions affect the start or end of notes. For example, you might want an event that resets the playback technique back to normal to apply only to the end of notes.
On events affects the start of notes. Off events affects the end of notes.
-
Actions table: Contains the following columns:
-
First column: Displays the action type. Actions can be a control change, program change, or key switch.
-
Second column: Controls the first parameter of the MIDI event. For key switches, this indicates the pitch. For control changes, this indicates the control change number. For program changes, this indicates the program number.
-
Third column: Controls the second parameter of the MIDI event. For key switches, this indicates the velocity. For control changes, this indicates the amount of control change within the range 0 to 127. Program changes do not have a second parameter.
Note-
You can change the values of cells in the Actions table by double-clicking them, or selecting them and pressing Return.
-
You can only select one action at a time in the Actions table.
-
-
Actions table action bar: Contains the following options:
-
Add Control Change Action
 : Adds a control change action with default settings.
 -
Add Program Change Action
 : Adds a program change action with default settings.
 -
Add Note Event Action
 : Adds a key switch action with default settings.
 -
Add Absolute Channel Change Action: Adds an absolute channel change action with default settings.
-
Add Relative Channel Change Action: Adds a relative channel change action with default settings.
-
Duplicate Action
: Creates a copy of an existing action that you can edit separately from the original. -
Move Action Up
: Moves the selected action up the table, which changes its order in the message sequence. -
Move Action Down
: Moves the selected action down the table, which changes its order in the message sequence. -
Delete Action
: Deletes the selected action.
-
Conditions
Displays in a table any conditions that determine the circumstances in which the base switch currently selected in the Switches table is used. Allows you to add new conditions and edit existing ones. Only available for Base switches.
For example, you can set conditions instructing the expression map to use a different legato sound with a quicker attack for short notes than for longer notes automatically.
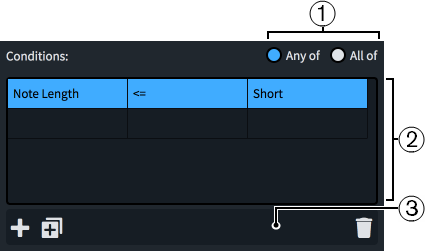
The Conditions subsection comprises the following:
-
Any of/All of: Allows you to set whether the switch is used when one or more conditions are met or only when all conditions are met.
-
Conditions table: Contains the following columns:
-
First column: Displays the condition type.
-
Second column: Controls how the condition type in the first column relates to the note length set in the third column using operators. The following operators are available:
-
==: Equal to
-
!=: Not equal to
-
<: Less than
-
<=: Less than or equal to
-
>: More than
-
>=: More than or equal to
-
-
Third column: Controls the note length used by the condition. The following note length values are available:
-
Very short: A dotted 16th note at 120 bpm, or 0.1875 seconds
-
Short: A dotted eighth note at 120 bpm, or 0.375 seconds
-
Medium: A dotted quarter note at 120 bpm, or 0.75 seconds
-
Long: A dotted half note at 120 bpm, or 1.5 seconds
-
Very long: Any longer duration
Note-
You can change the values of cells in the Conditions table by double-clicking them, or selecting them and pressing Return.
-
You can only select one condition at a time in the Conditions table.
-
-
-
Conditions action bar: Contains the following options:
-
Add Technique
: Adds a new technique condition with default settings. -
Duplicate Technique
: Creates a copy of an existing technique condition that you can edit separately from the original. -
Delete Technique
: Deletes the selected technique condition.
-
Technique controls
Contains controls that affect the base switch currently selected in the Switches table. Only available for Base switches.
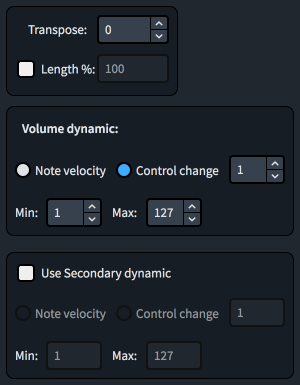
The following technique controls are available:
-
Transpose: Allows you to set the MIDI transposition.
-
Length %: Allows you to set the note duration, which overrides the default value.
-
Volume dynamic: Allows you to choose whether the volume dynamic for the selected switch is controlled by its Note velocity or a Control change.
If you choose Control change, you must specify the controller by number. You can consult the documentation for the VST instrument and/or MIDI controller you are using to find the appropriate controller number.
-
Volume dynamic Min/Max: Allow you to set the minimum and maximum range for dynamics using either note velocity or MIDI CC, depending on the sound library.
-
Use Secondary dynamic: Allows you to define an additional volume control for sound libraries that use both note velocity and control changes for volume dynamic.
-
Secondary dynamic Min/Max: Allow you to set the minimum and maximum range for dynamics using either note velocity or MIDI CC, depending on the sound library.
Playback Options Overrides
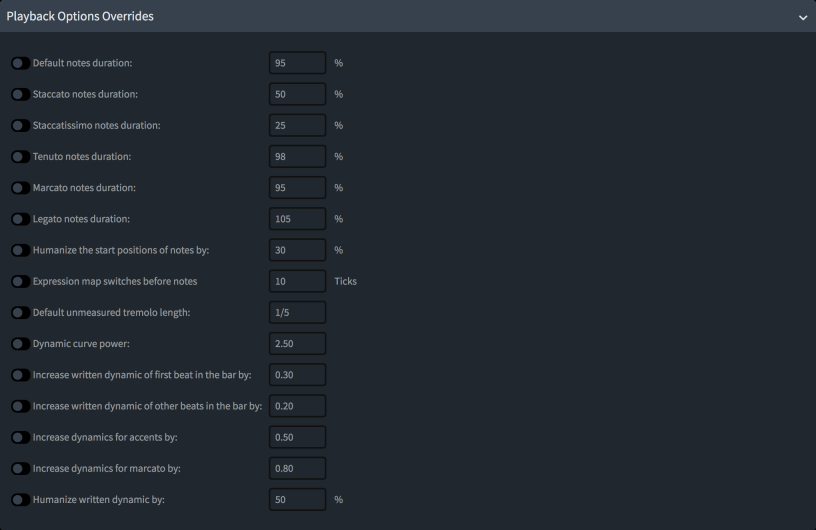
Allows you to override specific playback options for the selected expression map only. Activating a playback option overrides it. The available playback options include the default duration of notes with different articulations, unmeasured tremolo notes, and the effect that beat position and articulations have on dynamics.
You can hide/show the Playback Options Overrides section by clicking the section header.
Mutual Exclusion Groups
Allows you to define playback techniques that are mutually exclusive, that is, cannot be in use concurrently. For example, players cannot play vibrato and non-vibrato at the same time. Putting playback techniques into the same exclusion group means only one can be used at a time.
You can allow Dorico Elements to define mutual exclusion groups automatically or define them yourself manually.
Mutual exclusion groups apply only to the selected expression map. This allows you to set different mutual exclusion groups in each expression map, for example, if one of your sound libraries supports a particular playback technique combination for an instrument but another sound library does not.
You can hide/show the Mutual Exclusion Groups section by clicking the section header.
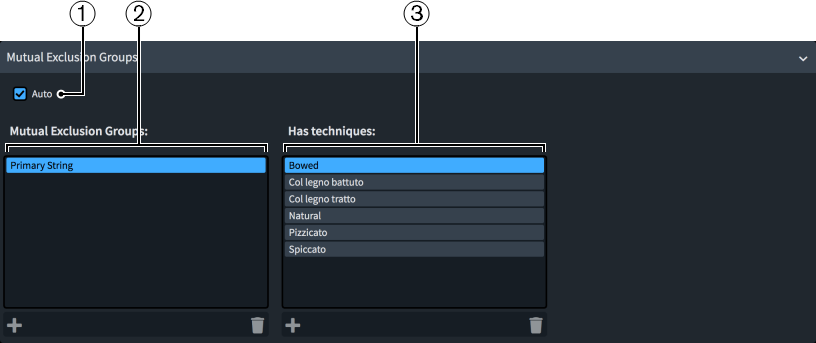
The Mutual Exclusion Groups section contains the following options and columns:
-
Auto: Allows Dorico Elements to define mutual exclusion groups automatically.
NoteActivating Auto permanently deletes any manual exclusion groups you have created.
-
Mutual Exclusion Groups column: Allows you to add and delete mutual exclusion groups manually. The action bar at the bottom of the column contains the following options:
-
Add
: Opens a dialog that allows you to create a new mutual exclusion group and enter a name for it. -
Delete
: Deletes the selected mutual exclusion group.NoteYou can only select one mutual exclusion group at a time.
-
-
Has techniques column: Allows you to change the playback techniques included in the selected mutual exclusion group. The action bar at the bottom of the column contains the following options:
-
Add
: Opens the Playing Technique Combinations dialog that allows you to select playback techniques to add to the selected mutual exclusion group. -
Delete
: Deletes the selected playback technique from the mutual exclusion group.NoteYou can only select one playback technique at a time.
-
Expression map/Library management options

At the bottom of the Expression Maps dialog, there are the following expression map and library management options:
- Reset to Library Defaults
-
Allows you to revert any changes you have made to the expression maps from the Default Library.
- Import Library
-
Opens the File Explorer/macOS Finder, where you can select the .doricolib files that you want to import as expression maps.
You can also import Dorico and Cubase expression maps by dragging and dropping them into the Expression Maps dialog.
- Export Library
-
Opens the File Explorer/macOS Finder, where you can select the location to which you want to export the currently selected expression maps as a .doricolib file. You can then import the .doricolib file into other projects and share it with other users.
- Import Cubase Expression Map
-
Opens the File Explorer/macOS Finder, where you can select the Cubase .expressionmap files you want to import as expression maps.
NoteCubase expression maps that you have imported often require some editing to function correctly in Dorico Elements. However, switch data is preserved.