Project Default Chord Symbol Appearances dialog
The Project Default Chord Symbol Appearances dialog allows you to edit the appearance of all instances of specific chord symbols project-wide. For example, if you want to change the arrangement of components in all Gmaj7 chord symbols in the project, independently of your project-wide settings for all other major seventh chord symbols.
You can open the Project Default Chord Symbol Appearances dialog in any of the following ways:
-
Choose .
-
In , click Edit.
The Project Default Chord Symbol Appearances dialog contains the following sections:
-
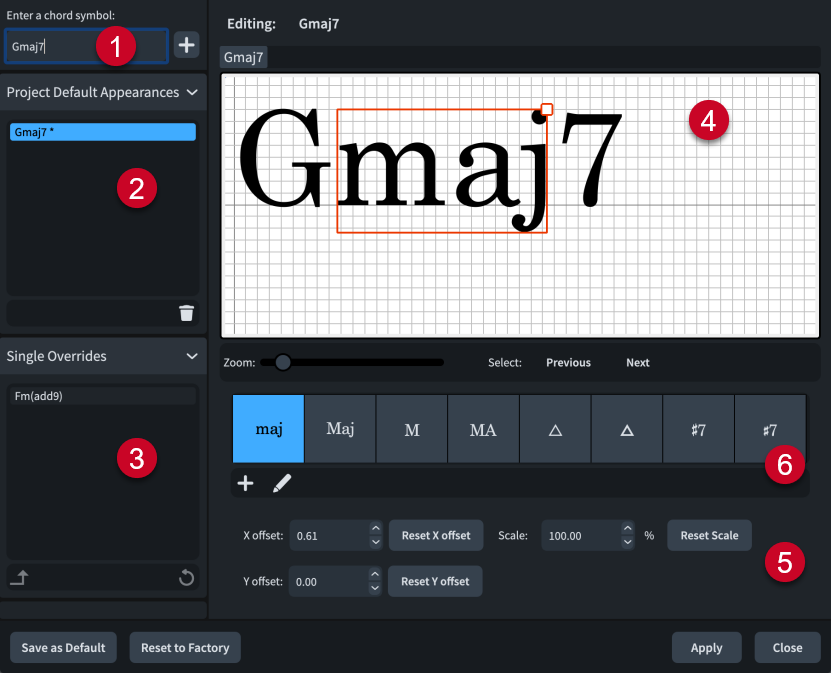
Enter a chord symbol
Allows you to enter the chord symbol whose default project-wide appearance you want to edit. Click Add Project Default
 or press Return to add the chord symbol to the Project Default Appearances list, which allows you to edit the chord symbol in the editor.
 -
Project Default Appearances list
Contains the chord symbols whose project default appearance you have edited in the project.
You can delete changes to the project default appearance of chord symbols by clicking Delete
 in the action bar.
 -
Single Overrides list
Contains the chord symbols whose appearance you have overridden for single chord symbol instances in the project.
You can promote single overrides to be the project default appearance for that chord symbol by clicking Promote to Project Default
 in the action bar.
You can reset single overrides to the project default appearance for that chord symbol by clicking Remove Overrides
 in the action bar.
 -
Editor
Allows you to arrange and edit the components that make up the chord symbol. You can use the controls at the bottom of the dialog, and you can also move individual components in any of the following ways after selecting them in the editor:
-
Press the standard key commands for moving items. For example, press Alt/Opt-Right Arrow to move components to the right, or press Ctrl/Cmd-Alt/Opt-Right Arrow to move components to the right by larger increments.
-
Click and drag each component.
NoteYou cannot move the first component in chord symbols.
In addition to using Scale, you can also change the size of components by clicking and dragging the square handle in the top right corner after selecting a component in the editor.
-
-
Controls
-
X offset moves components horizontally. Increasing the value moves components to the right, decreasing the value moves components to the left.
-
Y offset moves components vertically. Increasing the value moves components upwards, decreasing the value moves components downwards.
-
Scale changes the size of components. Increasing the value increases the size of components proportionally, decreasing the value decreases the size of components proportionally.
-
Reset X offset resets the horizontal position of the selected component.
-
Reset Y offset resets the vertical position of the selected component.
-
Reset Scale resets the size of the selected component.
-
-
Components list
Contains alternative ways of presenting the component selected in the editor.
Allows you to create new components and edit existing components by clicking the respective button in the action bar.
-
Add Component
-
Edit Component

Clicking either button opens the Edit Chord Symbol Component dialog, in which you can create new chord symbol components and edit existing chord symbol components. Editing components from inside the Project Default Chord Symbol Appearances dialog affects all chord symbols that use the component project-wide.
-