Edit Music Symbol dialog
The Edit Music Symbol dialog allows you to edit the appearance of all the different music symbols used in Dorico Pro that do not have a dedicated editor, such as chord symbols, accidentals, noteheads, and playing techniques.
-
You can open the Edit Music Symbol dialog in Engrave mode by choosing .
You cannot create new music symbols in the Edit Music Symbol dialog, you can only edit existing music symbols.
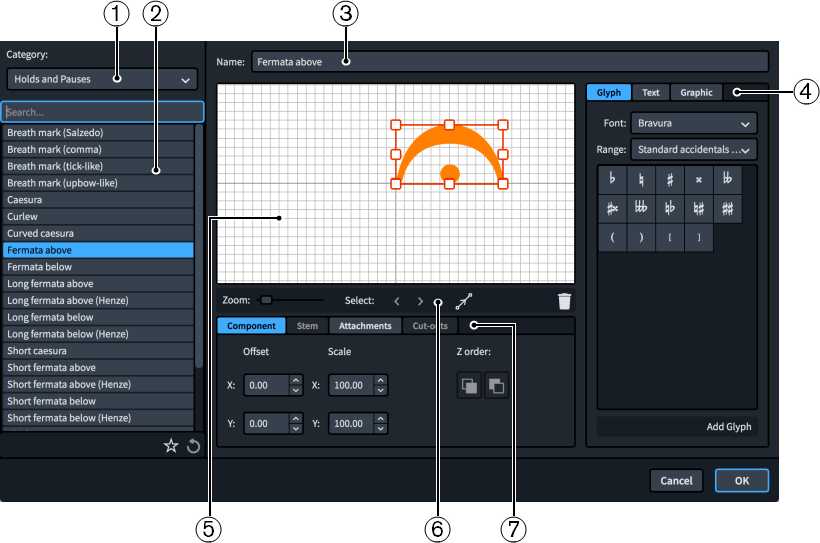
The Edit Music Symbol dialog contains the following sections and options:
-
Category menu
Allows you to filter the list of music symbols by selecting a category from the menu.
-
Music symbol list
Contains all the music symbols in the project within the currently selected category.
The action bar at the bottom of the list contains the following options:
-
Save as Default: Saves the currently selected music symbol in its current state as the default for all future projects.

-
Revert to Factory: Removes all edits you have made to the selected music symbol, returning it to its original settings and appearance.

-
-
Name
Displays the default name for the selected music symbol.
-
Component selector
Allows you to choose components to add to the music symbol. You can add different types of components by clicking the respective tab titles.
-
Glyph, for example, ♮ or ♯. You can use different styles of glyphs by selecting different fonts and different ranges from the menus. Click Add Glyph to add the selected glyph to the music symbol.
NoteA full list of the different ranges of glyphs is available on the SMuFL website.
-
Text, including numbers and other text. You can use numbers and text from the available Preset text list, or select any font available from the menu and enter your preferred text into the text box at the bottom. Click Add Text to add the selected text, or input text, to the music symbol.
-
Graphic: Allows you to load a new graphics file, or select an existing graphic from the Select existing list, in SVG, PNG, or JPG format. You can see a preview of the graphic in the Preview box. Click Add Graphic to add the selected graphic to the music symbol.
-
-
Editor
Allows you to arrange and edit the components that make up the music symbol. You can arrange and edit components by clicking and dragging them in the editor and by using the controls at the bottom of the dialog. You can also use the handles on each component to change their size.
-
Editor action bar
Contains selection and view options for the editor.
-
Zoom: Allows you to change the zoom level in the editor.
-
Select: Allows you to select the next/previous component.
-
Show Attachments: Shows all the attachments on all components in the editor.

-
Delete: Deletes the selected component.

-
-
Controls
Contains controls that allow you to edit individual components. Controls are divided into tabs according to the aspect of the selected component they affect. For music symbols, only the Component and Attachments tabs are available as the other tabs do not apply to the symbols in the dialog.
The Component tab contains the following options:
-
Offset: Controls the position of the selected component. X moves it horizontally, Y moves it vertically.
-
Scale: Controls the size of the selected component. For graphics, X controls its width, Y controls its height.
NoteAlthough some components scale their height and width independently, others retain their aspect ratio, meaning only one value affects their overall size.
-
Z order: Allows you to Bring Forward or Send Backward the selected component in relation to other components when they overlap.
The Attachments tab is only available if the music symbol comprises at least two separate components. It contains the following options:
-
Attachment from: Sets the attachment point on the component to the left of the selected component to which the selected component attaches. We recommend that you select a right edge attachment point for Attachment from.
-
Attachment to: Sets the attachment point on the selected component which attaches to the component to its left. We recommend that you select a left edge attachment point for Attachment to.
-
There are eight attachment points for glyphs and graphics, and eleven for text, due to the extra space required for letters that extend below the baseline. The example diagram helps you visualize how these points relate to components.
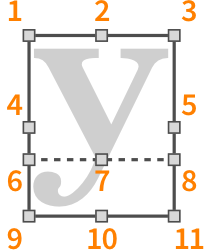
The attachment points have the following names in the Edit Music Symbol dialog:
-
Top Left
-
Top Center
-
Top Right
-
Middle Left
-
Middle Right
-
Baseline Left (text only)
-
Baseline Center (text only)
-
Baseline Right (text only)
-
Bottom Left
-
Bottom Center
-
Bottom Right