Pages panel
The Pages panel in Engrave mode provides several sections that allow you to specify how the pages of your notation are formatted. The way this is done is based on the typical techniques as they are used in desktop publishing programs.
The Pages panel is located on the right of the window in Engrave mode. You can hide/show the Pages panel in any of the following ways:
-
Press Ctrl/Cmd-9.
-
Click the disclosure arrow on the right edge of the main window.
-
Choose .
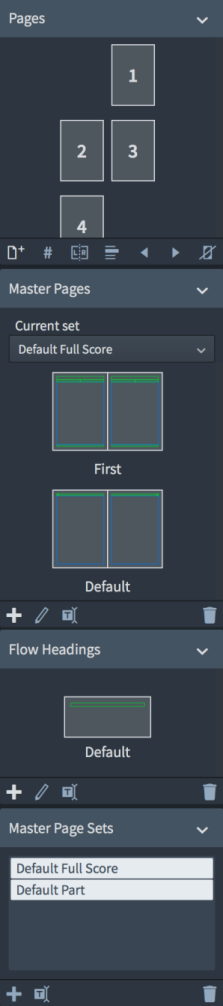
Figure: Pages panel in Engrave mode
The Pages panel is divided into the following sections:
- Pages
-
Shows the pages in your layout with their page number in the middle. A highlighted page frame indicates the currently selected page. Markings in the top left and the bottom right corner of the pages indicate that a page has overrides. Additional frames at the top or left frames of the page indicate that master page changes have been applied.
The action bar at the bottom of the section contains the following options:
-
Insert Pages

Allows you to insert pages into your layout before or after existing pages, based on a selected master page.
-
Insert Page Number Change

Allows you to change the page numbers for pages in your layout.
-
Insert Master Page Change

Allows you to assign a different master page to the selected page.
-
Swap with Previous Page

Swaps the arrangement of the selected page with the previous page.
-
Swap with Next Page

Swaps the arrangement of the selected page with the next page.
-
Remove Overrides

Removes all overrides from the selected pages.
-
- Master Pages
-
Shows the master page pairs that are used in your layout. A highlighted frame indicates the currently selected master page. If you select a page in the Pages display, the master pages display highlights the master page pair that is used for this page.
The Current set menu allows you to view and change the master page set used in the layout currently open in the music area.
The action bar at the bottom of the section contains the following options:
-
New Master Page

Allows you to add a new master page to a master page set.
-
Edit Master Page

Opens the master page editor in which you can change the formatting of the master page. You can also open the master page editor by double-clicking a master page in the Flow Headings section.
-
Rename Master Page

Allows you to rename the selected master page.
-
Delete Master Page

Deletes the selected master page.
-
- Flow Headings
-
Shows the flow headings available in the currently selected master page set. A highlighted frame indicates the currently selected flow heading.
The action bar at the bottom of the section contains the following options:
-
New Flow Heading
Allows you to add a new flow heading to a master page set.
-
Edit Flow Heading
Opens the flow heading editor in which you can change the formatting of the flow heading. You can also open the flow heading editor by double-clicking a flow heading in the Flow Headings section.
-
Rename Flow Heading
Allows you to rename the selected flow heading.
-
Delete Flow Heading
Deletes the selected flow heading.
-
- Master Page Sets
-
Contains a list of available master page sets in the project.
The action bar at the bottom of the section contains the following options:
-
New Master Page Set
Creates a new master page set based on the master page set that is selected in the list. The new master page set is automatically added to the Current set menu in the Master Pages section.
-
Rename Master Page Set
Allows you to rename the selected master page set.
-
Delete Master Page Set
Deletes a selected master page set from the list.
-