If you have already recorded the chords for a project, Cubase can analyze them and create chord symbols:
Procedure
Open the recording in the Score Editor.
If you want the chords to be inserted on another track, you can create an empty part on that track and open it along with the recording.
If you like, make display settings for the chords. These settings are available in the Score Settings dialog, on the Project page (Chord Symbols subpage).
You can change all these settings after you inserted the chords as well.
Select the notes for which you want chord symbols to be created.
If you want chord symbols to be created for all chords on the track, use the Select All function on the Edit menu.
Use the Up Arrow/Down Arrow keys to make the desired staff active.
This should be the staff on which you want the chord symbols to end up.
On the Scores menu, select “Make Chord Symbols”.
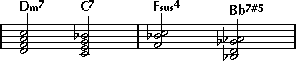
The chords appear. They can be moved, duplicated and deleted as any other symbol. You can also double-click on a chord symbol to edit it in the Edit Chord Symbol dialog (in the same way as when creating chords manually – see above).
Figure: A staff after using Make Chord Symbols.
Instead of using the “Make Chord Symbols” menu item, you can click the “Make Chord Symbols” button on the extended toolbar.