Machine Control Output Destination
If Use External Synchronization in the Transport menu is activated, all transport commands (including movements of the cursor in the Project window) are translated into machine control commands and routed according to the settings that are made in the Machine Control Output Destination section.
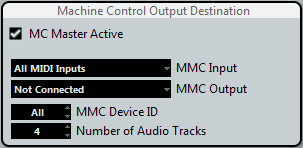
- MC Master Active
If this option is activated, transport commands are routed or sent to any device while sync is enabled. Additional routing options become available, see below. Deactivating this option does not affect the operation of the individual MMC Device panels. They can still function regardless of the machine control destination.
- MMC Input and Output
The MMC Input and MMC Output settings determine which MIDI port in your system will send and receive MMC commands. Set both the input and output to MIDI ports that are connected to the desired MIDI device.
- MMC Device ID
The MMC device ID should be set to the same number as the receiving device. You can also set the device ID to “All” if more than one machine is receiving MMC commands or if the device ID is not known.
NoteSome devices can only listen to their specific IDs. Therefore, using the All option will not work with such devices.
- Number of Audio Tracks (Cubase Pro only)
The number of audio tracks should be set to match the amount of available audio tracks in the destination device. This setting determines how many record-enable buttons are shown in the MMC Master panel (see below).
- MMC Master panel
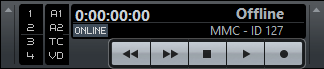
The MMC Master panel can be opened from the Devices menu. In order to use the MMC Master panel, proceed as follows:
Open the Preferences dialog, select the MIDI Filter section and make sure SysEx is activated in the Thru section.
This is necessary since MMC uses 2-way communication (the tape recorder “replies” to the MMC messages it receives from Cubase). By filtering out SysEx Thru, you ensure that these MMC System Exclusive replies are not echoed back to the tape recorder.
On the MMC Master panel, activate the Online button to use the transport buttons on the panel to control the transport of the device.
It is not necessary to have this activated in order to synchronize with the MMC device. It only affects operation of the MMC Master panel.
You can use the buttons to the left on the MMC Master panel to arm tape tracks for recording.
The “A1, A2, TC, VD” items refer to additional tracks usually found on video tape recorders.
Refer to the manual of your VTR device to see if these tracks are supported.