Import From Audio CD Dialog
The Import from Audio CD dialog allows you to specify how the CD tracks are imported.
-
To open the Import from Audio CD dialog, select .
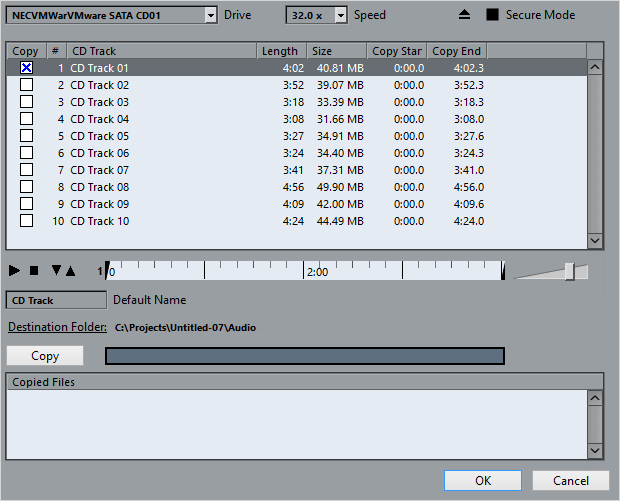
- Drive
-
Opens a pop-up menu that allows you to select the correct CD drive.
- Speed (Windows only)
-
Allows you to select the data transfer speed.
NoteWhile you normally want to use the fastest possible speed, you may have to select a slower speed for flawless audio extraction.
- Eject CD
-
Opens the CD drive.
- Secure Mode (Windows only)
-
Activates error checking and correction when reading the CD.
Columns
The columns in the dialog have the following functions:
- Copy
-
Activate this option for the tracks that you want to copy/import.
- #
-
Shows the track number.
- CD Track
-
The name of the CD track. On import, this is used as file name. It is provided automatically from CDDB, if available.
To rename a track, click the track name and enter a new name.
- Length
-
The length of the audio CD track in minutes and seconds.
- Size
-
The file size of the audio CD track in MB.
- Copy Start
-
The start of the section that is imported. On the ruler, drag the Left Marker to the right to adjust this.
- Copy End
-
The end of the section that is imported. On the ruler, drag the Right Marker to the left to adjust this.
The Ruler
The ruler has the following functions:
-
Play Tracks
Plays back the selected track from the start to the end or from the left marker to the right marker.
-
Stop Playback
Stops playback.
-
Play from Left Marker
Starts playback at the left marker.
-
Play to Right Marker
Starts playback some moments before the right marker and stops at the right marker.
-
Left Marker
Allows you to set the copy start manually.
-
Right Marker
Allows you to set the copy end manually.
- Destination Folder
-
Allows you to select a folder for the imported files.
- Copy
-
Copies the files.
- Copied Files
-
Lists the files that you copied for import.