Zoom Presets
You can create zoom presets that allow you to set up different zoom settings. For example, one where the whole project is displayed in the Project window and another with a high zoom factor for detailed editing. The Zoom Presets pop-up menu allows you to select, create, and organize zoom presets.
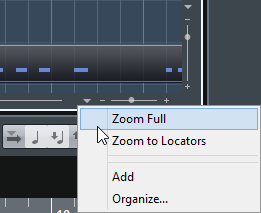
To open the Zoom Presets pop-up menu, click the button to the left of the horizontal zoom control.
The upper part of the menu lists the zoom presets.
To save the current zoom setting as a preset, open the Zoom Presets pop-up menu and select Add. In the Type In Preset Name dialog that opens, type in a name for the preset and click OK.
To select and apply a preset, select it from the Zoom Presets pop-up menu.
To zoom out so that the whole project is visible, open the Zoom Presets pop-up menu and select Zoom Full.
This displays the project from the Project Start Time to the Project Length that is set in the Project Setup dialog.
To delete a preset, open the Zoom Presets pop-up menu and select Organize. In the dialog that opens, select the preset in the list and click Delete.
To rename a preset, open the Zoom Presets pop-up menu and select Organize. In the dialog that opens, select a preset in the list and click Rename. In the dialog that opens, type in a new name for the preset. Click OK to close the dialogs.
Zoom presets are global for all projects. They are available in all projects that you open or create.