REVelation
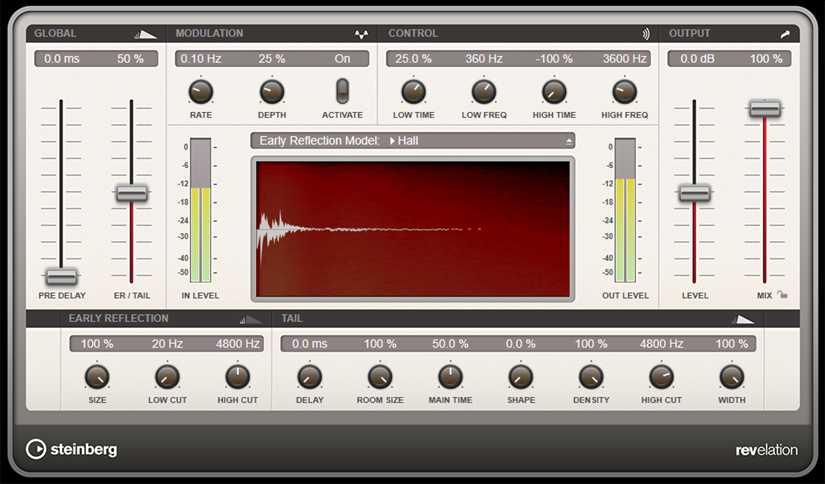
REVelation produces a high-quality algorithmic reverb with early reflections and reverb tail.
|
Cubase LE |
Cubase AI |
Cubase Elements |
Cubase Artist |
Cubase |
Nuendo |
|
|---|---|---|---|---|---|---|
|
Included with |
– |
– |
– |
X |
X |
X |

The early reflections are responsible for the spatial impression in the first milliseconds of the reverb. For emulating different rooms, you can choose between different early reflections patterns and adjust their size. The reverb tail, or late reverberation, offers parameters for controlling the room size and the reverb time. You can adjust the reverb time individually in 3 frequency bands.
- Pre-Delay
Determines how much time passes before the reverb is applied. This allows you to simulate larger rooms by increasing the time it takes for the first reflections to reach the listener.
- Early Reflections
Here, you select an early reflections pattern. The early reflections pattern contains the most important delays that deliver the key information for the spatial impression of the room.
- ER/Tail Mix
Sets the level balance between the early reflections and the reverb tail. At a setting of 50 %, early reflections and tail have the same volume. Settings below 50 % raise the early reflections and lower the tail, as a result the sound source moves towards the front of the room. Settings above 50 % raise the tail and lower the early reflections, as a result the sound source moves towards the back of the room.
- Size
Adjusts the length of the early reflections pattern. At a setting of 100 %, the pattern is applied with its original length and the room sounds the most natural. At settings below 100 %, the early reflections pattern is compressed and the room is perceived smaller.
- Low Cut
Attenuates the low frequencies of the early reflections. The higher this value, the less low frequencies are present in the early reflections.
- High Cut
Attenuates the high frequencies of the early reflections. The lower this value, the less high frequencies the early reflections will have.
- Delay
Delays the onset of the reverb tail.
- Room Size
Controls the dimensions of the simulated room. At a setting of 100 %, the dimensions correspond to a cathedral or a large concert hall. At a setting of 50 %, the dimensions correspond to a medium-sized room or studio. Settings below 50 % simulate the dimensions of small rooms or a booth.
- Main Time
Controls the overall reverb time of the tail. The higher this value, the longer the reverb tail will decay. At a setting of 100 %, the reverb time is infinitely long. The Main Time parameter also represents the mid band of the reverb tail.
- High Time
Controls the reverb time for the high frequencies of the reverb tail. With positive values, the decay time of the high frequencies is longer. With negative values, it is shorter. Frequencies are affected depending on the High Freq parameter.
- Low Time
Controls the reverb time for the low frequencies of the reverb tail. For positive values, low frequencies decay longer and vice versa. Frequencies will be affected depending on the Low Freq parameter.
- High Freq
Sets the cross-over frequency between the mid and the high band of the reverb tail. You can offset the reverb time for frequencies above this value from the main reverb time with the High Time parameter.
- Low Freq
Sets the cross-over frequency between the low and the mid band of the reverb tail. The reverb time for frequencies below this value can be offset from the main reverb time with the Low Time parameter.
- Shape
Controls the attack of the reverb tail. At a setting of 0 %, the attack is more immediate, which is a good setting for drums. The higher this value, the less immediate the attack.
- Density
Adjusts the echo density of the reverb tail. At a setting of 100 %, single reflections from walls cannot be heard. The lower this value, the more single reflections can be heard.
- High Cut
Attenuates the high frequencies of the reverb tail. The lower this value, the less high frequencies the reverb tail will have.
- Width
Adjusts the output of the reverb signal between mono and stereo. At a setting of 0 %, the output of the reverb is mono, at 100 % it is stereo.
- Mix
Sets the level balance between the dry signal and the wet signal. If the effect is used as a send effect, set this parameter to the maximum value as you can control the dry/effect balance with the send.
- Lock
Activate this button (padlock symbol) next to the Mix parameter to lock the dry/wet balance while browsing through the available presets.
Modulation
Modulation allows you to enrich the reverb tail through subtle pitch modulations.
- Modulation Enable
Activates/Deactivates the chorusing effect.
- Modulation Rate
Specifies the frequency of the pitch modulation.
- Modulation Depth
Sets the intensity of the pitch modulation.