Frequency
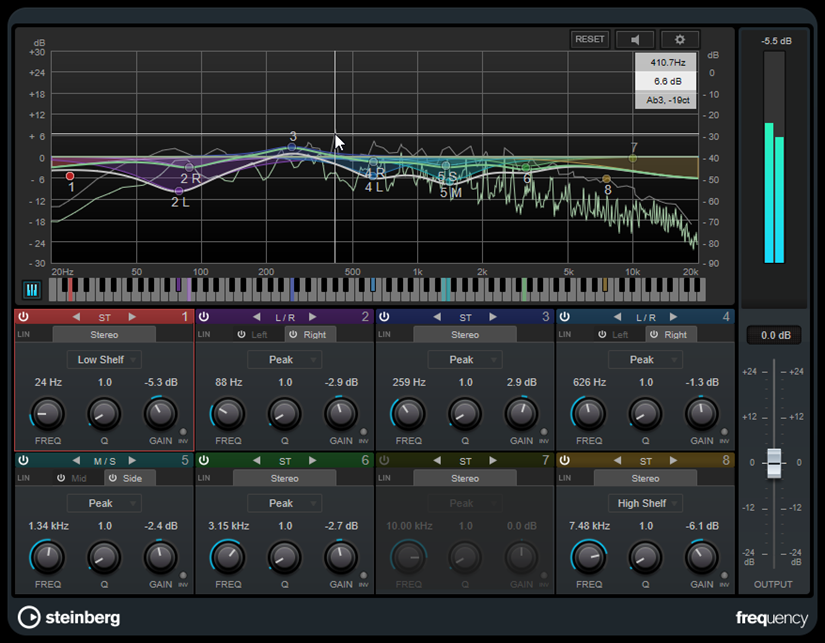
Frequency is a high-quality equalizer with 8 fully parametric bands. The bands can act as either shelving filter, as peak or notch filter (band-pass), or as cut filter (low-pass/high-pass).
|
Cubase LE |
Cubase AI |
Cubase Elements |
Cubase Artist |
Cubase Pro |
Nuendo |
|
|---|---|---|---|---|---|---|
|
Included with |
– |
– |
– |
– |
X |
X |

Main Layout
- Reset
-

Alt-click this button to reset all parameter values.
- Auto Listen for Filters
-

If this option is activated and you edit a parameter of a band, the corresponding frequency range is isolated. This helps you to focus on a particular frequency range and allows you to locate unwanted frequencies in your audio.
- Global Settings
-

Opens the settings dialog for the spectrum display.
- Show/Hide Keyboard
-

Shows/Hides the keyboard below the graphical editor.
On the keyboard, color indicators reflect the center frequencies of all active equalizer bands. You can adjust the frequency of a band by dragging its color indicator. If you drag the color indicator of a band to a key, the band is set to its exact frequency.
- Output
-
Adjusts the overall output level.
Band Settings

- Activate/Deactivate Band
-
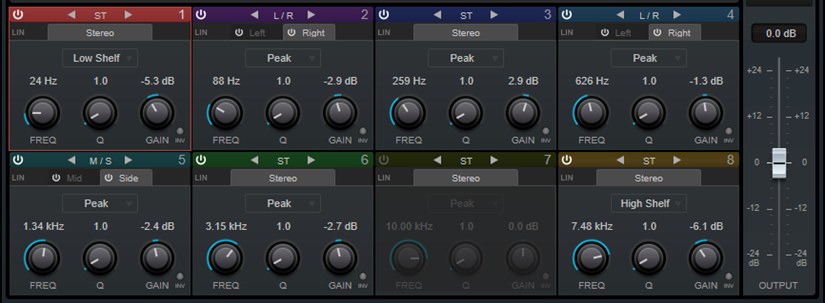
Activates/Deactivates the corresponding band.
Note-
To activate/deactivate a band, you can also double-click the corresponding handle in the graphical editor.
-
If a band is deactivated, you can still modify its parameters.
-
- Switch Processing
-
Allow you to switch between left/right, stereo, and mid/side processing. In Left/Right or Mid/Side processing mode, you can make different settings for the two channels.
ImportantWhen using Mid/Side processing mode, we recommend that you activate Linear Phase in order to avoid unwanted sound colorization.
NoteThis setting is only available for stereo tracks.
- Linear Phase
-
Activates/Deactivates linear phase mode for the corresponding band.
Linear phase mode avoids unwanted frequency dependent phase shifts of the audio signal that might occur with standard minimum phase equalizing.
Note-
Linear phase mode leads to an increase in latency.
-
In rare cases, for example, when using low cut filtering with a high slope for bass signals, also an unwanted pre-ringing effect may be audible.
-
- Filter type
-
You can choose between the filter types Low Shelf, Peak, High Shelf, and Notch. For band 1 and 8, you can also select the types Cut 6, Cut 12, Cut 24, Cut 48, and Cut 96.
-
Low Shelf boosts or attenuates frequencies below the cutoff frequency by the specified amount.
-
Peak boosts or attenuates frequencies at the set frequency value with a bell shaped filter.
-
High Shelf boosts or attenuates frequencies above the cutoff frequency by the specified amount.
-
Notch boosts or attenuates frequencies at the set frequency value with a very narrow filter.
-
Cut attenuates frequencies below (band 1) or above (band 8) the set frequency. You can choose between different slopes: 6 dB, 12 dB, 24 dB, 48 dB, or 96 dB per octave.
-
- Freq
-
Sets the frequency of the corresponding band. You can set the frequency either in Hz or as a note value. If you enter a note value, the frequency is automatically changed to Hz. For example, a note value of A3 sets the frequency to 440 Hz. When you enter a note value, you can also enter a cent offset. For example, enter A5 -23 or C4 +49.
Note-
You can adjust the Freq parameter of a band in the graphical editor by Alt-clicking the corresponding handle and moving the mouse left and right.
-
Ensure that you enter a space between the note and the cent offset. Only in this case, the cent offsets are taken into account.
If the band is active, the frequency value is reflected as a highlighted key on the keyboard below the graphical editor.
-
- Q
-
For Peak and Notch filters, this parameter controls the width of the band. For Low Shelf and High Shelf filters, it adds a drop or a boost, depending on the gain setting of the band. For Cut filters, it adds a resonance.
Note-
You can adjust the Q parameter of a band in the graphical editor by Shift-clicking the corresponding handle and moving the mouse up and down. Alternatively, you can point on the handle and turn the mouse wheel.
-
This parameter is not available for Cut 6 filters.
-
- Gain
-
Sets the amount of attenuation/boost for the corresponding band.
Note-
You can adjust the Gain parameter of a band in the graphical editor by Ctrl/Cmd-clicking the corresponding handle and moving the mouse up and down.
-
This parameter is not available for Cut filters.
-
- Invert Gain
-
Inverts the value of the gain parameter. Positive gain values become negative and vice versa.